Deploying Windows 10 with Microsoft Deployment Toolkit (MDT)

Microsoft Deployment Toolkit is a collection of tools for automating desktop and server deployments. MDT performs deployments by using the Lite Touch Installation (LTI), Zero Touch Installation (ZTI), and User-Driven Installation (UDI) methods. Only MDT is used in LTI deployments, while ZTI and UDI deployments are performed using MDT with Configuration Manager.

Once downloaded, you will find the tools inside C:\Program Files\Microsoft Deployment Toolkit\. It then creates the deployment share at C:\DeploymentShare which mimics the Deployment Workbench:

Deployment Workbench

The Deployment Workbench is an MMC snapin and will be the main area used to configure the deployment.

Configure MDT to Create the Reference Computer

  1. Download Windows ADK
  2. Open the Deployment Workbench (DeploymentWorkbench.msc)
  3. Import the Operating System (.ISO)

  4. Update any required Out-of-Box Drivers or Packages
  5. Create a Task Sequence

  6. Update your deployment share

  7. The Deployment Workbench creates the C:\DeploymentShare\Boot\LiteTouchPE_x64.iso and LiteTouchPE_x64.wim files

Deploy Windows / Capture Image of Reference Computer

You can burn C:\DeploymentShare\Boot\LiteTouchPE_x64.iso to a DVD or you can add it to Windows Deployment Services, which is a server role that gives you the ability to deploy Windows through PXE.

Now boot your reference computer with LiteTouchPE_x64.iso

Once Windows PE boots up, go ahead and choose your Task Sequence that you created earlier

Since you are deploying this from the original operating system, out-of box drivers, applications, etc. you really want to capture a .WIM of this deployment and bring it back into the Deployment Workbench to deploy again so that it is all compacted into one neat file.

The task sequence deployment will begin

Now there will be a .WIM file of this Task Sequence deployment process ready for you to import into the Deployment Workbench.

Configure MDT to Deploy Windows to the Target Computers

During this task sequence process you chose to capture an image of your reference computer. Microsoft recommends you do this. Once you capture the image, you will have a .WIM file that you can import back into Deployment Workbench and start he whole process again (import WIM, create task sequence, boot PE, etc.) to finally deploy to your target computers

  1. Add the captured image of the reference computer to the Deployment Workbench


  2. Create a Task Sequence

  3. Again, boot from LiteTouchPE_x64.iso and this time choose your new Task Sequence you created for this WIM

Deciding to Use the Default Image or a Captured Image

Default image

The default image install.wim is included with the Windows ISO. This image is a basic operating system image that contains a standard set of drivers.

  • Advantages
    • The image size is smaller than a captured image.
    • Installing apps and configurations with task sequences is dynamic
  • Disadvantages
    • Takes more time

Captured image

With a customized image, you build a reference computer, install apps and configure settings. Then, you capture the image from the computer as a WIM file.

  • Advantages
    • The installation can be faster than using the default image
  • Disadvantages
    • Not dynamic
    • OS install portion takes longer

Windows 10 Deployment Solutions and Tools

Windows AutoPilot

Windows AutoPilot automates the process of setting up and configuring Windows 10 on new devices. It can also be used to reset, repurpose and recover devices. Windows AutoPilot joins devices to Azure Active Directory (Azure AD), optionally enrolls into MDM services, configures security policies, and sets a custom out-of-box-experience (OOBE) for the end user.

You can use Windows AutoPilot to configure the Out of Box Experience (OOBE), which includes automatic enrollment that enrolls devices in Intune.

Login URL: https://portal.azure.com/

First, create a new Windows AutoPilot Deployment Program profile in intune:

Then, find the devices you want the profile enabled for and assign the profile to those devices.

Windows Analytics

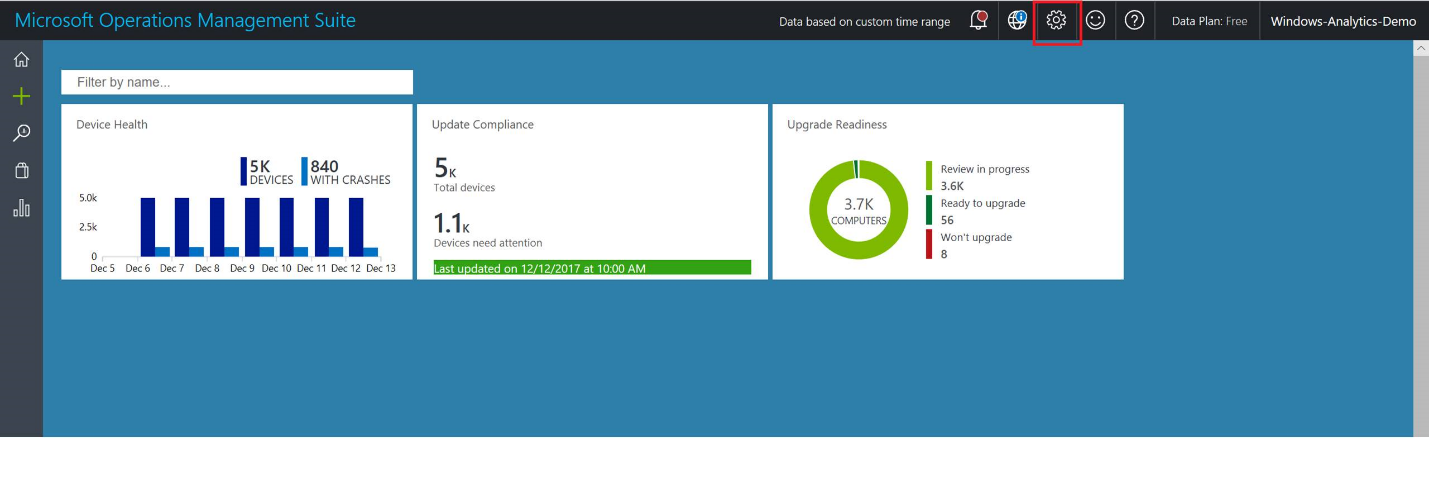
Windows Analytics is a set of solutions that run on Operations Management Suite (OMS):

  • Device Health
  • Update Compliance
  • Update Readiness

Devices report telemetry data and this data can be accessed and analyzed by one of these solutions. Generically, Telemetry is an automated communications process by which measurements and other data are collected at remote or inaccessible points and transmitted to receiving equipment for monitoring.

Operations Management Suite dialog showing settings icon (a gear) in the title bar indicated by a red box.

Windows Analytics: Upgrade Readiness

The Upgrade Readiness is a free tool for Azure subscribers that helps you confirm applications and drivers are ready for a Windows 10 upgrade. The tool provides application and driver inventory, information about known issues, troubleshooting guidance, and per-device readiness. Upgrade Readiness was previously called Upgrade Analytics. Further, the Application Compatibility Toolkit (ACT) was replaced with Upgrade Analytics.

Upgrade Readiness works by forming a connection between your computers and Microsoft. Upgrade Readiness collects computer, application, and driver data for analysis.

Upgrade Readiness is offered as a solution in the Microsoft Operations Management Suite (OMS), a collection of cloud based services for managing your on-premises and cloud environments.

Login URL: https://www.microsoft.com/en-us/WindowsForBusiness/windows-analytics

To launch the upgrade readiness process, run the Upgrade Readiness script on each computer that you would like to run the readiness for. There is a pilot and deployment. Run the pilot on a couple machines to verify things are working, then run the deployment in your environment.

Once the script is run, you can identify and resolve issues in the Upgrade Readiness dashboard. By connecting Upgrade Readiness to Configuration Manager, you can directly access the data in the Monitoring node of the Configuration Manager console.

Windows Analytics: Update Compliance

Update Compliance helps keep Windows 10 devices secure and up-to-date using Microsoft Operations Management Suite (OMS) Logs and Analytics to provide information about the status of monthly quality and feature updates.

Windows Analytics: Device Health

Device Health complements Upgrade Readiness and Update Compliance by helping to identify devices crashes and the cause. Device drivers that are causing crashes are identified along with alternative drivers that might reduce crashes. Windows Information Protection misconfigurations are also identified.

MBR2GPT (MBR -> GPT)

MBR2GPT.EXE, introduced in the Windows 10 1703 (Creator’s Update), converts a disk from Master Boot Record (MBR) to GUID Partition Table (GPT) partition style without modifying data on the disk. Previously, it was necessary to image, then wipe and reload a disk to change from MBR format to GPT.

The tool is designed to be run from a Windows PE command prompt, but can also be run from the full Windows 10 operating system (OS) by using the /allowFullOS option.

GPT enables the use of larger disk partitions, added data reliability, and faster boot and shutdown speeds

GPT also enables the use of the Unified Extensible Firmware Interface (UEFI) which replaces the BIOS. Security features of Windows 10 that require UEFI mode include: Secure Boot, Early Launch Anti-malware (ELAM) driver, Windows Trusted Boot, Measured Boot, Device Guard, Credential Guard, and BitLocker Network Unlock.

MBR2GPT.EXE is located in the Windows\System32

Windows ADK for Windows 10

The Windows Assessment and Deployment Kit (Windows ADK) is a suite of tools to asses and deploy Windows. A version is released for each version of Windows with the current version being Windows ADK for Windows 10, version 1709. It used to be called the Windows Automated Installation Kit (AIK) (for Windows 7).

DISM is used to mount and service Windows images.

  • Mount an offline image
  • Add drivers to an offline image
  • Enable or disable Windows features
  • Add or remove packages
  • Add language packs
  • Add Universal Windows apps
  • Upgrade the Windows edition

Sysprep prepares a Windows for imaging and allows you to capture a customized installation.

  • Generalize a Windows installation
  • Customize the default user profile
  • Use answer files

Windows PE (WinPE) is a small operating system used to boot a computer that does not have an operating system. You can boot to Windows PE and then install a new operating system, recover data, or repair an existing operating system.

  • Create a bootable USB drive
  • Create a Boot CD, DVD, ISO, or VHD

Windows Recovery Environment (Windows RE) is a recovery environment that can repair common problems.

Windows System Image Manager (Windows SIM) creates “answer files” that change Windows settings and run scripts during installation.

  • Create answer file
  • Add a driver path to an answer file
  • Add a package to an answer file
  • Add a custom command to an answer file

Windows Imaging and Configuration Designer (ICD) customizes and provisions Windows 10. It’s a similar concept to using imagex, by importing applications, updating drivers, etc.

  • Build and apply a provisioning package
  • Export a provisioning package
  • Build and deploy an image for Windows 10 for desktop editions

When using it to provision Windows 10:

Volume Activation Management Tool (VAMT)

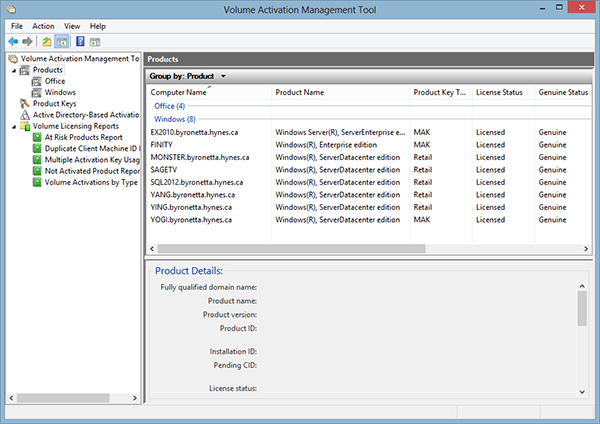
The Volume Activation Management Tool (VAMT) allows you to automate and centrally manage the Windows, Office, and other Microsoft products volume and retail-activation process. VAMT can manage volume activation using Multiple Activation Keys (MAKs) or the Windows Key Management Service (KMS).

https://docs.microsoft.com/en-us/windows/deployment/images/volumeactivationforwindows81-18.jpg

User State Migration Tool (USMT)

The User State Migration Tool (USMT) is a user-profile migration tool. USMT includes three command-line tools: ScanState.exe, LoadState.exe, and UsmtUtils.exe. USMT also includes a set of three modifiable .xml files: MigApp.xml, MigDocs.xml, and MigUser.xml. You can create custom migration .xml files and you can also create a Config.xml file to specify files or settings to exclude from the migration.

The USMT broadly works in these three steps:

  1. Configure USMT: Make copies and modify the three migration XML files

    
      MigApp.xml, MigDocs.xml, and MigUser.xml
      
  2. Scan Source Computer

    
      scanstate \\server\migration\mystore /config:config.xml /i:migdocs.xml /i:migapp.xml /v:13 /l:scan.log
      
  3. Load results on Destination Computer

    
      loadstate \\server\migration\mystore /config:config.xml /i:migdocs.xml /i:migapp.xml /v:13 /l:load.log
      

Windows To Go

Windows To Go allows you to boot a fully manageable Windows environment on a USB jump drive. You insert the USB drive (known as a Windows To Go workspace) into a computer to boot and run a managed Windows 10 system.

You can easily start the wizard by opening Windows To Go in the Control Panel.

In this tutorial, I provide an overview of Process Monitor (ProcMon), a powerful Windows monitoring tool. I explain how to start and filter ProcMon, find changed values, enable boot logging, and run ProcMon against a remote machine. I created this tutorial to practice key concepts for my upcoming interview for the Senior Solutions Architect position at Microsoft. By mastering ProcMon and other tools in the Windows Sysinternals suite, I was able to showcase my troubleshooting and diagnostic skills to the Microsoft hiring team.

Process Monitor (ProcMon) Overview

Process Monitor is a monitoring tool for Windows that shows live file, Registry and process/thread activity. It is a combination of two older Sysinternals utilities, Filemon and Regmon.

Process Monitor is a part of Windows Sysinternals which is a set of utilities to manage, diagnose, troubleshoot, and monitor Windows. Sysinternals was originally created in 1996 by Winternals Software and was started by Bryce Cogswell and Mark Russinovich. Microsoft acquired Winternals on July 18, 2006, which included Sysinternals and the utilities within it.

The set of tools is now available on any Windows computer by opening \\live.sysinternals.com\tools\ in file explorer. This UNC path is a service provided by Microsoft and is referred to as Sysinternals Live.

Starting Process Monitor

You must run ProcMon.exe from an elevated command prompt, so that it opens in administrative mode as it needs to install Filter Drivers. As soon as you start it, it will begin capturing, and quite quickly will start taking space from your paging file. Therefore, only run it for the necessary time as leaving it running will likely cause your computer to crash unless you run it to Drop Filtered Events against a certain filter. More on this under Filter Process Monitor

Filtering with Process Monitor

ProcMon can be run for days if you chose to have it filter for a certain type of event. Start by selecting Filter -> Drop Filtered Events.

Choosing this option means that only what is filtered will be saved to the log file, as opposed to only filtering will filter what you see, but will log all to the log file. Now, filter to only view processes where the result is Access Denied by opening Filter -> Filter:

You can also filter right from the main console by selecting a Process, right clickign and choosing one of the filtering options. For example, if we choose to Exclude Events After this event, we can also see that it automatically creates a filter for this choice which we can choose to remove later.

Once you have a specific filter set that might be useful for a certain troubleshooting task, you can choose to Save or Load the filters under the Filter menu:

Advanced Filtering with Process Monitor

In some instances, you may want to view all events, including those by default that are filtered out of ProcMon. You could opt to manually remove all of the built in filters, but an easier way to do this is to simply select Filter -> Enabled Advanced Output

How to Find Changed Values

Some people will use ProcMon to try and see what changes a process makes, but it can become daunting. An easier method is to try and utilize ProcMon in a way where you can filter for events happening. Let’s say for example we want to see what registry values are set when we disable Automatic Restart on system failure. To do this, first stop and clear the trace, then filter ProcMon to only show RegSetValue Operations:

Now, begin the capture and make the desired change:

Stop the capture once the change has been made. Now, we can easily see the registry value change that was required to make this change:

Enable Boot Logging

A very useful feature of process monitor is to trace events during logoff, shutdown, startup and login. There is a special feature to do this ProcMon to do this under the Options menu. Select Enable Boot Logging and then reboot your system. The next time you open ProcMon, you’ll be prompted to save the boot log events to a file.

ProcMon Tools: Process Tree

ProcMon has several tools available by selecting Tools from the menu. For example the Process Tree shows you the processes lifetime and how long they lived during the trace.

Running ProcMon against a Remote Machine

Utilizing psexec, 23 can run ProcMon against a remote machine if we do not or cannot be at a remote site for monitoring.

To start the trace on a remote computer run:


Psexec \\ /s /d procmon.exe /accepteula /quiet /backingfile c:\hostname_trace.pml

Now, to stop the trace on the remote computer run:


Psexec \\ /s /d procmon.exe /accepteula /terminate

Finally, copy the log file to your remote machine for viewing:


xcopy \\\c$\hostname_trace.pml c:\TEMP

You can then view the log file in ProcMon locally by running:


Procmon /openlog c:\temp\hostname_trace.pml

ProcMon Filter Drivers

If ProcMon has some issue connecting to the filter driver and gets stuck opening, you can run it to not connect to the filter driver:


Procmon /noconnection

To view the filter driver that is associated to Procmon, run


fltmc

I created a tutorial for Process Explorer (ProcExp) to help me practice my skills for an upcoming interview to be a Sr Solutions Architect at Microsoft. Process Explorer is a tool within the Windows Sysinternals utilities that shows information about which handles and DLLs processes have opened or loaded. This tutorial covers a variety of topics, including how to start ProcExp in administrative mode, how to find running processes and those that close quickly, how to understand threads with Service Host (svchost.exe), and how to hunt for a virus. I also cover how to enable additional columns in ProcExp, and how to save column sets for future use. This tutorial helped me develop my technical skills and become more familiar with the Sysinternals toolkit.

Process Explorer (ProcExp) Overview

Process Explorer shows you information about which handles and DLLs processes have opened or loaded. This is the most downloaded tool of the Sysinternals toolkit, with over 3 Million downloads a year.

Process Explorer is a part of Windows Sysinternals which is a set of utilities to manage, diagnose, troubleshoot, and monitor Windows. Sysinternals was originally created in 1996 by Winternals Software and was started by Bryce Cogswell and Mark Russinovich. Microsoft acquired Winternals on July 18, 2006, which included Sysinternals and the utilities within it.

The set of tools is now available on any Windows computer by opening \\live.sysinternals.com\tools\ in a file explorer. This UNC path is a service provided by Microsoft and is referred to as Sysinternals Live.

Starting Process Explorer

I recommend starting ProcExp.exe from an elevated command prompt, so that it opens in administrative mode. If you start ProcExp in standard mode, you’ll notice it has extra options to Show Details for All Processes:

Also, if you every have issues opening ProcExp, you should clear its registry key at HKEY_CURRENT_USER\Software\Sysinternals.

One of the most useful ways to run ProcExp is before logon, or as a replacement to Task Manager. When you select to have process explorer replace task manager, it is actually making use of the Image File Execution Options which replaces taskmon.exe with procmon.exe.

Another useful way to start ProcMon is at the Windows Logon Screen (CTRL+ALT+DEL). You can do this by adding an Image File Execution Option for Sticky Keys (sethc.exe) and have it open cmd.exe. Once at the logon screen, press Shift 5 times and cmd.exe will open where you can run process explorer. This is useful to diagnose headless servers, etc.

Views in ProcExp

You can enable several additional columns in process explorer. To do this, right click on the columns and click Select Columns. In this example I have chosen columns that would help with debugging malware:

You can then choose to save the column set for future use by selecting View -> Save Column Set

Now, if you create multiple Column Sets you can toggle between them by entering CTRL+1, CTRL+2, etc.

Finding Running Processes

One of the best ways to determine what process a certain application is, you can use the target tool to click it, and the process will become highlighted. In this example, I click the Registry Editor

You can also reverse this process by right clicking a process and selecting to bring it to the front:

Finding Processes That Close Quickly

If you are trying to track down a process that is only very briefly popping up or closing quickly, there is a trick to see what processes might be doing this. To see them, first pause ProcExp by hitting the Space Key. Now, wait for the process to pop up on the screen, and then hit F5. Now, in ProcExp all new processes between the time you hit Space and F5 will be highlighted:

Threads and Stacks

Because Task Manager cannot see Threads and Stacks, this is one of the best uses of ProcExp. In a CPU core, only threads run. Processes are more like buckets that contain many threads to run that are given their own memory allocation, etc. Stacks are integral to a thread and represents the stack of instructions in the memory that is associated to the thread running. Stacks are just like a stack of plates where you can Pop and Push items off the stack.

Understanding Threads with Service Host (svchost.exe)

If you wanted to know why a process crashed or is using a lot of memory, it could be any one of the threads within it causing the problem. For example Service Host (svchost.exe), the process that runs all services, is one of the most common processes to eat up memory. Many Service Hosts run on a modern Windows OS, because the granularity to have svchost.exe run with different permissions has increased as security has increased and the need to separate processes from a service if a service needed to be stopped. This introduced things like Service SIDs and Service Privileges. For example, to get an access token you need a Service SID. To view the Service SID associated to a Service, you can find it with

sc showsid <servicename>

For example, you might know that Trusted Installer owns everything in Windows, but Trusted Installer is actually the Windows Module Installer Service:

Back to ProcExp, we can view the Access Token and privileges associated to the svchost running by going to Properties, then the Security tab:

Next, then look at the Services tab which will show you the Binaries that are associated to the services running under the svchost you selected.

Finally, we can view the threads running in the svchost selected to try and debug exactly what might be causing a hang, etc.

As a note, a computer running Windows 10 1703 and above, with more than 3,484 MB of RAM, will have every service placed in its own Service Host (svchost.exe). This should make debugging Services a little bit easier.

Hunting for a Virus

First, choose the process you think might be associated to the virus. To do this, you can either look at which process is consuming the most CPU, but also you Verify Image Signatures and Check VirusTotal.com for relations to the process with a virus.

If the Signer is not verified, it doesn’t mean that it is a virus, but it warrants more investigation. The VirusTotal column shows if any engines found the hash value of the executable associated to something malicious.

Resource Usage in ProcExp

Another great use of ProcExp is determining what handles are open for a process. For example, if you wanted to see any process that had a handle on PhotoShop, click Find -> Find Handle or DLL which will allow you to find the processes, threads and DLLs associated:

Saving ProcExp Data

You can save a snapshot of the current data by selecting File -> Save As which will save a text file of the current view, with expanded details on the process you had highlighted:

In this Netsh Networking Shell Tutorial, I explain how to use the Netsh command line scripting utility that has been around since Windows Server 2003. Although somewhat depreciated by cmdlets available in PowerShell, Netsh can allow you to view or change the network configuration of your local computer or a remote computer. The tutorial takes you through how to browse around the tool, open contexts, and use sub-contexts to navigate through commands. It also covers how to use Netsh to manage remote servers and workstations, popular Netsh commands, and even provides an example batch file. The reason I created this tutorial was to help me improve my understanding of Netsh before my then-upcoming Microsoft interview to be a Senior Solutions Architect.

Netsh Overview

Netsh, pronounced just as it’s spelt as “netch”, is a command line scripting utility that’s been around since Windows Server 2003. Although somewhat depreciated by cmdlets available in PowerShell, Netsh can allow you to view or change the network configuration of your local computer or a remote computer. Netsh can be run at the command line or built into a script inside of a batch file.

To start Netsh, open a command line shell or PowerShell and type:


Netsh

How to Browse Netsh

Once inside Netsh, type “?” to see a list of commands available to you:

Note how it describes the list as “commands in this context”. Contexts are groups of commands available to you once you are inside of their context. Contexts can be nested in other Contexts and you’ll see it lists what sub-contexts are available. To get inside a context, just type its name, such as interface, and again a “?” will show you what commands area available to you in that context.

This is generally how you browse around. By opening contexts, typing “?” to see what is available, and typing sub-contexts to get even deeper until you find the command you want.

Also, note how it mentions that PowerShell should be used rather than Netsh for TCP/IP commands. This is true for most Netsh commands, so just keep in mind that, although useful, PowerShell has largely taken over Netsh.

Using Netsh to Manage Remote Servers and Workstations

While you’re still at the cmd line shell (net yet into Netsh), you can invoke Netsh against a remote computer by following this format:


Netsh -r  -u <domain\user> -p  

In this example, we can see the IPV4 information on the remote computer 63769:

For the -r argument, you can supply the hostname as either the IP address, the hostname, or the FQDN of the remote host.

Running Commands in Netsh

The general syntax to run a netsh command is:


netsh[ -a AliasFile] [ -c Context ] [-r RemoteComputer] [ -u [ DomainName\ ] UserName ] [ -p Password | *] [{NetshCommand | -f ScriptFile}]

For example, to open a firewall port on a remote computer:


netsh –r WORKSTATION001 –u DOMAIN\User –P P@ssw0rd! advfirewall set portopening tcp 445 smb enable

Additionally, some commands require a parameter string. In the case where the parameter string requires a space, be sure to include it in quotes:


interface="Wireless Network Connection"

Popular Netsh Commands

  1. Show the IP configuration
    
    netsh interface ip show config
    
  2. Show IPv4 or IPv6 information
    
    netsh interface ipv6 show address
    
  3. Open a Firewall Port
    
    netsh advfirewall firewall
      add rule name="HTTPS"
      dir=in action=allow protocol=TCP localport=443
    
  4. Show Network Adapter Status
    
    netsh interface show interface
    
  5. Configure adapter for static IP Address
    
    netsh interface ip
      set address "Local Area Connection"
      static 192.168.0.100
      255.255.255.0 192.168.0.254 1
    
  6. Configure adapter to use DHCP
    
    netsh interface ip 
      set dns "Local Area Connection" dhcp
    

Example Batch File

This is an example batch file:


netsh wins server 192.168.125.30 add name Name=MY\_RECORD EndChar=04 IP={192.168.0.205}

netsh wins server 192.168.125.30 add partner Server=192.168.0.189 Type=2
  
netsh wins server 192.168.0.189 add partner Server=192.168.125.30 Type=2
  
netsh wins server 192.168.125.30 init push Server=192.168.0.189 PropReq=0
  
netsh wins server 192.168.0.189 show name Name=MY\_RECORD EndChar=04

This tutorial will introduce you to Group Policy, a tool that allows you to centrally manage and apply user and computer settings and restrictions to maintain a consistent computer environment. Group Policy is made up of Group Policy Objects that arrange registry settings in a meaningful way, and can be managed using the Group Policy Management Console. Group Policy Objects can be divided into User Objects and Computer Configuration Objects, and are linked to an Organizational Unit to become effective. This tutorial includes information on different types of Group Policy filtering and delegating GPO management. I created this tutorial to help me practice concepts for my upcoming Microsoft interview as a Sr Solutions Architect.

Group Policy Overview

Maintaining a consistent computer environment can be challenging. We need a way to configure and enforce user and computer settings and restrictions. Group Policy gives us the tools we need to administer such an environment by giving us an area to centrally manage and apply these settings and restrictions.

Group Policy Components

Group Policy Settings are really just configuration settings that allow us to modify the computer and user specific registry settings on domain computers. If you have ever opened REGEDIT.EXE, you know that trying to manipulate registry settings directly can be confusing and daunting. If anything, the registry is not really oriented in a way that is meant to be modified directly. Group Policy is really just a collection of Group Policy Objects that arrange registry settings in a meaningful way. It’s kind of like the UI to a database called the registry.

Group Policy Management

The Group Policy Management Console is the tool used to modify these Group Policy Objects. You’ll notice that the console mimics very much the Active Directory Users and Computers console in the layout of Organizational Units (OUs). Keep this in mind as we move forward as all Group Policy Objects are simply created in one spot, the Group Policy Objects folder and are then linked to an OU to actually become effective. GPOs never sit inside an OU, they are only linked to one.

Group Policy Objects

There are two types of Group Policy Objects we can create. User Objects and Computer Configurations Object. Computer Configurations and apply to any users that log into the computers within the Computer OU they are linked to. User Configurations Object are similar with the only real differentiator being that they need to be linked to a User OU with users.

To force the policy to become active, we can run


GPUPDATE /FORECE 

on one of the computers we linked the policy to. Then, we must log off and then back on.

For each setting you’d like to configure, it is recommended that a new Group Policy Object is created. This is to keep things more organized and consistent. For example, if you wanted to set a wallpaper, and map a network drive, you should create one Group Policy called Corporate Wallpaper and another called Corporate Network Drive.

Policies and Preferences

Policies are normally registry values that are updated to no longer exist once we remove/unlink their policy. So, if we apply a policy based GPO, the registry is edited, and then if we later remove it, the modified registry settings are restored to the original values.

Preferences, on the other hand, permanently creates registry values, and unless we go and manually edit the registry to remove this preference, the original settings can never be restored, even if we unlink the GPO. Also the settings applied via preferences are user specific. If a user wants to change them, they can do that, whereas policies cannot be changed by the user. An example of this would be a mapped drive, where the user can decide to go into My Computer and un-map the drive.

Policies

All local group policy objects are stored locally on the client on C:\Windows\SYSVOL\domain. From here you can see the Policies listed. They are arranged by GUID, which can be matched up the actual policy if desired:

Within this folder we will see a GPT.INI configuration file, which contains a version number. The next time GPUPDATE.EXE is run, it is this version that Group Policy will match up with the object on the domain controller to determine if an update is required. If the version numbers match, no update is needed, and if they do not, an update is synced and applied.

Preferences

As we mentioned, Preferences, as opposed to Policies can be disabled by the user and are not removed from a system, even if a GPO is no longer linked to it. Another neat feature of a preference is the ability to target them to a whole slew of options such as in the example below:

Multiple Local GPOs

Prior to Vista, there was only one configuration policy that applied to all users that logged onto that computer. A new feature is now available to allow for different user configurations for different users where we can decide to disable a certain GPO for a group of users.

To enable multiple local GPOs, from the client run MMC.EXE and run as an administrator. Then add Group Policy Object snap-in. Choose Users and then pick a user group. Browse to the policy, such as Corporate Wallpaper you’d like to NOT apply to these users and click Disable on the policy.

Starter GPOs

Starter GPOs are default templates that come with Group Policy or you can create on your own. They must first be enabled in Group Policy Management by clicking Create Starter GPOs Folder

From here, you can right click a Starter GPO and select Create GPO from Starter GPO. By doing this, you are creating GPO based off this template. The most common use of a starter GPO is when you want a group of settings for a type of computer role.

You can create new Starter GPOs simply by right clicking and selecting Create New Starter GPO. The process of configuring the Starter GPO is just like configuring a normal GPO. Finally, you can opt to import or export all of your Starter GPOs to migrate them to another domain, etc.

Delegating GPO Management

We can decide to delegate some of the Group Policy Management task to other users that do NOT need to be Domain Administrators. We do this by adding a User or Security Group to the delegation tab for the GPO we want to delegate permissions. We can select to allow them to have Read, Edit Settings, or Edit Settings, delete and modify security the GPO.

Delegation can also be managed through Active Directory Users and Computers on an OU level. This is accomplished by right clicking the desired OU and selecting, Delegate Control. This will bring up the wizard which will allow you to choose exactly who and how you want control delegated to objects containing within the OU:

Resultant Group Policy

Group Policy Objects are cumulative in nature where all GPOs along the tree are added on top of each other to produce the results that are seen within a particular OU. In this example, the Default Domain Policy + Laptops Configuration Policy settings will all apply to the computers within the Laptop OU:

To see these results for yourself you can view them by right clicking Group Policy Results and selecting Group Policy Results Wizard. This will generate a results report where you can view all GPO results that apply to the target you chose in the Wizard.

You can also view the GPO results locally on a client computer. To view all the policies applied to the user account you’re currently logged in with, you would use the following command:


gpresult /Scope User /v

The /v argument in that command specifies verbose results, so you’ll see everything.

Group Policy Modeling

The Group Policy Modeling wizard is a tool that allows you to see the effects of a GPO for a specific user or computer account without actually having to apply it. Simply run the wizard and choose where, with what settings and who you’d like to simulate it against, and it will create a similar report to resultant group policy.

Group Policy Filtering

Using Group Policy Filtering will allow you to target Group Policy to better meet the needs of your environment by allowing you to target objects more specifically than just by OU.

The Problem with Applying Group Policy to OUs

If you consider a typical OU structure, we separate users and computers by things like departments, locations, etc.

This type of structure works ok in most situations with Group Policy as all weed need to do is design the Group Policy depending on which OU it is linked to. However, the problem with this approach is that it requires you to sort all of the desired objects into Active Directory into the correct OU. On a large network you might have hundreds or thousands of objects that need to be sorted, so this can definitely become a problem.

For example, if you wanted to target computers belonging to Windows Server 2012 Operating Systems, you would need to manually move what OU each computer was in when it was upgraded from Server 2008. In this example, you might want to apply Group Policy to an Operating System by detecting it, and it is in this section we’ll look at different filtering techniques that will allow us to target Group Policies to users and computers without having to move objects around in Active Directory.

Security Filtering

The first type of filtering is Security Filtering. By default, this is disabled and you’ll notice that by seeing “Authenticated Users” listed in the filter, which simply means the policy will apply to all users authenticated by the domain, aka everyone. You can opt to Remove this group and choose your own group this will apply to. This is a great way of narrowing down who this Group Policy will be applied to.

WMI Filtering

Sometimes narrowing down by User or Group is simply not enough and we need something even more granular. In that case, we can filter down even further by using a WMI filter. For example, maybe we want to target a certain Operating System. To do this we create a new WMI Filter and write the filter in WQL, which we have already done in some of my other articles centered around WMI filtering in SCCM.

After we create the WMI filter, now we need to configure one or more GPOs to actually use the filter. At the bottom of the Scope tab in WMI Filtering we simply select the appropriate WMI filter. In this instance, now we will be filtering on computers within the New York OU that are Windows Server 2012 machines only.

You can create more complex WMI queries that could cover anything you might want to search for with a WMI query.

Windows 10 Servicing Model

With Windows 10, a new model was introduced called “Windows as a service – WAAS”. Rather than new features being added only in new OS/every few years, WAAS will continually provide new capabilities. The Semi-Annual Channel is a twice-per-year feature update release targeting around March and September, with 18-month servicing timelines for each release

Starting October 2016, Windows also changed it update model to have a single Monthly Rollup that takes care of security and reliability issues. The update will be published to SCCM/WSUS automatically. Each month’s rollup will supersede the previous months, so there is only ever the most recent update to install to be up to date.

Deploying Windows 10

Deploying Windows 10 is easier than with previous versions of Windows because now it supports a simple in-place upgrade process from 7 -> 10 and 8 -> 10. This automatically preserves all apps, settings, and data. Then, once you’re running Windows 10, 10 -> 10 deployments of Windows 10 feature updates, such as Windows 10 1703 -> Windows 10 1706 is the new way to go

Additionally, Windows 10 is compatible with most hardware and software capable of running on Windows 7 and Windows 8. Software compatibility is so high because Win32 application programming interfaces were not changed very much between versions. As a result of this, the app compatibility testing process is simplified. Finally, most hardware drivers that functioned in 7 or 8 will continue to function in Windows 10.

Feature Updates (“A New OS”)

Released twice a year, one in March and one in September. Since feature updates contain an entire copy of the OS, they are also used to install Windows 10 on existing devices running Windows 7 or Windows 8.1, and on new devices where no operating system is installed. Examples include 1703, 1709, aka March 2017, Sept 2017

Version

Marketing name

Release date

Ent Support Ends
(+18 Months)

LTSC Support Ends
(10 Years)

1507

Threshold 1

July 29, 2015

May 9, 2017

October 14, 2025

1511

November Update

November 10, 2015

April 10, 2018

N/A

1607

Anniversary Update

August 2, 2016

October 9, 2018

October 13, 2026

1703

Creators Update

April 5, 2017

April 9, 2019

N/A

1709

Fall Creators Update

October 17, 2017

October 8, 2019

N/A

1803

Redstone 4

Early 2018

TBA

N/A

1809

Redstone 5

Late 2018

TBA

TBA

Monthly Quality Rollup Update (Monthly Update)

In addition to larger feature updates, Microsoft will publish regular monthly quality updates on Patch Tuesday. These smaller updates are similar to the monthly security updates and patches that you have been used to before Windows 10, but there are some significant differences. For one, the new quality updates are specific to the Windows 10 versions you are currently running. Secondly, expect Microsoft to publish as many of these as needed for any feature updates that are still in support.

No longer will you see individual KB updates, but rather the Monthly Rollups as such:

Monthly Quality Rollup Update

Description

Security Only Quality Update

Collects all of the security patches for JUST that month into a single update

Security Monthly Quality Rollup

Same as above + non-security (reliability) updates, and cumulative for past 6-8 months, so will keep getting bigger

.Net Framework Security-Only Update

Contains only security updates for JUST that month

.Net Framework Rollup

Same as above + non-security (reliability) updates, and cumulative for past 6-8 months, so will keep getting bigger

Servicing Channel (previously called Branches)

Servicing Channels are determined by the frequency with which the computer is configured to receive feature updates. In other words, it defines when a “Feature Update / A New OS” is available to you after it is released by Microsoft.

Servicing Channel

Old Name Prior to July 2017

Availability of new features

Overview

Windows Insider community

Before Release

In the past, when Microsoft developed new versions of Windows, it typically released technical previews near the end of the process, when Windows was nearly ready to ship. With Windows 10, new features will be delivered to the as soon as possible — during the development cycle, through a process called flighting.

Semi-Annual Channel (Targeted)

Current Branch (CB)

Immediately after first published by Microsoft (March / Sept)

What all home users get and what most small business corporate Pro users will get.

Semi-Annual Channel

Current Branch for Business (CBB)

Approximately 4 months after Targeted (July/January)

Just like Targeted, but delayed by 4 months.

Long-Term Servicing Channel (LTSC)

Long-Term Servicing Branch (LTSB)

Every 10 Years

Identical to old versions of Windows where users receive Security Updates and bug fixes every month but no new features and enhancements will be installed. Minimum length of servicing lifetime of LTSB is 10 years.

Deploying Windows 10 via SCCM

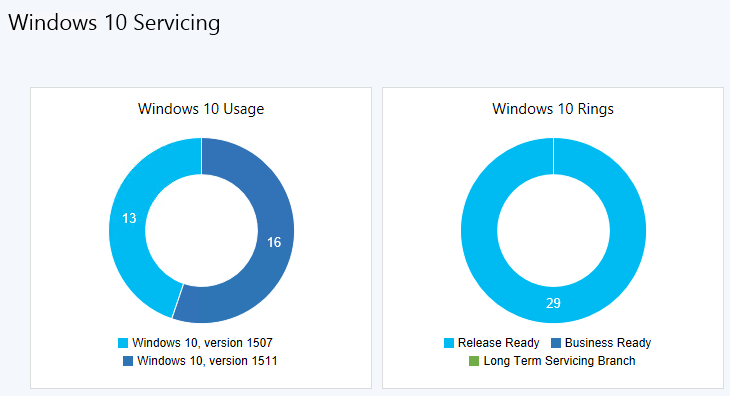
With all the latest versions of the Configuration Manager console (see my other article New Features in SCCM) the Windows 10 Servicing Dashboard is now available to you to begin deploying Windows 10 feature updates. This will be used to deploy Windows 10 in SCCM.

Deployment Rings

First, let’s take a closer look at the area on the Windows 10 servicing dashboard defined as a Deployment Ring. A ring is a groups of PCs that are all on the same branch and have the same update settings. Rings can be used internally by your company to better control the upgrade rollout process.

Deploying prior versions of Windows required you to build groups of users/computers to deploy the new OS out to in phases. These typically ranged from the most adaptable and least risky (like your IT staff) to the least adaptable or riskiest (like executives). Now with Windows 10 deployment Rings, a similar tactic exists, but the ideas is a little different.

Deployment Rings, in the simplest sense, are a way for you to separate machines into your deployment timeline. The idea is to have each deployment ring reduce the risk of issues derived from the deployment of the feature updates by gradually deploying the update to entire departments, just like you had before.

Creating your Deployment Rings should only really need to occur once, but revisit from time to time to assure everything is still how you want it.

Here is an example of a set of deployment rings you could create in your environment

Deployment Ring

Servicing Channel

Feature Updates Deferral

Quality Updates Deferral

Example

Pre-Pilot

Windows Insider Program

None

None

A few computers, perhaps owned by your IT staff, to evaluate the new version on.

Pilot

Semi-annual channel (Targeted)

None

None

Select computers across various departments. This could also be the same as your Pilot Windows Update Group

Production

Semi-annual channel

120 days

7-14 days

Deployed to the Majority of your Company

Executive

Semi-annual channel

180 days

30 days

Critical Users and Computers that need the most testing done prior to their use of the new feature update or Quality Update.

You could additionally have a ring for the LTSC Serving Channel for things such as ATMs if you were a bank.

Create SCCM Collections Based Off Your Deployment Rings

You must start the Windows 10 servicing process by creating collections of computers that represent the deployment rings we defined above. In this example, you create four collections:

  • Windows 10 – Pre-Pilot
  • Windows 10 – Pilot
  • Windows 10 – Production
  • Windows 10 – Executive

Limit these collections to only hold Windows 10 computers. If you don’t already have a Windows 10 collection to limit from, simply create one with a query such as:


select SMS_R_SYSTEM.ResourceID,SMS_R_SYSTEM.ResourceType,SMS_R_SYSTEM.Name,SMS_R_SYSTEM.SMSUniqueIdentifier,SMS_R_SYSTEM.ResourceDomainORWorkgroup,SMS_R_SYSTEM.Client
from SMS_R_System
where SMS_R_System.OperatingSystemNameandVersion = "Microsoft Windows NT Workstation 10.0"

Finally, after you have created your four collections, add the computers inside of those collections that you would want represented in each deployment phase.

Use Windows 10 Servicing Plans to Deploy Feature Updates

There are two ways to deploy Windows 10 feature updates with SCCM.

  1. Use Windows 10 Servicing Plans, which are similar to Automatic Deployment Rules for software updates.
  2. Use a Task Sequence, which is the old way.

For this article, we are going to focus on Windows 10 Servicing Plans as Task Sequence deployments can be covered in other areas. For example, let’s create the serving plan for the collection, Windows 10 – Production. Creating the serving plans for the other collections will be a similar process.

  1. In SCCM console, go to Software Library -> Overview -> Windows 10 Servicing, and then click Servicing Plans.
  2. On the Ribbon, click Create Servicing Plan.
  3. Name the plan Windows 10 – Production (Servicing Plan), and then click Next.
  4. Next, select/browse to the Windows 10 – Production collection, and click Next.
  5. On the Deployment Ring section, choose the Business Ready (Semi-annual channel) readiness state, set the delay to 120 days, and then click Next.
  6. On the Deployment Schedule page, click Next to modify the values if you wish, but the defaults of making the content available immediately and requiring installation by the 7-day deadline are fine for this example.
  7. On the User Experience section, choose Software Installation and System restart (if necessary). Select Workstations, and then click Next.
  8. On the Deployment Package section, select create a new deployment package. In Name, type Windows 10 – Upgrades, select a UNC path for your package source location, and then click Next.
  9. On the Distribution Points section, add the Distribution Points you want this deployment package to be available from (preferably the same ones these computer’s Boundary Groups would be associated to)

Excellent. You now just created a servicing plan, for the Windows 10 – Production collection, which is based off the Windows 10 –Production Deployment Ring. As you can see as we created the serving plan, your Production users will get the Windows 10 Feature Update automatically deployed to their computer’s 120 days after it is released by Microsoft. That’s pretty simply, right?

Finally, you could elect to create your Windows Update ADRs to deploy Monthly Quality Rollups to this same collection 7-14 days after they are released on patch Tuesday, completing the criteria we reviewed in the Deployment Rings table earlier. Servicing plans use only the “Upgrades” software updates classification, not cumulative updates for Windows 10. For those updates, you will still need to deploy by using the software updates workflow.

Converting from BIOS to UEFI without Wiping Harddisk (MBR2GPT.EXE)

UEFI Convergence has been a big issue, and required a “wipe and load” until Windows 10 1703 released MBR2GPT.EXE. This tool is used to Shift from MBR to GPT so you can go from BIOS to UEFI without having to reformat. Usually, MBR + BIOS, and GPT + UEFI go hand in hand. This is compulsory for some systems (eg Windows), while optional for others (eg Linux).

Windows 7 (BIOS) -> Windows 10 (UEFI)

Mentioned in the 1703 feature updates below, MBR2GPT.EXE converts a disk from the Master Boot Record (MBR) to the GUID Partition Table (GPT) partition style without modifying or deleting data on the disk. The tool is designed to be run from Windows PE or from the full Windows 10 OS by using the /allowFullOS option.

MBR2GPT.EXE is located in the Windows\System32 directory on a computer running Windows 10 version 1703 (Creators Update).

“Use this tool for in place upgrade.”

Example Use of MBR2GPT


X:\>mbr2gpt /convert /disk:0
MBR2GPT will now attempt to convert disk 0.If conversion is successful the disk can only be booted in GPT mode.

These changes cannot be undone!

*After the disk has been converted to GPT partition style, the firmware must be reconfigured to boot in UEFI mode.

MBR vs GPT

Compared with MBR disk, A GPT disk can support larger than 2 TB volumes where MBR cannot. A GPT disk can be basic or dynamic, just like an MBR disk can be basic or dynamic. GPT disks also support up to 128 partitions rather than the 4 primary partitions limited to MBR. Also, GPT keeps a backup of the partition table at the end of the disk. Furthermore, GPT disk provides greater reliability due to replication and cyclical redundancy check (CRC) protection of the partition table. GPT disk partitioning style supports volumes up to 18 exabytes in size and up to 128 partitions per disk

BIOS vs. UEFI

UEFI enables better use of bigger hard drives. Though UEFI supports the traditional master boot record (MBR) method of hard drive partitioning, it doesn’t stop there. It’s also capable of working with the GUID Partition Table (GPT), which is free of the limitations the MBR places on the number and size of partitions. GPT ups the maximum partition size from 2.19TB to 9.4 zettabytes.

UEFI may be faster than the BIOS. Various tweaks and optimizations in the UEFI may help your system boot more quickly it could before. For example: With UEFI you may not have to endure messages asking you to set up hardware functions (such as a RAID controller) unless your immediate input is required; and UEFI can choose to initialize only certain components. The degree to which a boot is sped up will depend on your system configuration and hardware, so you may see a significant or a minor speed increase.

Windows 10 Feature Updates – What’s New

This section is meant to provide a broad overview of the changes in the latest Windows 10 Feature Updates.

Windows 10 1709

Below is a list of some of the new changes in Windows 10 1709, also known as the Fall Creators Update. 1709 also contains the features from version 1703.

Deployment

  • Windows AutoPilot – a zero touch deployment for Windows 10 devise, is now configurable with Configuration Policies.
  • Windows 10 Subscription Activation – lets you deploy Win 10 Enterprise without the need for keys or reboots.
  • Windows Automatic Redeployment – similar to Steady State (oh I how I loved and miss Windows Steady State) or DeepFreeze, which allows you to wipe the OS back to a known state you set.

Mobile Device Management (MDM)

  • MDM in Intune has been expanded to include domain joined devices with Azure Active Directory. Group Policy can be used with AD joined devices to trigger auto-enrollment to MDM.

Application Management

  • Windows Mixed Reality Introduction – VR headsets such as Samsung HMD Odyssey now integrate into Windows 10

Windows 10 1703

Below is a list of some of the new changes in Windows 10 1709, also known as Creators Update.

Configuration

  • Windows Configuration Designer – Let’s you provision devices such as needed for bulk enrollment in InTune
  • Windows Spotlight – New MDM / Group policy settings made available to turn it off

Deployment

  • MBR2GPT.EXE – Used to Shift from MBR to GPT so you can go from BIOS to UEFI without having to reformat. Usually, MBR + BIOS, and GPT + UEFI go hand in hand. This is compulsory for some systems (eg Windows), while optional for others (eg Linux). Windows 7 (BIOS) -> Windows 10 (UEFI). Because this is such an important feature, I cover it more above.

This tutorial provides an overview of Active Directory (AD), which is a collection of services used to manage identity and access for and to resources on a network. The tutorial describes various AD services, such as Domain Services, Lightweight Directory Services, Certificate Services, Federation Services, Rights Management Services, and Flexible Single-Master Operations (FSMO) Roles, including their functions, requirements, and usage. The tutorial also covers the Kerberos authentication method used in AD and provides tips and tools for diagnosing and troubleshooting common AD issues. The author created this tutorial to help others gain a better understanding of AD and to prepare for diagnosing AD issues in preparation for a Microsoft interview.

Active Directory Overview

I created this guide to assist in the general understanding of Active Directory and to give some examples of diagnosis procedures. Active directory is a collection of services (Server Roles and Features) that are used to manage identity and access for and to resources on a network. Initially, Active Directory was only in charge of centralized domain management. Starting with Windows Server 2008, however, Active Directory became an umbrella title for a broad range of directory-based identity-related services.

Active Directory Services

Domain Services

Active Directory Domain Services (AD DS) is central of every Windows domain network. It stores data about users and computers on the domain, verifies their credentials and defines their access rights. The server (or the cluster of servers) running AD DS is called a domain controller. A domain controller is contacted when a user logs into a computer or accesses another computer across the network.

*Other AD services, as well as many Microsoft server technologies rely on or use Domain Services; examples: Group Policy, Encrypting File System, BitLocker, Domain Name Services, Remote Desktop Services, Exchange Server and SharePoint Server.

Lightweight Directory Services

Active Directory Lightweight Directory Services (AD LDS) is a light-weight implementation of AD DS. AD LDS runs as a service on Windows Server. AD LDS shares the code base with AD DS and provides the same functionality, including an identical API, but does not require the creation of domains or domain controllers.

Certificate Services

Active Directory Certificate Services (AD CS) establishes an on-premises public key infrastructure (PKI). It can create, validate and revoke public key certificates for uses of an organization. These certificates can be used to encrypt files (when used with Encrypting File System), emails, and network traffic (VPNs, IPSec, etc.).

*AD CS requires an AD DS infrastructure

Federation Services

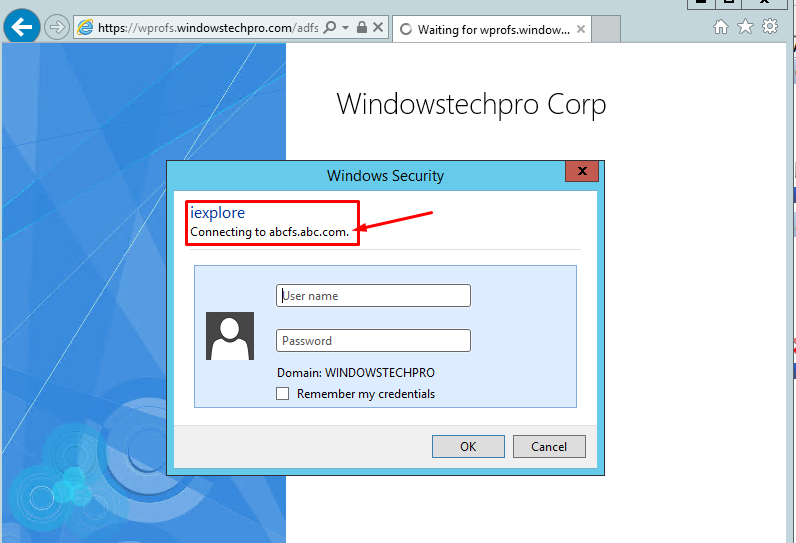
Active Directory Federation Services (AD FS) is a single sign-on service. With an AD FS infrastructure in place, users may use several web-based services (e.g. internet forum, blog, online shopping, webmail) or network resources using only one set of credentials stored at a central location, as opposed to having to be granted a dedicated set of credentials for each service. AD FS’s purpose is an extension of that of AD DS: The latter enables users to authenticate with and use the devices that are part of the same network, using one set of credentials. The former enables them to use the same set of credentials in a different network.

Image result for ADFS website

*AD FS requires an AD DS infrastructure, although its federation partner may not.

Rights Management Services

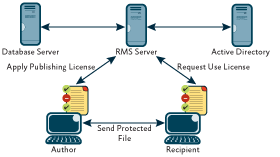
Active Directory Rights Management Services (AD RMS, known as Rights Management Services or RMS before Windows Server 2008) is used for information rights management. It uses encryption and a form of selective functionality denial for limiting access to documents such as e-mails, Word documents, and websites, and the operations authorized users can perform on them.

Image result for rights management services

Flexible Single-Master Operations (FMSO) Roles

These are also known as the Operation Master Roles.

  • Some operations can only be performed on one server (for instance, the DC)
  • However other roles can be split to an individual server to guarantee operations to it will be consistent.
  • It also eliminates replication conflicts.
  • Roles can be moved from DC to DC
  • Certain AD functions require these roles and will fail if the role/server is down.
  • Roles are Forest Wide or Domain Wide

Forest-Wide Roles

Schema Master (One per forest)

  • Defines the design of AD database
  • Some software, such as Exchange, will expand the Schema
  • Once the schema is expanded, you can’t go back.
  • Not available? You can’t expand the schema
  • This role is not used very often, so Microsoft recommends keeping with Domain Naming Master role on same server, tucked away.

Domain Naming Master (One per forest)

  • Used when adding/removing domains from the forest
  • Ensures two domains are not added with the same name.
  • Not available? You can’t add/remove any domains within then forest.
  • This role is not used very often, so Microsoft recommends keeping with Schema Master role on same server, tucked away.

Forest DNS Zone Master role (one per forest)

  • Responsible for coordinating the adding or deleting of the forest-wide records on the DNS servers that host the top-level DNS zone.
  • These records contain the names of the Global Catalog (GC) servers.

Domain-Wide Roles

PDC (Primary Domain Controller) Emulator (One per domain)

  • Originally in place to make bridge between Win2000 DC and NT4 DC
  • Generally, not used if you don’t use any NT domain controllers, but still provides:
    • Keeps time accurate in the domain (other DCs will sync time with PDC)
    • Finally authority on passwords – password changes are sent to PDC with urgent replication (it has the most up to date password changes so a DC can contact PDC if password given is wrong to assure its really wrong)
    • DFS changes are made on PDC emulator
    • Group policy editing defaults to the PDC

RID (Relative Identifier) Master (One per domain)

  • Allocates RID Pools
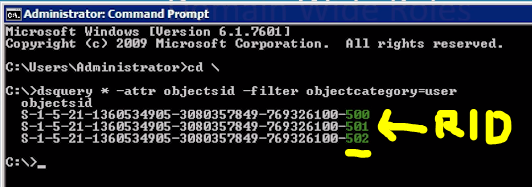
  • RID’s appended to end of SID’s (Security Identifier)
  • Not available? OK for a little while as DC asks for them before they run out. But, if down for too long, no new AD objects can be created.

Infrastructure Master (One per domain)

  • Keeps object references consistent across domains in the forest
  • Updates multi domain references
  • With a multi domain forest
    • Make sure all DC’s in forest are Global Catalog servers

Domain DNS Zone Master role (one per domain)

  • Responsible for coordinating the adding or deleting of any AD-integrated DNS zones on the DCs with DNS servers that host the domain.

Global Catalog (GC) Server

Each domain has its own copy of the AD database. This is stored in the NTDS.DIT (THE Active Directory database file) and changes are replicated to each DC in the domain. This is fine if you want to access resources in the same part of the domain, however is a problem if you want to access resources in a different part of the forest.

In a multi-domain forest, if you want to access a resource, and don’t know where it is, this can be a problem. Therefor a Global Catalog server acts as an index for the entire forest. The GC only contains a subset of each objects attributes (just enough to be searchable). This allows users in a domain to run queries against the GC to find any objects in the forest.

GC Facts

  • Any Domain Controller can be a GC
  • Must have one per domain (should have more than one for redundancy)

Turn on/off GC

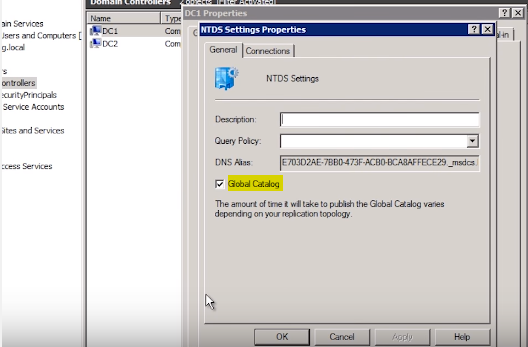
Turn on/off the Global Catalog in the NTDS (NT Directory Services) settings within Active Directory Users and Computers -> Domain Controllers.

Reasons to Deploy a GC

  1. Can only see what users are in a Universal Group (used to assign permissions to related resources in multiple domains) with a GC
  2. GCs are required when logging in with a Universal Principal Name (UPN) – username@domain
  3. Used to locate directory information regardless of where user is in the forest
  4. Need to be at sites connected by a WAN link (perhaps DC is blocked by firewall)
  5. Software, such as Exchange, requires a GC

Kerberos in AD

Kerberos is the native authentication method in Active Directory, so it’s used by Windows Networks everywhere.

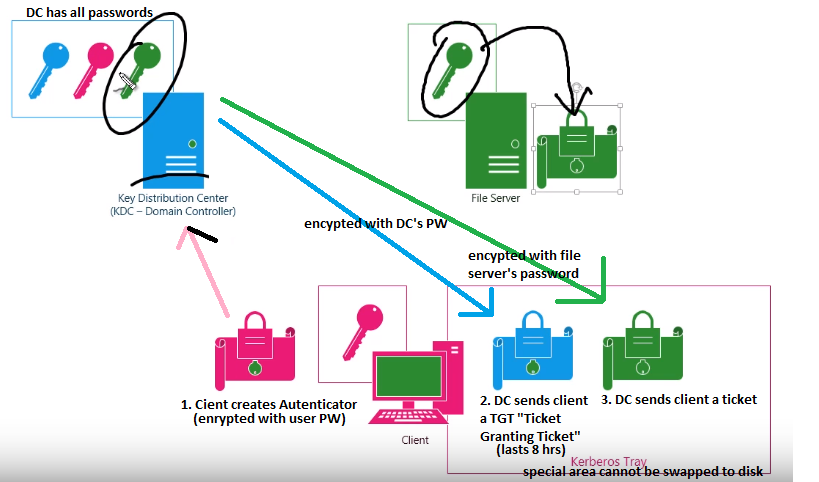
  1. A client creates an Authenticator that is encrypted with the users password and sends to the KDC
  2. The KDC checks if the password is correct, and if so, returns a Ticket Granting Ticket TGT encrypted with a key only KDC knows
  3. Client sends the Ticket Granting Ticket TGT back to the KDC with a request to access the file server.
  4. If KDC trusts its own password in the TGT, it knows it generated the TGT and sends client back a Ticket encrypted with the file server’s logon password
  5. Now, for the next 8 hours, the client sends a copy of the ticket to the file server and if it can decrypt the ticket, it knows the KDC generated it, so its legit.
  6. File server will use ticket (which also has clients username, etc) to decide what user can access.

Overview of Kerberos Process

How to View Kerberos Tray

Use klist.exe to view the Kerberos tray.


klist tickets

Use klist.exe to view the Kerberos sessions.


klist sessions

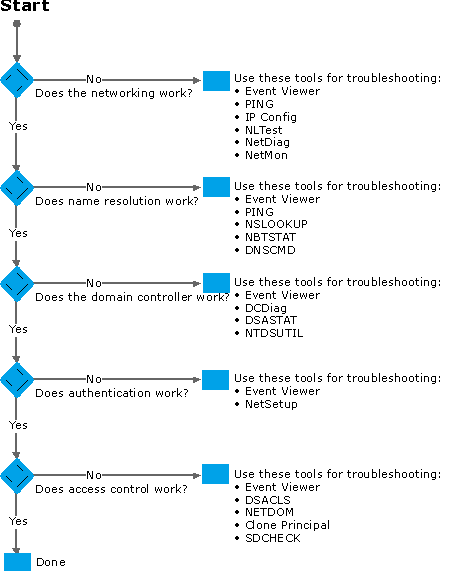
AD Troubleshooting Tools

This flow-chart will provide an overview of steps you can utilize to diagnose Active Directory. Information from chart derived from Microsoft.

Use NLTest to show trust relationship


Ntlest /trusted_domains


Nltest /dclist:yourdomain

AD replication troubleshooting

When looking at Active Directory replication, you may notice an update or updates have not arrived/replication. This could be caused by DNS problems, networking problems, or security issues.

Get a List of the Replication Errors Encountered

To get a list of the replication errors, and export them to a CSV file, run the following command


 repadmin /showrepl * /csv > replication_errors.csv

Use this to resolve replication failures. Sort by latest and hide unneeded columns.