This tutorial will introduce you to Group Policy, a tool that allows you to centrally manage and apply user and computer settings and restrictions to maintain a consistent computer environment. Group Policy is made up of Group Policy Objects that arrange registry settings in a meaningful way, and can be managed using the Group Policy Management Console. Group Policy Objects can be divided into User Objects and Computer Configuration Objects, and are linked to an Organizational Unit to become effective. This tutorial includes information on different types of Group Policy filtering and delegating GPO management. I created this tutorial to help me practice concepts for my upcoming Microsoft interview as a Sr Solutions Architect.

Group Policy Overview

Maintaining a consistent computer environment can be challenging. We need a way to configure and enforce user and computer settings and restrictions. Group Policy gives us the tools we need to administer such an environment by giving us an area to centrally manage and apply these settings and restrictions.

Group Policy Components

Group Policy Settings are really just configuration settings that allow us to modify the computer and user specific registry settings on domain computers. If you have ever opened REGEDIT.EXE, you know that trying to manipulate registry settings directly can be confusing and daunting. If anything, the registry is not really oriented in a way that is meant to be modified directly. Group Policy is really just a collection of Group Policy Objects that arrange registry settings in a meaningful way. It’s kind of like the UI to a database called the registry.

Group Policy Management

The Group Policy Management Console is the tool used to modify these Group Policy Objects. You’ll notice that the console mimics very much the Active Directory Users and Computers console in the layout of Organizational Units (OUs). Keep this in mind as we move forward as all Group Policy Objects are simply created in one spot, the Group Policy Objects folder and are then linked to an OU to actually become effective. GPOs never sit inside an OU, they are only linked to one.

Group Policy Objects

There are two types of Group Policy Objects we can create. User Objects and Computer Configurations Object. Computer Configurations and apply to any users that log into the computers within the Computer OU they are linked to. User Configurations Object are similar with the only real differentiator being that they need to be linked to a User OU with users.

To force the policy to become active, we can run


GPUPDATE /FORECE 

on one of the computers we linked the policy to. Then, we must log off and then back on.

For each setting you’d like to configure, it is recommended that a new Group Policy Object is created. This is to keep things more organized and consistent. For example, if you wanted to set a wallpaper, and map a network drive, you should create one Group Policy called Corporate Wallpaper and another called Corporate Network Drive.

Policies and Preferences

Policies are normally registry values that are updated to no longer exist once we remove/unlink their policy. So, if we apply a policy based GPO, the registry is edited, and then if we later remove it, the modified registry settings are restored to the original values.

Preferences, on the other hand, permanently creates registry values, and unless we go and manually edit the registry to remove this preference, the original settings can never be restored, even if we unlink the GPO. Also the settings applied via preferences are user specific. If a user wants to change them, they can do that, whereas policies cannot be changed by the user. An example of this would be a mapped drive, where the user can decide to go into My Computer and un-map the drive.

Policies

All local group policy objects are stored locally on the client on C:\Windows\SYSVOL\domain. From here you can see the Policies listed. They are arranged by GUID, which can be matched up the actual policy if desired:

Within this folder we will see a GPT.INI configuration file, which contains a version number. The next time GPUPDATE.EXE is run, it is this version that Group Policy will match up with the object on the domain controller to determine if an update is required. If the version numbers match, no update is needed, and if they do not, an update is synced and applied.

Preferences

As we mentioned, Preferences, as opposed to Policies can be disabled by the user and are not removed from a system, even if a GPO is no longer linked to it. Another neat feature of a preference is the ability to target them to a whole slew of options such as in the example below:

Multiple Local GPOs

Prior to Vista, there was only one configuration policy that applied to all users that logged onto that computer. A new feature is now available to allow for different user configurations for different users where we can decide to disable a certain GPO for a group of users.

To enable multiple local GPOs, from the client run MMC.EXE and run as an administrator. Then add Group Policy Object snap-in. Choose Users and then pick a user group. Browse to the policy, such as Corporate Wallpaper you’d like to NOT apply to these users and click Disable on the policy.

Starter GPOs

Starter GPOs are default templates that come with Group Policy or you can create on your own. They must first be enabled in Group Policy Management by clicking Create Starter GPOs Folder

From here, you can right click a Starter GPO and select Create GPO from Starter GPO. By doing this, you are creating GPO based off this template. The most common use of a starter GPO is when you want a group of settings for a type of computer role.

You can create new Starter GPOs simply by right clicking and selecting Create New Starter GPO. The process of configuring the Starter GPO is just like configuring a normal GPO. Finally, you can opt to import or export all of your Starter GPOs to migrate them to another domain, etc.

Delegating GPO Management

We can decide to delegate some of the Group Policy Management task to other users that do NOT need to be Domain Administrators. We do this by adding a User or Security Group to the delegation tab for the GPO we want to delegate permissions. We can select to allow them to have Read, Edit Settings, or Edit Settings, delete and modify security the GPO.

Delegation can also be managed through Active Directory Users and Computers on an OU level. This is accomplished by right clicking the desired OU and selecting, Delegate Control. This will bring up the wizard which will allow you to choose exactly who and how you want control delegated to objects containing within the OU:

Resultant Group Policy

Group Policy Objects are cumulative in nature where all GPOs along the tree are added on top of each other to produce the results that are seen within a particular OU. In this example, the Default Domain Policy + Laptops Configuration Policy settings will all apply to the computers within the Laptop OU:

To see these results for yourself you can view them by right clicking Group Policy Results and selecting Group Policy Results Wizard. This will generate a results report where you can view all GPO results that apply to the target you chose in the Wizard.

You can also view the GPO results locally on a client computer. To view all the policies applied to the user account you’re currently logged in with, you would use the following command:


gpresult /Scope User /v

The /v argument in that command specifies verbose results, so you’ll see everything.

Group Policy Modeling

The Group Policy Modeling wizard is a tool that allows you to see the effects of a GPO for a specific user or computer account without actually having to apply it. Simply run the wizard and choose where, with what settings and who you’d like to simulate it against, and it will create a similar report to resultant group policy.

Group Policy Filtering

Using Group Policy Filtering will allow you to target Group Policy to better meet the needs of your environment by allowing you to target objects more specifically than just by OU.

The Problem with Applying Group Policy to OUs

If you consider a typical OU structure, we separate users and computers by things like departments, locations, etc.

This type of structure works ok in most situations with Group Policy as all weed need to do is design the Group Policy depending on which OU it is linked to. However, the problem with this approach is that it requires you to sort all of the desired objects into Active Directory into the correct OU. On a large network you might have hundreds or thousands of objects that need to be sorted, so this can definitely become a problem.

For example, if you wanted to target computers belonging to Windows Server 2012 Operating Systems, you would need to manually move what OU each computer was in when it was upgraded from Server 2008. In this example, you might want to apply Group Policy to an Operating System by detecting it, and it is in this section we’ll look at different filtering techniques that will allow us to target Group Policies to users and computers without having to move objects around in Active Directory.

Security Filtering

The first type of filtering is Security Filtering. By default, this is disabled and you’ll notice that by seeing “Authenticated Users” listed in the filter, which simply means the policy will apply to all users authenticated by the domain, aka everyone. You can opt to Remove this group and choose your own group this will apply to. This is a great way of narrowing down who this Group Policy will be applied to.

WMI Filtering

Sometimes narrowing down by User or Group is simply not enough and we need something even more granular. In that case, we can filter down even further by using a WMI filter. For example, maybe we want to target a certain Operating System. To do this we create a new WMI Filter and write the filter in WQL, which we have already done in some of my other articles centered around WMI filtering in SCCM.

After we create the WMI filter, now we need to configure one or more GPOs to actually use the filter. At the bottom of the Scope tab in WMI Filtering we simply select the appropriate WMI filter. In this instance, now we will be filtering on computers within the New York OU that are Windows Server 2012 machines only.

You can create more complex WMI queries that could cover anything you might want to search for with a WMI query.

Windows 10 Servicing Model

With Windows 10, a new model was introduced called “Windows as a service – WAAS”. Rather than new features being added only in new OS/every few years, WAAS will continually provide new capabilities. The Semi-Annual Channel is a twice-per-year feature update release targeting around March and September, with 18-month servicing timelines for each release

Starting October 2016, Windows also changed it update model to have a single Monthly Rollup that takes care of security and reliability issues. The update will be published to SCCM/WSUS automatically. Each month’s rollup will supersede the previous months, so there is only ever the most recent update to install to be up to date.

Deploying Windows 10

Deploying Windows 10 is easier than with previous versions of Windows because now it supports a simple in-place upgrade process from 7 -> 10 and 8 -> 10. This automatically preserves all apps, settings, and data. Then, once you’re running Windows 10, 10 -> 10 deployments of Windows 10 feature updates, such as Windows 10 1703 -> Windows 10 1706 is the new way to go

Additionally, Windows 10 is compatible with most hardware and software capable of running on Windows 7 and Windows 8. Software compatibility is so high because Win32 application programming interfaces were not changed very much between versions. As a result of this, the app compatibility testing process is simplified. Finally, most hardware drivers that functioned in 7 or 8 will continue to function in Windows 10.

Feature Updates (“A New OS”)

Released twice a year, one in March and one in September. Since feature updates contain an entire copy of the OS, they are also used to install Windows 10 on existing devices running Windows 7 or Windows 8.1, and on new devices where no operating system is installed. Examples include 1703, 1709, aka March 2017, Sept 2017

Version

Marketing name

Release date

Ent Support Ends
(+18 Months)

LTSC Support Ends
(10 Years)

1507

Threshold 1

July 29, 2015

May 9, 2017

October 14, 2025

1511

November Update

November 10, 2015

April 10, 2018

N/A

1607

Anniversary Update

August 2, 2016

October 9, 2018

October 13, 2026

1703

Creators Update

April 5, 2017

April 9, 2019

N/A

1709

Fall Creators Update

October 17, 2017

October 8, 2019

N/A

1803

Redstone 4

Early 2018

TBA

N/A

1809

Redstone 5

Late 2018

TBA

TBA

Monthly Quality Rollup Update (Monthly Update)

In addition to larger feature updates, Microsoft will publish regular monthly quality updates on Patch Tuesday. These smaller updates are similar to the monthly security updates and patches that you have been used to before Windows 10, but there are some significant differences. For one, the new quality updates are specific to the Windows 10 versions you are currently running. Secondly, expect Microsoft to publish as many of these as needed for any feature updates that are still in support.

No longer will you see individual KB updates, but rather the Monthly Rollups as such:

Monthly Quality Rollup Update

Description

Security Only Quality Update

Collects all of the security patches for JUST that month into a single update

Security Monthly Quality Rollup

Same as above + non-security (reliability) updates, and cumulative for past 6-8 months, so will keep getting bigger

.Net Framework Security-Only Update

Contains only security updates for JUST that month

.Net Framework Rollup

Same as above + non-security (reliability) updates, and cumulative for past 6-8 months, so will keep getting bigger

Servicing Channel (previously called Branches)

Servicing Channels are determined by the frequency with which the computer is configured to receive feature updates. In other words, it defines when a “Feature Update / A New OS” is available to you after it is released by Microsoft.

Servicing Channel

Old Name Prior to July 2017

Availability of new features

Overview

Windows Insider community

Before Release

In the past, when Microsoft developed new versions of Windows, it typically released technical previews near the end of the process, when Windows was nearly ready to ship. With Windows 10, new features will be delivered to the as soon as possible — during the development cycle, through a process called flighting.

Semi-Annual Channel (Targeted)

Current Branch (CB)

Immediately after first published by Microsoft (March / Sept)

What all home users get and what most small business corporate Pro users will get.

Semi-Annual Channel

Current Branch for Business (CBB)

Approximately 4 months after Targeted (July/January)

Just like Targeted, but delayed by 4 months.

Long-Term Servicing Channel (LTSC)

Long-Term Servicing Branch (LTSB)

Every 10 Years

Identical to old versions of Windows where users receive Security Updates and bug fixes every month but no new features and enhancements will be installed. Minimum length of servicing lifetime of LTSB is 10 years.

Deploying Windows 10 via SCCM

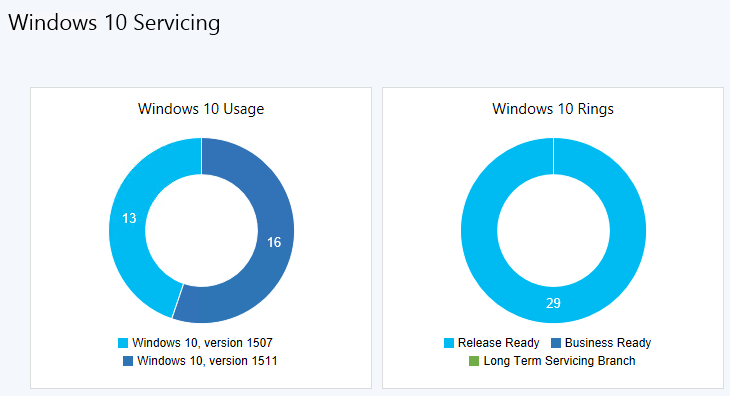
With all the latest versions of the Configuration Manager console (see my other article New Features in SCCM) the Windows 10 Servicing Dashboard is now available to you to begin deploying Windows 10 feature updates. This will be used to deploy Windows 10 in SCCM.

Deployment Rings

First, let’s take a closer look at the area on the Windows 10 servicing dashboard defined as a Deployment Ring. A ring is a groups of PCs that are all on the same branch and have the same update settings. Rings can be used internally by your company to better control the upgrade rollout process.

Deploying prior versions of Windows required you to build groups of users/computers to deploy the new OS out to in phases. These typically ranged from the most adaptable and least risky (like your IT staff) to the least adaptable or riskiest (like executives). Now with Windows 10 deployment Rings, a similar tactic exists, but the ideas is a little different.

Deployment Rings, in the simplest sense, are a way for you to separate machines into your deployment timeline. The idea is to have each deployment ring reduce the risk of issues derived from the deployment of the feature updates by gradually deploying the update to entire departments, just like you had before.

Creating your Deployment Rings should only really need to occur once, but revisit from time to time to assure everything is still how you want it.

Here is an example of a set of deployment rings you could create in your environment

Deployment Ring

Servicing Channel

Feature Updates Deferral

Quality Updates Deferral

Example

Pre-Pilot

Windows Insider Program

None

None

A few computers, perhaps owned by your IT staff, to evaluate the new version on.

Pilot

Semi-annual channel (Targeted)

None

None

Select computers across various departments. This could also be the same as your Pilot Windows Update Group

Production

Semi-annual channel

120 days

7-14 days

Deployed to the Majority of your Company

Executive

Semi-annual channel

180 days

30 days

Critical Users and Computers that need the most testing done prior to their use of the new feature update or Quality Update.

You could additionally have a ring for the LTSC Serving Channel for things such as ATMs if you were a bank.

Create SCCM Collections Based Off Your Deployment Rings

You must start the Windows 10 servicing process by creating collections of computers that represent the deployment rings we defined above. In this example, you create four collections:

  • Windows 10 – Pre-Pilot
  • Windows 10 – Pilot
  • Windows 10 – Production
  • Windows 10 – Executive

Limit these collections to only hold Windows 10 computers. If you don’t already have a Windows 10 collection to limit from, simply create one with a query such as:


select SMS_R_SYSTEM.ResourceID,SMS_R_SYSTEM.ResourceType,SMS_R_SYSTEM.Name,SMS_R_SYSTEM.SMSUniqueIdentifier,SMS_R_SYSTEM.ResourceDomainORWorkgroup,SMS_R_SYSTEM.Client
from SMS_R_System
where SMS_R_System.OperatingSystemNameandVersion = "Microsoft Windows NT Workstation 10.0"

Finally, after you have created your four collections, add the computers inside of those collections that you would want represented in each deployment phase.

Use Windows 10 Servicing Plans to Deploy Feature Updates

There are two ways to deploy Windows 10 feature updates with SCCM.

  1. Use Windows 10 Servicing Plans, which are similar to Automatic Deployment Rules for software updates.
  2. Use a Task Sequence, which is the old way.

For this article, we are going to focus on Windows 10 Servicing Plans as Task Sequence deployments can be covered in other areas. For example, let’s create the serving plan for the collection, Windows 10 – Production. Creating the serving plans for the other collections will be a similar process.

  1. In SCCM console, go to Software Library -> Overview -> Windows 10 Servicing, and then click Servicing Plans.
  2. On the Ribbon, click Create Servicing Plan.
  3. Name the plan Windows 10 – Production (Servicing Plan), and then click Next.
  4. Next, select/browse to the Windows 10 – Production collection, and click Next.
  5. On the Deployment Ring section, choose the Business Ready (Semi-annual channel) readiness state, set the delay to 120 days, and then click Next.
  6. On the Deployment Schedule page, click Next to modify the values if you wish, but the defaults of making the content available immediately and requiring installation by the 7-day deadline are fine for this example.
  7. On the User Experience section, choose Software Installation and System restart (if necessary). Select Workstations, and then click Next.
  8. On the Deployment Package section, select create a new deployment package. In Name, type Windows 10 – Upgrades, select a UNC path for your package source location, and then click Next.
  9. On the Distribution Points section, add the Distribution Points you want this deployment package to be available from (preferably the same ones these computer’s Boundary Groups would be associated to)

Excellent. You now just created a servicing plan, for the Windows 10 – Production collection, which is based off the Windows 10 –Production Deployment Ring. As you can see as we created the serving plan, your Production users will get the Windows 10 Feature Update automatically deployed to their computer’s 120 days after it is released by Microsoft. That’s pretty simply, right?

Finally, you could elect to create your Windows Update ADRs to deploy Monthly Quality Rollups to this same collection 7-14 days after they are released on patch Tuesday, completing the criteria we reviewed in the Deployment Rings table earlier. Servicing plans use only the “Upgrades” software updates classification, not cumulative updates for Windows 10. For those updates, you will still need to deploy by using the software updates workflow.

Converting from BIOS to UEFI without Wiping Harddisk (MBR2GPT.EXE)

UEFI Convergence has been a big issue, and required a “wipe and load” until Windows 10 1703 released MBR2GPT.EXE. This tool is used to Shift from MBR to GPT so you can go from BIOS to UEFI without having to reformat. Usually, MBR + BIOS, and GPT + UEFI go hand in hand. This is compulsory for some systems (eg Windows), while optional for others (eg Linux).

Windows 7 (BIOS) -> Windows 10 (UEFI)

Mentioned in the 1703 feature updates below, MBR2GPT.EXE converts a disk from the Master Boot Record (MBR) to the GUID Partition Table (GPT) partition style without modifying or deleting data on the disk. The tool is designed to be run from Windows PE or from the full Windows 10 OS by using the /allowFullOS option.

MBR2GPT.EXE is located in the Windows\System32 directory on a computer running Windows 10 version 1703 (Creators Update).

“Use this tool for in place upgrade.”

Example Use of MBR2GPT


X:\>mbr2gpt /convert /disk:0
MBR2GPT will now attempt to convert disk 0.If conversion is successful the disk can only be booted in GPT mode.

These changes cannot be undone!

*After the disk has been converted to GPT partition style, the firmware must be reconfigured to boot in UEFI mode.

MBR vs GPT

Compared with MBR disk, A GPT disk can support larger than 2 TB volumes where MBR cannot. A GPT disk can be basic or dynamic, just like an MBR disk can be basic or dynamic. GPT disks also support up to 128 partitions rather than the 4 primary partitions limited to MBR. Also, GPT keeps a backup of the partition table at the end of the disk. Furthermore, GPT disk provides greater reliability due to replication and cyclical redundancy check (CRC) protection of the partition table. GPT disk partitioning style supports volumes up to 18 exabytes in size and up to 128 partitions per disk

BIOS vs. UEFI

UEFI enables better use of bigger hard drives. Though UEFI supports the traditional master boot record (MBR) method of hard drive partitioning, it doesn’t stop there. It’s also capable of working with the GUID Partition Table (GPT), which is free of the limitations the MBR places on the number and size of partitions. GPT ups the maximum partition size from 2.19TB to 9.4 zettabytes.

UEFI may be faster than the BIOS. Various tweaks and optimizations in the UEFI may help your system boot more quickly it could before. For example: With UEFI you may not have to endure messages asking you to set up hardware functions (such as a RAID controller) unless your immediate input is required; and UEFI can choose to initialize only certain components. The degree to which a boot is sped up will depend on your system configuration and hardware, so you may see a significant or a minor speed increase.

Windows 10 Feature Updates – What’s New

This section is meant to provide a broad overview of the changes in the latest Windows 10 Feature Updates.

Windows 10 1709

Below is a list of some of the new changes in Windows 10 1709, also known as the Fall Creators Update. 1709 also contains the features from version 1703.

Deployment

  • Windows AutoPilot – a zero touch deployment for Windows 10 devise, is now configurable with Configuration Policies.
  • Windows 10 Subscription Activation – lets you deploy Win 10 Enterprise without the need for keys or reboots.
  • Windows Automatic Redeployment – similar to Steady State (oh I how I loved and miss Windows Steady State) or DeepFreeze, which allows you to wipe the OS back to a known state you set.

Mobile Device Management (MDM)

  • MDM in Intune has been expanded to include domain joined devices with Azure Active Directory. Group Policy can be used with AD joined devices to trigger auto-enrollment to MDM.

Application Management

  • Windows Mixed Reality Introduction – VR headsets such as Samsung HMD Odyssey now integrate into Windows 10

Windows 10 1703

Below is a list of some of the new changes in Windows 10 1709, also known as Creators Update.

Configuration

  • Windows Configuration Designer – Let’s you provision devices such as needed for bulk enrollment in InTune
  • Windows Spotlight – New MDM / Group policy settings made available to turn it off

Deployment

  • MBR2GPT.EXE – Used to Shift from MBR to GPT so you can go from BIOS to UEFI without having to reformat. Usually, MBR + BIOS, and GPT + UEFI go hand in hand. This is compulsory for some systems (eg Windows), while optional for others (eg Linux). Windows 7 (BIOS) -> Windows 10 (UEFI). Because this is such an important feature, I cover it more above.

Overview

This article is meant to provide you an overview of common troubleshooting tasks centered around client health and upcoming SCCM components. I created several custom tools and scripts to aid in the detection and remediation of several SCCM related troubleshooting tasks. Snippets of those scripts are provided throughout. A Microsoft PFE assisted me in understanding this information and it was used to help a large company improve client health and software update compliance.


Log Files

Log File Locations

  • Client

    • %WINDIR%\System32\CCM\Logs
    • %WINDIR%\SysWOW64\CCM\Logs
    • %WINDIR%\CCM\Logs
  • Server

    • <INSTALL_PATH>\Logs

Looking up Log File Errors in CMTrace

CMTrace has the option to look up an error code. For example, you might come across the message: Unable to find or read WUA Managed Server Policy 0x80004005. More information can be found in Tools -> Error Lookup.

Also, searching on the internet for a 0x80004005 error shows us you can rename registry.pol and run gpupdate /force as a potential solution.

Content Distribution

When you distribute content to one your distribution points, the Distribution Manager creates a content transfer job. Next, it notifies the Package Transfer Manager on the site server to transfer the content to the remote distribution points.

Package Transfer Manager logs this process in the pkgxfermgr.log file on the site server.

Content Distribution Troubleshooting (Using Log Files)

  1. smsdbmon.log (SITE SERVER)
    1. SMS_DATABASE_NOTIFICATION component updates the database
    2. Records database changes.
  2. distmgr.log (SITE SERVER)
    1. SMS_DISTRIBUTION_MANAGER component starts the process of adding package to DP
    2. Records details about package creation, compression, delta replication, and information updates.
  3. Monitoring Workspace (SCCM CONSOLE)
  4. PkgXferMgr.log (SITE SERVER)
    1. SMS_PACKAGE_TRANSFER_MANAGER Package Transfer Manager Log
    2. Records the actions of the SMS Executive component that is responsible for sending content from a primary site to a remote distribution point.
  5. smsdbprov.log (remote DP)
    1. Provides information about the SMS Provider

Content Distribution Troubleshooting (By Tracking Content)

Troubleshooting content distribution is important. The following SCCMContentLib folders are located in the Content Library folder on any given distribution point:

  1. P – PkgLib
  2. D – DataLib
  3. F – PkgLib

Tracing content through a distribution point starts by identifying its Package ID in the SCCM console at Monitoring > Overview > Distribution Status > Content Status

Then, using this Package ID, you can further discover the GUID within the associated INI file within PkgLib:

Now using the GUID, you can find the content information in DataLib:

Finally, using the last 4 characters of the hash value within this INI, you can find the differential content in the FileLib directory:

SCCM only stores differential content in order to save space. In other words, these files are the differences between this and a different content folder somewhere else in SCCM of similar files. This is used in order to save space on the distribution point.

The only two places the full content exists is at the source location and final cache on the client such as:

  • \\sccmserver\d$\SOURCE_FILES
  • c:\windows\ccmcache

Distribution points, as you saw in the P. D. F. example above only contain the differential content.

Application Deployment

Enable Enhanced Logging for Application Deployment

Enable enhanced logging to get more intricate details of your application deployment issues.

  1. Enable verbose logging on client: HKLM\Software\Microsoft\CCM\Logging\@GLOBAL

    1. LogLevel = 0
  2. Restart SMS Agent Host service
  3. Enable debug logging on client: HKLM\Software\Microsoft\CC\Logging, Create DebugLogging

    1. Create Enabled = True
  4. Restart SMS Agent Host Service

C:\E8296865\595C7EFE-D7D3-459D-BBE8-E1DF3EF2A18B_files\image001.png

Machine generated alternative text:
Logging 
v @GIobaI 
DebugLogging 
ADALOperationPro 
AlternateHandIer 
AppDiscovery 
AppEnforce 
ApplntentEvaI 
Name 
(Default) 
ab LogDirectory 
LogEnabIed 
LogLeveI 
LogMaxHistory 
LogMaxSize 
Type 
REG SZ 
REG SZ 
REG DWORD 
REG DWORD 
REG DWORD 
REG DWORD 
(value not set) 
CAWINDOWSXCCMXLogs 
DxDDDDDD01 (1) 
DxDDDDDDDO (0) 
DxDDDDDD01 (1) 
DxDD03dD90 (2SDDDO)


Troubleshooting Empty CCMCache Folders

In some cases the cache subfolder within C:\Windows\ccmcache for the content will be empty.

  1. Open CMTrace on the client you wish to troubleshoot and browse to C:\Windows\CCM\Logs
  2. Merge the three files below. File -> Open -> Merge Selected Files

    1. L – LocationService.log
    2. C – ContentTransferManager.log
    3. D – DataTransferService.log
  3. Find call backs. Find -> Find What: “calling back”

Calling back with an “empty distribution point list” means there are no DPs for the boundary group (likely no boundary group). Also look at the “Locality=” below the calling back line. This will tell you where the boundary group is. Also look at ContentTransferManager component. This will tell you what DP was actually used.

Troubleshooting Application Deployments

Get Deployment ID of The Application You’re Trying to Troubleshoot

  1. Go to Applications and add column ‘CI Unique ID’ (CONSOLE)
  2. Write down the ‘CI Unique ID’ of problem application.
  3. Write down the ‘Deployment ID’ of problem deployment by either

    1. SQL Studio: Select * from dbo.v_CIAssignment where AssignmentName like ‘%Acrobat%’ <– Assignment_UniqueID
    2. Console: Application -> Deployments -> Show Deployed ID Column

Use That Deployment ID To Track Down Issue

  1. PolicyAgent.log <– Initializing download of policy <Deployment ID> (CLIENT)
  2. Find ‘DTS Job ID’ from log and write it down
  3. DataTransferService.log <- DTSJob <DTS Job ID> created to download… (CLIENT)
  4. PolicyAgent.log <– Applying Policy <Deployment ID> (CLIENT)

Software Updates and Troubleshooting

The software update deployment phase is the process of deploying Microsoft software updates to your workstations and servers. Within SCCM, the updates are typically added to a software update group, the software updates are downloaded to distribution points, and the update group is deployed to clients.

When you deploy software updates, you add the updates to a SUG and then deploy the SUG to your clients. When you create the deployment, the update policy is sent to client computers, and the update content files are downloaded from a DP to the local cache on the client computer. The updates are then available for installation. After the deployment and the deployment policy have been created on the server, clients receive the policy on the next policy evaluation cycle.

Software Update Log Files

Log name

Description

Computer with log file

objreplmgr.log

Records details about the replication of software updates notification files from a parent to child sites.

Site server

PatchDownloader.log

Records details about the process of downloading software updates from the update source to the download destination on the site server.

The computer hosting the Configuration Manager console from which downloads are initiated

ruleengine.log

Records details about automatic deployment rules for the identification, content download, and software update group and deployment creation.

Site server

SUPSetup.log

Records details about the software update point installation. When the software update point installation completes, Installation was successful is written to this log file.

Site system server

WCM.log

Records details about the software update point configuration and connections to the Windows Server Update Services (WSUS) server for subscribed update categories, classifications, and languages.

Site server that connects to the WSUS server

WSUSCtrl.log

Records details about the configuration, database connectivity and health of the WSUS server for the site.

Site system server

wsyncmgr.log

Records details about the software updates synchronization process.

Site system server

WindowsUpdate.log

Records details about when the Windows Update Agent connects to the WSUS server and retrieves the software updates for compliance assessment and whether there are updates to the agent components.

Client

Getting Your Console Ready for Software Update Troubleshooting

Before you can track a deployment, you must first find the Deployment Unique ID of the deployment by adding the Deployment Unique ID column in the console.

Making the Console More Useful

Within the SCCM console, adding the following columns under Software Updates can help when diagnosing issue in the log files and on the client side:

  • Bulletin
  • Article ID
  • Unique Update ID

Troubleshooting Software Updates Using Reports

Windows Update Related Reports

The following reports are available from your SCCM reports server and will allow you to further diagnose server related update issues:

Compliance Reports

Report Name

Description

Compliance 1 – Overall Compliance

Displays the overall compliance data for a software update group.

Compliance 7 – Computers in a specific compliance state for an update group

Displays all computers in a collection that have a specified overall compliance state against a software update group.

Deployment Management Reports

Report Name

Description

Management 2 – Updates required but not deployed

This report returns all software updates that have been detected as required on clients but that have not been deployed to a specific collection. To limit the amount of information returned, you can specify the software update class. Please see my article
Automating Required But Not Deployed Updates to automate this task.

Management 7 – Updates in a deployment missing content

This report returns the software updates in a specified deployment that do not have all of the associated content retrieved, preventing clients from installing the update and achieving 100% compliance for the deployment.

Deployment State Reports

Report Name

Description

States 1 – Enforcement states for a deployment

This report returns the enforcement states for a specific software update deployment, which is typically the second phase of a deployment assessment. For the overall progress of software update installation, use this report in conjunction with “States 2 – Evaluation states for a deployment”.

States 2 – Evaluation states for a deployment

This report returns the evaluation state for a specific software update deployment, which is typically the first phase of a deployment assessment. For the overall progress of software update installation, use this report in conjunction with “States 1 – Enforcement states for a deployment”.

States 5 – States for an update in a deployment (secondary)

This report returns a summary of states for a specific software update targeted by a specific deployment. For best results, start with ‘Management 3 – Updates in a deployment’ to return the software updates contained in a specific deployment, and then drill into this report to return the state for the selected software update.

Scan Report

Report Name

Description

Scan 1 – Last scan states by collection

This report returns the count of computers for a specific collection in each compliance scan state returned by clients during the last compliance scan.

Troubleshooting Report

Report Name

Description

Troubleshooting 2 – Deployment errors

This report returns the deployment errors at the site and a count of computers that are experiencing each error.

How To Track a Windows Update Error (Using Log Files)

If you receive errors in your console in the status area, there are several areas we can look at.

Once you have found an error in the SCCM console, we can continue to troubleshoot by looking at the log files on the affected client.

  1. Open CMTrace on the client you wish to troubleshoot and browse to C:\Windows\CCM\Logs
  2. Merge the three files below. File -> Open -> Merge Selected Files

    1. W – WUAHandler.log
    2. U – UpdateStore.log
    3. S – ScanAgent.log
  3. Filter for missing updates. Tools -> Filter -> Filter when the entry test contains “missing”

If the log file displays “missing” but Add\Remove Programs (appwiz.cpl) shows that the update is installed, you can assume scanning is not working properly.

Further, when looking through the WUHandler column in CMTrace, you can track a deployment as follows:


Windows Update Shows “In Progress”, But You Know Its Installed: State Message Communication

If the UpdateStore.log on the client shows that a particular windows update component is installed, but it is still in progress in the SCCM console, the State Message is likely not communicating properly to the SQL Server.

State messaging is a mechanism in SCCM which replicates point in time conditions on the client.

Fix-DGMSCCMStateMessage Tool

I created the tool Fix-DGMSCCMStateMessage.ps1 which will automatically update the State Message locally on the SCCM client by invoking the following two commands:


$SCCMUpdatesStore = New-Object -ComObject Microsoft.CCM.UpdatesStore
$SCCMUpdatesStore.RefreshServerComplianceState()

The tool requires the –csvfile argument, which is the path to a csv file containing one column, Hostname, with the hostnames listed in the column.

For more information on the latest changes and updates to this tool please see SCCM Script: Fix State Messages

Fixing Windows UpdateStore Corruption (Datastore.edb)

The Windows UpdateStore Datastore.edb in Windows\Software Distribution\.. contains scan results. This may become corrupted.

Fix-DGMSCCMUpdateStore Tool

I created the tool Fix-DGMSCCMUpdateStore.ps1 which will automatically attempt to fix the Windows Update Store on an array of clients imported via a CSV. It accomplishes this by performing the following steps:

  • Stop the Windows Update Service
  • Move SoftwareDistribution to a backup location
  • Start Windows Update Service
  • Recreate SoftwareDistribution

For the latest updates on this tool, please see SCCM Script: Fix Software Update Store

Software Update Points: Troubleshooting Creation

Creating a Software Update Point

  1. Install WSUS 3.0 SP2 (WSUS SERVER)
  2. Administration -> Site Config -> Servers and System Roles -> Create Site -> Update Point (CONSOLE)

Troubleshooting a Software Update Point Creation

  1. sitecomp.log (SITE SERVER)
    1. “SMS_WSUS_CONTROL_MANAGER has been flagged for installation”
    2. Records details about the maintenance of the installed site components on all site system servers in the site.
  2. SUPsetup.log (WSUS SERVER)
    1. Records details about the software update point installation. When the software update point installation completes, Installation was successful is written to this log file.

Errors?

  • The port settings configured for the active SUP must be the same as the port settings configured for the WSUS website in Internet Information Services (IIS) (that is, port 8530).
  • The computer and local Administrator accounts must be able to access virtual directories under the WSUS website in IIS from the site server.

Software Update Points: Troubleshooting Configuration

You have three options when configuring a software update point:

  • Sync from Microsoft Update
  • Sync Upstream data source location (URL)
  • Don’t do either

Troubleshooting Configuration of Software Update Point

  1. WsyncMgr.log (SITE SERVER)
    1. any issues with synchronizing “WSUS server not configured”
    2. Records details about the software updates synchronization process.
  2. WCM.log (SITE SERVER)
    1. Issues with ports or connectivity “Attempting connection to WSUS Server: <SiteServerName, port: <portnumber>, useSSL:<True or False>.” (SERVER)
    2. Records details about the software update point configuration and connections to the Windows Server Update Services (WSUS) server for subscribed update categories, classifications, and languages.
  3. WSUSCtrl.log (SITE SERVER)
    1. configuration or database connectivity issues (SERVER)
    2. Records details about the configuration, database connectivity, and health of the WSUS server for the site.

A Software Update Point Common Problem

  • Both IIS Configuration for WSUS and SUP properties are both using port 8530. However, IIS Config for WSUS is really using port 80.
  • Best thing to do is just wait for the next retry to see if it pulls in the new port.

Software Update Points: Other Issues

Software Update Point Switching/Failover

  • Multiple SUPs? List is given to clients. They choose one at random.
  • Fails? Tries 4 times, 30 mins a part. After 4th attempt, waits 2 minutes and tries next SUP on list.
  • Only certain error codes will trigger SUP to failover.

Verifying Software Update Point in Client Registry

On the client, the Software Update Point can be verified in the following registry location:

HKEY_LOCAL_MACHINE\Software\Policies\Microsoft\Windows\WindowsUpdate

Pull Distribution Points

Create a Pull Distribution Point

  1. Administration -> Site Config -> Servers and System Roles -> Create Site -> DP (CONSOLE)
  2. Configure Pull and Source for Pull (CONSOLE)

Troubleshooting Pull Distribution Point

  1. hman.log (SITE SERVER)
    1. “Inserted DP”
    2. Records information about site configuration changes, and the publishing of site information in Active Directory Domain Services.
  2. distmgr.log (SITE SERVER)
    1. “Windows Installer installed the product. ConfigMgr Distribution Point”
    2. Records details about package creation, compression, delta replication, and information updates.
  3. Verify “c:\SMS_DP$” is created (PULL DISTRIBUTION POINT)
  4. pulldp_install.log (PULL DISTRIBUTION POINT)
    1. c:\SMS_DP$\SMS\BIN\ “Windows Installer installed the product. ConfigMgr Distribution Point”
    2. How to confirm whether the Package or application is replicated to PULL DP

What To Do If DISTMGR.LOG Has WMI Error

  1. Check Windows Firewall on the pull distribution point server to see if the connection to the remote WMI provider is being blocked.
  2. Check to see if an anti-virus program might be blocking the communication.
  3. Verify that the site server’s computer account (for example, PrimaryServer$ if PrimaryServer is the name of the server) is part of the local Administrator group on the pull distribution point server.


Rotating Management Point

Think of this scenario:

  • 2 Management Points. One with HTTPS with PKI and client has PKI, this one chosen first.
  • If both HTTP, clients prefer MP from their forest.

Scenario: Assume Forests A, B and C. Clients are in C. B has open firewall, A does not. If both B and A are HTTP, who knows if Clients will try to connect to B or A, when they should really only be connecting to A.

Solution: Install MP in C or HTTPS PKI n B.

Client Troubleshooting

Troubleshooting Configuration Manager Client Issues is an important step to understanding why you have certain deployment issues and understanding the overall client health in SCCM.

Understanding Client Health

A client heath task on each client will perform checks to make sure that key areas such as prerequisites, dependent services and WMI are all functioning, and if needed remediate those issues. The Configuration Manager Health Evaluation runs as a schedule task and launches an executable called CCMEval.EXE which will perform checks and remediation listed in the CCMEval.XML file. This scheduled task is called “Configuration Manager Health Evaluation” when vieyoud in Task Scheduler.

The results of the CCMEval task can be vieyoud in the Monitoring > Client Status > Client Check area of the console:

Client Health Reports

Your reports server has several client health reports available. Searching for “Client Health” yields plenty of useful results, including a new Dashboard – Client Health Statistics report that can imported through a special Microsoft PFE engagement (details on this below).

Baseline Collections

In order to create a good baseline for your other collections to limit against, the following best practice queries are recommended to create the baseline collections:

Exclude Inactive Clients


select SMS_R_SYSTEM.ResyourceID,SMS_R_SYSTEM.ResyourceType,SMS_R_SYSTEM.Name,SMS_R_SYSTEM.SMSUniqueIdentifier,SMS_R_SYSTEM.ResyourceDomainORWorkgroup,SMS_R_SYSTEM.Client 
from SMS_R_System inner join SMS_G_System_CH_ClientSummary on SMS_G_System_CH_ClientSummary.ResyourceId = SMS_R_System.ResyourceId 
where SMS_G_System_CH_ClientSummary.ClientActiveStatus = 0

Exclude Heartbeat Discovery That is Greater Date > 14 Days

select SMS_R_SYSTEM.ResyourceID,SMS_R_SYSTEM.ResyourceType,SMS_R_SYSTEM.Name,SMS_R_SYSTEM.SMSUniqueIdentifier,SMS_R_SYSTEM.ResyourceDomainORWorkgroup,SMS_R_SYSTEM.Client 
from SMS_R_System 
where SMS_R_System.ResyourceId in (select ResyourceID from SMS_R_System where (SMS_R_SYSTEM.AgentTime <= DateAdd(dd,-14,getdate())) and AgentName = 'Heartbeat Discovery') and SMS_R_System.ResyourceId NOT in (select ResyourceID from SMS_R_System where (SMS_R_SYSTEM.AgentTime > DateAdd(dd,-14,getdate())) and AgentName = 'Heartbeat Discovery') and SMS_R_System.ResyourceId in (select ResyourceId from SMS_G_System_CH_ClientSummary Where ClientActiveStatus = 1)

Exclude HW Missing

select SMS_R_SYSTEM.ResyourceID,SMS_R_SYSTEM.ResyourceType,SMS_R_SYSTEM.Name,SMS_R_SYSTEM.SMSUniqueIdentifier,SMS_R_SYSTEM.ResyourceDomainORWorkgroup,SMS_R_SYSTEM.Client 
from SMS_R_System inner join SMS_G_System_COMPUTER_SYSTEM on SMS_G_System_COMPUTER_SYSTEM.ResyourceID = SMS_R_System.ResyourceId 
where SMS_G_System_COMPUTER_SYSTEM.Model is null and SMS_R_System.ResyourceId in (select ResyourceId from SMS_G_System_CH_ClientSummary Where ClientActiveStatus = 1)

Exclude HW Inventory Greater Than 30 Days

select SMS_R_SYSTEM.ResyourceID,SMS_R_SYSTEM.ResyourceType,SMS_R_SYSTEM.Name,SMS_R_SYSTEM.SMSUniqueIdentifier,SMS_R_SYSTEM.ResyourceDomainORWorkgroup,SMS_R_SYSTEM.Client 
from SMS_R_System where SMS_R_System.ResyourceId not in (select SMS_R_System.ResyourceId from SMS_R_System inner join SMS_G_System_WORKSTATION_STATUS on SMS_G_System_WORKSTATION_STATUS.ResyourceId = SMS_R_System.ResyourceId 
where SMS_G_System_WORKSTATION_STATUS.LastHardwareScan >= DateAdd(dd, -30, getdate())) and SMS_R_System.ResyourceId in (select ResyourceId from SMS_G_System_CH_ClientSummary Where ClientActiveStatus = 1)

Exclude SW Inventory Greater Than 30 Days

select SMS_R_SYSTEM.ResyourceID,SMS_R_SYSTEM.ResyourceType,SMS_R_SYSTEM.Name,SMS_R_SYSTEM.SMSUniqueIdentifier,SMS_R_SYSTEM.ResyourceDomainORWorkgroup,SMS_R_SYSTEM.Client 
from SMS_R_System 
where SMS_R_System.ResyourceId not in (select ResyourceID from SMS_R_System inner join SMS_G_System_LastSoftwareScan on SMS_G_System_LastSoftwareScan.ResyourceID = SMS_R_System.ResyourceId where SMS_G_System_LastSoftwareScan.LastScanDate >= DateAdd(dd,-30,getdate())) and SMS_R_System.ResyourceId in (select ResyourceId from SMS_G_System_CH_ClientSummary Where ClientActiveStatus = 1)

These queries can be used to create new baseline collections and exclusions for those collections

Advanced Troubleshooting: SCCM ToolKit

Use the SCCM toolkit for advanced troubleshooting tools. It contains fifteen downloadable tools to help you manage Configuration Manager.

Installer: ConfigMgrTools.msi (download the latest via Bing)

Client Based Tools

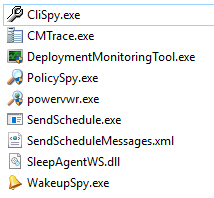
  • Client Spy – A tool that helps you troubleshoot issues related to software distribution, inventory, and software metering on System Center 2012 Configuration Manager clients.
  • Configuration Manager Trace Log Viewer – A tool used to view log files created by Configuration Manager components and agents.
  • Deployment Monitoring Tool – The Deployment Monitoring Tool is a graphical user interface designed help troubleshoot Applications, Updates, and Baseline deployments on System Center 2012 Configuration Manager clients.
  • Policy Spy – A policy viewer that helps you review and troubleshoot the policy system on System Center 2012 Configuration Manager clients.
  • Power Viewer Tool – A tool to view the status of power management feature on System Center 2012 Configuration Manager clients.
  • Send Schedule Tool – A tool used to trigger a schedule on a client or trigger the evaluation of a specified DCM Baseline. You can trigger a schedule either locally or remotely.
  • Wakeup Spy – A tool that provides a view of the power state of Configuration Manager client computers and which operate as managers or manages.
Machine generated alternative text:
CliSpy.exe 
CMTrace.exe 
DeploymentMonitoringTooI.exe 
PolicySpy.exe 
power"vr.exe 
SendScheduIe.exe 
SendScheduIeMessages.xmI 
SleepAgentWS.dII 
WakeupSpy.exe

Server Based Tools

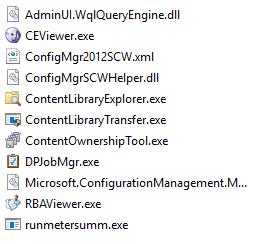
  • DP Job Manager – A tool that helps troubleshoot and manage ongoing content distribution jobs to Configuration Manager distribution points.
  • Collection Evaluation Viewer – A tool that assists in troubleshooting collection evaluation related issues by viewing collection evaluation details.
  • Content Library Explorer – A tool that assists in troubleshooting issues with and viewing the contents of the content library.
  • Security Configuration Wizard Template for Microsoft System Center 2012 R2 Configuration Manager – The Security Configuration Wizard (SCW) is an attack-surface reduction tool for the Microsoft Windows Server 2008 R2 operating system. Security Configuration Wizard determines the minimum functionality required for a server’s role or roles, and disables functionality that is not required.
  • Content Library Transfer – A tool that transfers content from one disk drive to another.
  • Content Ownership Tool – A tool that changes ownership of orphaned packages (packages without an owner site server).
  • Role-based Administration Modeling and Auditing Tool – This tool helps administrators to model and audit RBA configurations.
  • Run Metering Summarization Tool – The purpose of this tool is to run the metering summarization task to analyze raw metering data
Machine generated alternative text:
AdminU WqIQueryEngine.dII 
CEViewer.exe 
ConfigMgr2012SCWxml 
ConfigMgrSCWHeIper .dll 
ContentLibraryExpIorer.exe 
ContentLibraryTransfer.exe 
ContentOwnershipTooI.exe 
DPJobMgr.exe 
Microsoft.ConfigurationManagement.M... 
RBAViewer.exe 
runmetersumm.exe

Infrastructure Health (SQL and Site Server)

The SCCM infrastructure health is vital to the overall system responsiveness and functionality for your installation.

Bandwidth Throttling

Within the SCCM console, bandwidth throttling is available to the Distribution Points at Administration > Overview > Distribution Points -> Properties -> Rate Limits.

Limited to a specific maximum: This method allows you to limit bandwidth to a configured percentage by hyour as a time slice.

Pulse mode throttling is also available, which divides the data into data blocks, transmitted at a time interval. In your example above, 20KB would transmit every second, or 20KBps.

SQL Memory Allocation

Your SCCM SQL instance is handled by your SQL Server or SQL Failover CNO.

If you have a virtual SQL server, you can use the Virtual Machine Manager Console to first increase the minimum and maximum memory available to the two SQL servers:

Opening SQL Management Studio allows you to then adjust the maximum memory used by the SQL service

Site Server Memory Allocation

Using the Virtual Machine Manager Console you can verify your SCCM site server has adequate memory allocation:

TempDB Memory Allocation

Opening SQL Management Studio now allows you to verify and adjust the initial size and autogrowth settings on the Tempdb database.

Console Latency

Rebuilding Indexes can help maintain the SCCM SQL database efficiency. To turn on database indexing, go to

Administration > Site Configuration > Sites

To help with console latency, the rebuild index task can enabled with a Sunday 12:00AM to 5:00AM schedule.

Data Discovery Record (DDR) Workflow

When SCCM Discovery runs, it creates discovery data records (DDRs). The information contained in a DDR varies depending upon the discovered resyource. For example, it can include the NetBIOS name of a computer, the IP address and IP subnet of a computer or device, and the computer operating system name.

DDRs are sent to the site server inbox located as a .DDR file:

  • \\siteserver\C$\Program Files\Microsoft System Center Configuration Manager\inboxes\auth\ddm.box

Once processed, the .DDR file is erased. If many .DDR records are visible, that likely means Active Directory discovery in SCCM is set to too short of an interval.

Additional values in DDR files appear within the SCCM console in the client properties of an asset. Although it is not officially supported, one can create their own DDRs to be processed by the site server by

  1. Creating a new instance of the SMSResGen class.
  2. Creating a new DDR by using the NewDDR method.
  3. Adding properties to the DDR by using the ADDPROP_ methods.
  4. Writing the new DDR to a file by using the DDRWrite method.

The site server can process multiple DDRs for the same asset, as is the case in a custom PFE engagement that was mentioned during your engagement.

This tutorial provides an overview of Active Directory (AD), which is a collection of services used to manage identity and access for and to resources on a network. The tutorial describes various AD services, such as Domain Services, Lightweight Directory Services, Certificate Services, Federation Services, Rights Management Services, and Flexible Single-Master Operations (FSMO) Roles, including their functions, requirements, and usage. The tutorial also covers the Kerberos authentication method used in AD and provides tips and tools for diagnosing and troubleshooting common AD issues. The author created this tutorial to help others gain a better understanding of AD and to prepare for diagnosing AD issues in preparation for a Microsoft interview.

Active Directory Overview

I created this guide to assist in the general understanding of Active Directory and to give some examples of diagnosis procedures. Active directory is a collection of services (Server Roles and Features) that are used to manage identity and access for and to resources on a network. Initially, Active Directory was only in charge of centralized domain management. Starting with Windows Server 2008, however, Active Directory became an umbrella title for a broad range of directory-based identity-related services.

Active Directory Services

Domain Services

Active Directory Domain Services (AD DS) is central of every Windows domain network. It stores data about users and computers on the domain, verifies their credentials and defines their access rights. The server (or the cluster of servers) running AD DS is called a domain controller. A domain controller is contacted when a user logs into a computer or accesses another computer across the network.

*Other AD services, as well as many Microsoft server technologies rely on or use Domain Services; examples: Group Policy, Encrypting File System, BitLocker, Domain Name Services, Remote Desktop Services, Exchange Server and SharePoint Server.

Lightweight Directory Services

Active Directory Lightweight Directory Services (AD LDS) is a light-weight implementation of AD DS. AD LDS runs as a service on Windows Server. AD LDS shares the code base with AD DS and provides the same functionality, including an identical API, but does not require the creation of domains or domain controllers.

Certificate Services

Active Directory Certificate Services (AD CS) establishes an on-premises public key infrastructure (PKI). It can create, validate and revoke public key certificates for uses of an organization. These certificates can be used to encrypt files (when used with Encrypting File System), emails, and network traffic (VPNs, IPSec, etc.).

*AD CS requires an AD DS infrastructure

Federation Services

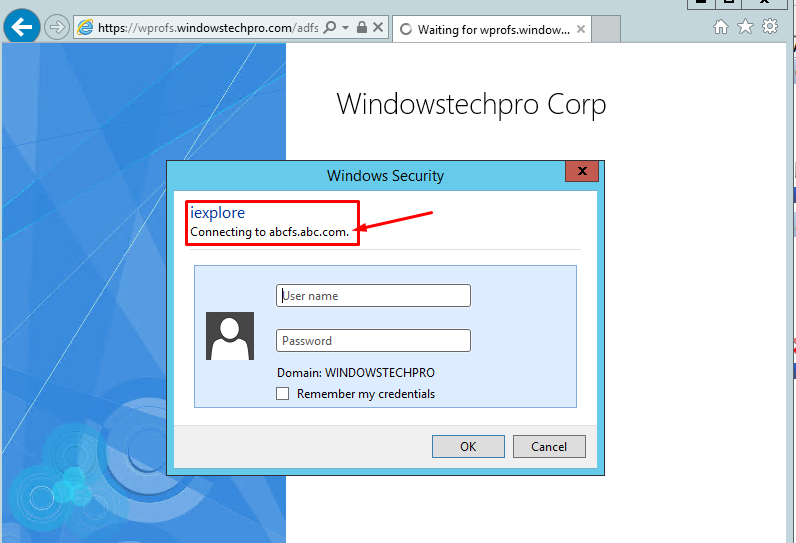
Active Directory Federation Services (AD FS) is a single sign-on service. With an AD FS infrastructure in place, users may use several web-based services (e.g. internet forum, blog, online shopping, webmail) or network resources using only one set of credentials stored at a central location, as opposed to having to be granted a dedicated set of credentials for each service. AD FS’s purpose is an extension of that of AD DS: The latter enables users to authenticate with and use the devices that are part of the same network, using one set of credentials. The former enables them to use the same set of credentials in a different network.

Image result for ADFS website

*AD FS requires an AD DS infrastructure, although its federation partner may not.

Rights Management Services

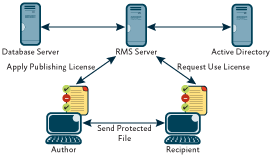
Active Directory Rights Management Services (AD RMS, known as Rights Management Services or RMS before Windows Server 2008) is used for information rights management. It uses encryption and a form of selective functionality denial for limiting access to documents such as e-mails, Word documents, and websites, and the operations authorized users can perform on them.

Image result for rights management services

Flexible Single-Master Operations (FMSO) Roles

These are also known as the Operation Master Roles.

  • Some operations can only be performed on one server (for instance, the DC)
  • However other roles can be split to an individual server to guarantee operations to it will be consistent.
  • It also eliminates replication conflicts.
  • Roles can be moved from DC to DC
  • Certain AD functions require these roles and will fail if the role/server is down.
  • Roles are Forest Wide or Domain Wide

Forest-Wide Roles

Schema Master (One per forest)

  • Defines the design of AD database
  • Some software, such as Exchange, will expand the Schema
  • Once the schema is expanded, you can’t go back.
  • Not available? You can’t expand the schema
  • This role is not used very often, so Microsoft recommends keeping with Domain Naming Master role on same server, tucked away.

Domain Naming Master (One per forest)

  • Used when adding/removing domains from the forest
  • Ensures two domains are not added with the same name.
  • Not available? You can’t add/remove any domains within then forest.
  • This role is not used very often, so Microsoft recommends keeping with Schema Master role on same server, tucked away.

Forest DNS Zone Master role (one per forest)

  • Responsible for coordinating the adding or deleting of the forest-wide records on the DNS servers that host the top-level DNS zone.
  • These records contain the names of the Global Catalog (GC) servers.

Domain-Wide Roles

PDC (Primary Domain Controller) Emulator (One per domain)

  • Originally in place to make bridge between Win2000 DC and NT4 DC
  • Generally, not used if you don’t use any NT domain controllers, but still provides:
    • Keeps time accurate in the domain (other DCs will sync time with PDC)
    • Finally authority on passwords – password changes are sent to PDC with urgent replication (it has the most up to date password changes so a DC can contact PDC if password given is wrong to assure its really wrong)
    • DFS changes are made on PDC emulator
    • Group policy editing defaults to the PDC

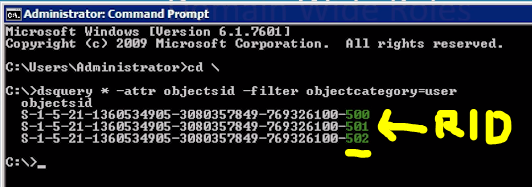
RID (Relative Identifier) Master (One per domain)

  • Allocates RID Pools
  • RID’s appended to end of SID’s (Security Identifier)
  • Not available? OK for a little while as DC asks for them before they run out. But, if down for too long, no new AD objects can be created.

Infrastructure Master (One per domain)

  • Keeps object references consistent across domains in the forest
  • Updates multi domain references
  • With a multi domain forest
    • Make sure all DC’s in forest are Global Catalog servers

Domain DNS Zone Master role (one per domain)

  • Responsible for coordinating the adding or deleting of any AD-integrated DNS zones on the DCs with DNS servers that host the domain.

Global Catalog (GC) Server

Each domain has its own copy of the AD database. This is stored in the NTDS.DIT (THE Active Directory database file) and changes are replicated to each DC in the domain. This is fine if you want to access resources in the same part of the domain, however is a problem if you want to access resources in a different part of the forest.

In a multi-domain forest, if you want to access a resource, and don’t know where it is, this can be a problem. Therefor a Global Catalog server acts as an index for the entire forest. The GC only contains a subset of each objects attributes (just enough to be searchable). This allows users in a domain to run queries against the GC to find any objects in the forest.

GC Facts

  • Any Domain Controller can be a GC
  • Must have one per domain (should have more than one for redundancy)

Turn on/off GC

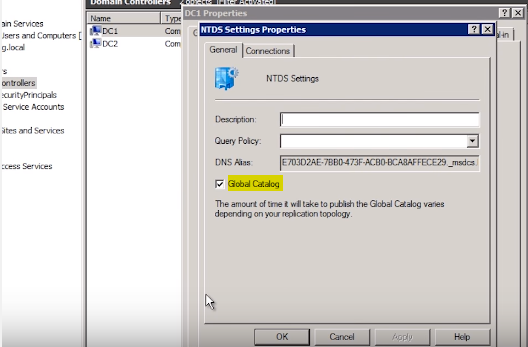
Turn on/off the Global Catalog in the NTDS (NT Directory Services) settings within Active Directory Users and Computers -> Domain Controllers.

Reasons to Deploy a GC

  1. Can only see what users are in a Universal Group (used to assign permissions to related resources in multiple domains) with a GC
  2. GCs are required when logging in with a Universal Principal Name (UPN) – username@domain
  3. Used to locate directory information regardless of where user is in the forest
  4. Need to be at sites connected by a WAN link (perhaps DC is blocked by firewall)
  5. Software, such as Exchange, requires a GC

Kerberos in AD

Kerberos is the native authentication method in Active Directory, so it’s used by Windows Networks everywhere.

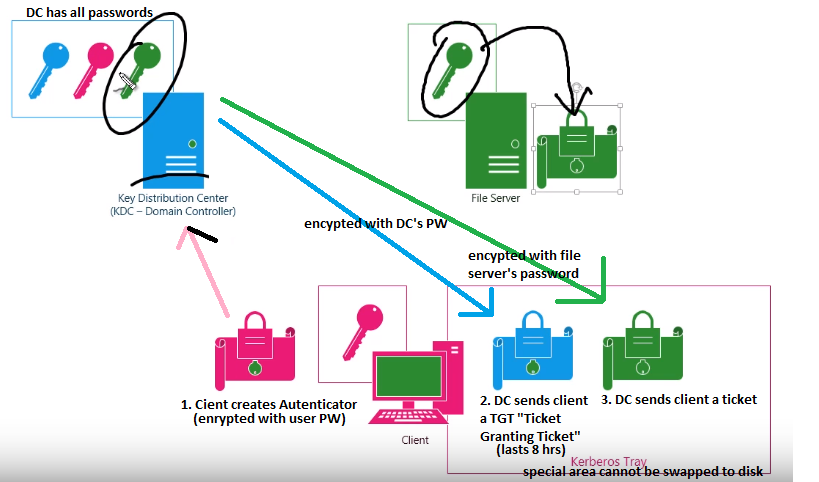
  1. A client creates an Authenticator that is encrypted with the users password and sends to the KDC
  2. The KDC checks if the password is correct, and if so, returns a Ticket Granting Ticket TGT encrypted with a key only KDC knows
  3. Client sends the Ticket Granting Ticket TGT back to the KDC with a request to access the file server.
  4. If KDC trusts its own password in the TGT, it knows it generated the TGT and sends client back a Ticket encrypted with the file server’s logon password
  5. Now, for the next 8 hours, the client sends a copy of the ticket to the file server and if it can decrypt the ticket, it knows the KDC generated it, so its legit.
  6. File server will use ticket (which also has clients username, etc) to decide what user can access.

Overview of Kerberos Process

How to View Kerberos Tray

Use klist.exe to view the Kerberos tray.


klist tickets

Use klist.exe to view the Kerberos sessions.


klist sessions

AD Troubleshooting Tools

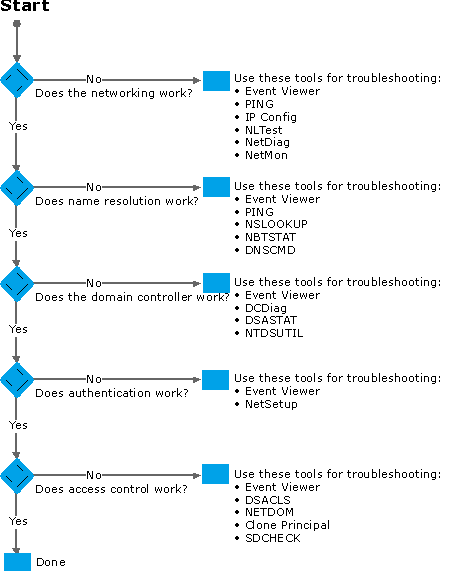
This flow-chart will provide an overview of steps you can utilize to diagnose Active Directory. Information from chart derived from Microsoft.

Use NLTest to show trust relationship


Ntlest /trusted_domains


Nltest /dclist:yourdomain

AD replication troubleshooting

When looking at Active Directory replication, you may notice an update or updates have not arrived/replication. This could be caused by DNS problems, networking problems, or security issues.

Get a List of the Replication Errors Encountered

To get a list of the replication errors, and export them to a CSV file, run the following command


 repadmin /showrepl * /csv > replication_errors.csv

Use this to resolve replication failures. Sort by latest and hide unneeded columns.

What’s New in SCCM

This guide is meant to summarize the latest features you can expect in the SCCM 1702, 1706 and 1710. Most of the information from these features was obtained by summarizing the information contained in Microsoft’s SCCM documentation. (What’s new in version 1710 of System Center Configuration Manager, What’s new in version 1706 of System Center Configuration Manager and What’s new in version 1702 of System Center Configuration Manager)

New Features in SCCM 1702


Operating System Deployment (OSD)

  • Expire stand-alone media (expire date)
  • Package ID displayed in Task Sequence Step
  • Try again when a task sequence fails
  • BIOS to UEFI (MBR2GPT /convert /disk:0 /AllowFullOS)

MDM (Intune Managed Devices)

  • Compliance settings for iOS to match Intune
  • deploy volume-purchased iOS apps
  • Don’t need to specify mobile OS version when creating new policies and profiles for Intune-managed devices
  • Android for Work support
  • New device compliance policy rule is available to help you block access to corporate resources that support conditional access.
  • Deploy Office 365 apps to clients: Use O365 Client Management dashboard

Software Updates

  • “Available for Install” and “Ready for Download” states added.
  • If more than one update applies to environment, only one is downloaded.
  • ‘EasySetupPayload’ folder on your site server is cleaned up automatically.
  • Software Update Point: Use boundary groups to find a new software update point, and can now fallback if theirs isn’t found.

Protect devices

  • Detect outdated antimalware client versions
  • Device health attestation service can now be managed
  • Windows 10 notification informs end users that they must take additional actions to complete Windows Hello for Business setup.

In Console Search

  • Object Path property added
  • search text is saved as you click different nodes

Misc.

  • Feedback button available (send feedback to Microsoft)
  • Data Warehouse service point added. Holds historical SCCM data.(up to 2TB)
  • Peer Cache: Won’t request from peer if low battery, CPU >80%, Disk I/O exceeds 10
  • Content library cleanup tool cleans up unneeded content from DPs
  • Windows Store for Business Apps: Can deploy apps from the Windows Store for Business to Windows 10
  • Software Deployment: Check for running executable files before install.

New Features in SCCM 1706


MDM (Intune Managed Devices)

  • New Configuration items (Windows 10 Devices)

    • Password (Device Encryption)
    • Device (System time modification)
    • Store (Auto-update apps from store)
    • Microsoft Edge (Default search engine)
  • New device compliance policy rules (Android, iOS)

    • Required password type
    • Block USB debugging on device.
    • Block apps from unknown sources
    • Require threat scan on apps
  • New MAM Policy Settings

    • Block screen capture (Android devices only)
  • Enrollment Restrictions

    • Set users cannot enroll personal Android or iOS devices

Operating System Deployment (OSD)

  • Hardware inventory collects Secure Boot information
  • Collapsible-view task sequence groups
  • Reload boot images with current Windows PE version

Software Updates

  • After failing to reach that SUP for 2 hours, the client then checks its pool of available software update points
  • Manage Microsoft Surface driver updates

Azure AD integration

  • Azure Services Wizard – This Wizard provides a common configuration experience that replaces the individual workflows to set up certain Azure services
  • Use Azure AD to authenticate clients on the Internet to access sites. Azure AD replaces the need to configure and use client authentication certificates. This requires the cloud management gateway site system role.
  • Install and manage the client on Internet PCs. This requires the use of the cloud management gateway site system role.
  • Configure Azure AD User Discovery.

Site Infrastructure / Misc

  • Run PowerShell scripts from the Configuration Manager console (released)
  • Client Peer Cache supports express installation files for Win10 and O365
  • Data Warehouse is no longer a pre-release feature
  • In-Console Updates: CMUpdateReset.exe will reset failed updates.

New Features in SCCM 1710


MDM (Intune Managed Devices)

  • Co-management for Windows 10 1709 (Fall Creators Update) devices
    • Use SCCM and Intune. Provides a bridge from traditional to modern management.
  • New MAM Policy Settings

    • Disable printing
    • Disable contact sync
  • Actions for non-compliance

    • Configure a time-ordered sequence of actions that are applied to devices that fall out of compliance. For example, notify users of non-compliant devices via e-mail, then mark non-compliant
  • Windows 10 ARM64 device support

Operating system deployment (OSD)

  • Add child task sequences to a task sequence

Protect devices

  • Create and deploy Exploit Guard policies

    • Only for Windows 10 1709 Fall Creators Update
    • New set of host intrusion prevention capabilities for Windows 10,
  • Create and deploy Windows Defender Application Guard policy

    • Only for Windows 10 1709 Fall Creators Update
    • If an employee goes to an untrusted site through either Microsoft Edge or Internet Explorer, Microsoft Edge opens the site in an isolated Hyper-V-enabled container, which is separate from the host operating system.

Site Infrastructure / Misc

  • Restart computers from the console
  • Run PowerShell scripts from the Configuration Manager console (updated features – was released in 1702)
    • Use Security Scopes to define who can run them
    • Real-time monitoring of the scripts
  • Software Center customization: Add enterprise branding elements, specify the visibility of tabs, add company name, set a color theme, set a company logo, and set the visible tabs for client devices

Overview

I created this application, Threaded Computer Details, to allow you to have a single point of data aggregation for common SCCM, DHCP and Active Directory metrics on the computers in your environment, and wrap those metrics around a convenient program with search options.

You can either search initially by computer name, or if User-Device Affinity is available in your environment, by user.

The application performs several initial network operations in a threaded hierarchy of ICMP -> RDP -> c$ -> SCCM queries -> AD Queries which provides efficiency when aggregating data on all of your machines.

Basic Use of Application

The application can be called directly, which will bring up a user interface for searching:


Get-DGMThreadedComputerDetails -ProviderMachineName SCCMSERVERNAME -Sitecode SITE -domaincontroller DOMAINCONTROLLER01

Or can be given input from the pipeline where it will not prompt for any interaction and would return the results as an array:

$mycomputerlist | Get-DGMThreadedComputerDetails -ProviderMachineName SCCMSERVERNAME -Sitecode SITE -domaincontroller DOMAINCONTROLLER01

It also supports switches for .CSV import and export via –csvimport and –csvexport, where both expect a path to a .CSV file.

As mentioned, the application returns the data as an array, which could easily be viewed in a GUI by piping the results to Out-Gridview as in this example:


$myservers | Get-DGMThreadedComputerDetails -ProviderMachineName SCCMSERVERNAME -Sitecode SITE -domaincontroller DOMAINCONTROLLER01 | Out-Gridview

Application Features

Given just a list of computer names, or a list of company user accounts, this program will attempt to find and return:

  • Name
  • Pingable Status
  • IP Address and IP Scope
  • AD Enabled/Disabled Status
  • RDP Enabled Status
  • Connect to c$ Status
  • VirtualCNO Status for Virtual Server Obects
  • SCCM Client Installation Status
  • Primary User Based On a Hierarchal Algorithm Including SCCM Pending User Device Affinity
  • User Source
  • User’s Company Title
  • User’s Company Department
  • User’s E-Mai
  • Other Users via User Device Affinity
  • Operating System
  • Manufacturer
  • Model
  • Serial Number
  • BIOS Version
  • Architecture (x86 / x64)
  • MAC Addresses
  • AD Description
  • DHCP Scope Location
  • AD Creation Date
  • AD Canonical Name
  • Last Time Online
  • Last Time Offline
  • Predetermined User

Getting Your Environment Ready for Threaded Computer Details 1.0

This application was written in PowerShell and needs to be run on a machine on your corporate network that has access to all the computers in your environment with ability to:

  • Ping (ICMP)
  • Check for RDP (3389)
  • Check for C$ share (if desired).

In addition, it needs access to read the DHCP scopes from your domain controller, and to do so needs the RSAT-DHCP tools installed:

Install-WindowsFeature -Name RSAT-DHCP 

In addition, it and also needs the SCCM Console installed on the computer it is run from, as it utilizes the SCCM modules to gather serial number, model, user-device affinity data, etc. To install the console, you could typically run something such as:

\\sccmserver\c$\Program Files\Microsoft System Center Configuration Manager\tools\ConsoleSetup\console.msi

Advanced Use of Application

If launched directly, the application provides you with several main search options:

[1] Search for single computer name:

Search for results on a single computer, such as MYPERSONALCOMPUTER01

[2] Search by wildcard computer name

Type a partial computer name and all computers matching those results will be returned, as in this example where we search for all computers with VDGMSC in the hostname:

[3] Search by description

Search via active directory description. Results will be returned for any computer containing the AD description query you specify.

[4] Search by Operating System

Partial matches work fine. For example, search for 2012 to return all of your Windows Sever 2012 computers. For this query, the OS is queried from Active Directory, not SCCM.

[5] Search by User Name (DOMAIN\USER)

If user-device affinity is enabled in your environment, you can search for what computers belong to what users.


[6] Import CSV (with PCs as ‘Name’ column)

Have a .CSV ready with a column header Name and underneath it with all of your computer names.

[7] Import CSV (with Users as ‘PredeterminedUser’ column)

Have a .CSV ready with a column header PredeterminedUser and underneath it with all of your user names in the format domain\user.

Use Case 1: Send Out an Automated E-Mail Report of All Important SCCM Non-Client Computers

Utilizing my HTML Email functions, here we import a list of non-compliant computers from SCCM and run them against the script. From there, we filter out computers than are non-enabled in AD, are not-pingable, etc. Then we break the list up by Server and Workstation and email it out.

Use Case Wrapper Function: Run-DGMSCCMNoClientReport.ps1


Import-Module "\\scriptserver\Scripts\Get-DGMThreadedComputerDetails\Get-DGMThreadedComputerDetails.psm1" -Force
Import-Module "\\scriptserver\scripts\New-DGMEmailReport\New-DGMEmailReport.psm1" -Force

function Run-DGMSCCMNoClientReport{
    param(
        [Parameter(Position=0,Mandatory=$true,ValueFromPipeline=$true)]
        [String]$ProviderMachineName,
        [Parameter(Position=1,Mandatory=$true,ValueFromPipeline=$true)]
        [ValidateLength(3,3)]
        [String]$Sitecode
    )

    #Create Some Arrays Of Data To Display in Report. You can create as many as you want.
    $OutputArrays = @()

    # Import the ConfigurationManager.psd1 module
    $module = "$($ENV:SMS_ADMIN_UI_PATH)\..\ConfigurationManager.psd1"
    if((Get-Module ConfigurationManager) -eq $null) {
        Write-Host Importing $module ...
        Import-Module $module -Force
    }

    # Connect to the site's drive if it is not already present
    if((Get-PSDrive -Name $SiteCode -PSProvider CMSite -ErrorAction SilentlyContinue) -eq $null) {
        $NewPSDrive = New-PSDrive -Name $SiteCode -PSProvider CMSite -Root $ProviderMachineName
    }

    # Set the current location to be the site code.
    Set-Location "$($SiteCode):\"

    $NonClients = Get-CMCollectionMember -CollectionName "All Non-Client Systems" | Select Name | Get-DGMThreadedComputerDetails -ProviderMachineName $ProviderMachineName -Sitecode $Sitecode -domaincontroller $domaincontroller
    $NonClientsWorkstations = $NonClients | Where-Object {$_."AD Enabled" -eq $true -and $_.Pingable -eq $true -and $_.VirtualCNO -ne $true -and $_."Operating System" -Clike "*Windows*" -and $_."Operating System" -cnotlike "*Server*"}
    $NonClientsServers = $NonClients | Where-Object {$_."AD Enabled" -eq $true -and $_.Pingable -eq $true -and $_.VirtualCNO -ne $true -and $_."Operating System" -Clike "*Windows*" -and $_."Operating System" -clike "*Server*"}

    #Array1
    $output = [PSCustomObject] @{
    'Message' = "These are all of the workstations that DO NOT HAVE THE SCCM CLIENT, however ARE PINGABLE and ENABLED IN AD. These workstations are not receiving Windows Updates or Software deployments from SCCM. 
    These workstations need to be investigated and potentially have the SCCM client installed manually. Source Location: \\scriptserver\c$\Program Files\Microsoft System Center Configuration  Manager\Client Installation Command: CCMSetup.exe /mp:SCCMSITESERVER /logon SMSSITECODE=AUTO";
    'Title' = "Non-Client Workstations";
    'Color' = "Red";
    'Array' = $NonClientsWorkstations | Select "Name","IP Address","RDP Enabled","Connect to c$","Operating System","Primary User","AD Description","DHCP Scope Location","AD Creation Date","Canonical Name" | Sort-Object -Property Name
    }
    if ($output.Array -ne $NULL){$OutputArrays+=$output}

    #Array2
    $output = [PSCustomObject] @{
    'Message' = "These are all of the SERVERS that DO NOT HAVE THE SCCM CLIENT, however ARE PINGABLE, ENABLED IN AD, and ARE NOT A VIRTUAL CNO. Please verify these servers are in the DMZ, etc..";
    'Title' = "Non-Client Servers";
    'Color' = "Red";
    'Array' = $NonClientsServers | Select "Name","IP Address","RDP Enabled","Connect to c$","Operating System","Primary User","AD Description","DHCP Scope Location","AD Creation Date","Canonical Name" | Sort-Object -Property Name
    }
    if ($output.Array -ne $NULL){$OutputArrays+=$output}

    #Multiple Arrays
    New-DGMEmailReport `
        -Arrays $OutputArrays `
        -ReportTitle "SCCM Non-Client Computers Report" `
        -from "SCCMDeployments@company.com" `
        -To "dmaiolo@company.com" `
        -subject "Report: SCCM Non-Clients That Are of Concern" `
        -AttatchResults 
}

Run-DGMSCCMNoClientReport -ProviderMachineName SCCMSITESERVER -Sitecode DGM

Use Case 2: Create a Comprehensive Computer Details Report of All Computers in Environment

Piping the SCCM “All Systems” collection as the input for the application, we can build a comprehensive details list of all equipment in the environment.

$ComprehensiveReport = Get-CMCollectionMember -CollectionName "All Systems" | Select Name | Get-DGMThreadedComputerDetails -ProviderMachineName $ProviderMachineName -Sitecode $Sitecode -domaincontroller $domaincontroller -csvoutput "C:\comprehensive_report.csv"

We could also run the data through an Excel PivotChart for some interesting metrics:

Use Case Wrapper Function: Run-DGMComprehensiveDetailsReport.ps1


Import-Module "\\scriptserver\Scripts\Get-DGMThreadedComputerDetails\Get-DGMThreadedComputerDetails.psm1" -Force
Import-Module "\\scriptserver\scripts\New-DGMEmailReport\New-DGMEmailReport.psm1" -Force

function Run-DGMComprehensiveDetailsReport{
    param(
        [Parameter(Position=0,Mandatory=$true,ValueFromPipeline=$true)]
        [String]$ProviderMachineName,
        [Parameter(Position=1,Mandatory=$true,ValueFromPipeline=$true)]
        [ValidateLength(3,3)]
        [String]$Sitecode
    )

    #Create Some Arrays Of Data To Display in Report. You can create as many as you want.
    $OutputArrays = @()

    # Import the ConfigurationManager.psd1 module
    $module = "$($ENV:SMS_ADMIN_UI_PATH)\..\ConfigurationManager.psd1"
    if((Get-Module ConfigurationManager) -eq $null) {
        Write-Host Importing $module ...
        Import-Module $module -Force
    }

    # Connect to the site's drive if it is not already present
    if((Get-PSDrive -Name $SiteCode -PSProvider CMSite -ErrorAction SilentlyContinue) -eq $null) {
        $NewPSDrive = New-PSDrive -Name $SiteCode -PSProvider CMSite -Root $ProviderMachineName
    }

    # Set the current location to be the site code.
    Set-Location "$($SiteCode):\"

    $ComprehensiveReport = Get-CMCollectionMember -CollectionName "All Systems" | Select Name | Get-DGMThreadedComputerDetails -ProviderMachineName $ProviderMachineName -Sitecode $Sitecode -domaincontroller $domancontroller -csvoutput "C:\comprehensive_report.csv"
}

Run-DGMComprehensiveDetailsReport -ProviderMachineName SCCMSERVER001 -Sitecode DGM 

Main Application: Get-DGMThreadedComputerDetails.psm1

This is the main application code.


<#
.Synopsis
   Get Computer Details
.DESCRIPTION
   The tool, Get-DGMThreadedComputerDetails.ps1, will build a detailed list of the computers or users you provide to it. 
.AUTHOR
   David Maiolo
#>

<#
.Synopsis
   Returns a True if name value is a Cluster Name Object/Virtual Computer Object
#>
function Get-DGMClusterComputerObject{
    [CmdletBinding()]
    Param
    (
        # Param1 help description
        [Parameter(
                   Mandatory=$true,
                   ValueFromPipeline=$true,
                   Position=0)]
        [ValidateScript({(Get-ADComputer -Identity $_).objectclass -eq 'computer' })]
        $Name

    )

    Begin
    {$Computer= Get-ADComputer $name -Properties serviceprincipalname
    }
    Process
    { If( $Computer.servicePrincipalName -contains 'DGMClusterVirtualServer/' + $Computer.Name){$result=$true}
      Else{$Result=$False}
    }
    End
    {$result
    }
}

Function Get-DGMThreadedComputerDetails{
    param(
        [Parameter(Position=0,Mandatory=$false,ValueFromPipeline=$true)]
        $input,
        [Parameter(Position=1,Mandatory=$true,ValueFromPipeline=$false)]
        [String]$ProviderMachineName,
        [Parameter(Position=2,Mandatory=$true,ValueFromPipeline=$false)]
        [ValidateLength(3,3)]
        [String]$Sitecode,
        [Parameter(Position=3,Mandatory=$true,ValueFromPipeline=$false)]
        [String]$domaincontroller,
        [Parameter(Position=4,Mandatory=$false,ValueFromPipeline=$false)]
        [ValidateScript({(Test-Path $_)})]
        [String] $csvinput,
        [Parameter(Position=5,Mandatory=$false,ValueFromPipeline=$false)]
        [ValidateScript({($_ -le 100 -and $_ -gt 0)})]
        [int] $threads=100,
        [Parameter(Position=6,Mandatory=$false,ValueFromPipeline=$false)]
        [String] $csvoutput,
        [Parameter(Position=7,Mandatory=$false,ValueFromPipeline=$false)]
        [Switch] $excludeCNO
    )

    $path = (get-item -Path .).FullName
    $arraytoping=@()

    #Header
    Write-Host "==========================================" -ForegroundColor Cyan
    Write-Host "Get Threaded Computer Details" -ForegroundColor Cyan
    Write-Host "v1.0 (2018-02-14) by dmaiolo" -ForegroundColor Cyan
    Write-Host "==========================================" -ForegroundColor Cyan

    #Check for what arguments were passed
    if([bool]($MyInvocation.BoundParameters.Keys -match 'csvinput')){
        Write-Host "Importing $csvinput..."
        $csvimport = import-csv $csvinput
        <#
        $csvimport | foreach-object {
            $temparray = [PSCustomObject] @{'Name' = $_.Name}
            $arraytoping += $temparray 
            Write-Host "Importing"($_.Name)"..."
            }#>
        $arraytoping = $csvimport    
    }
    elseif([bool]($MyInvocation.BoundParameters.Keys -match 'input')){
        Write-Host "Importing from pipeline..."
        foreach ($object in $input) {
            $arraytoping += $object
        }
    }else{
        Write-Host "Manual Input Selected."
        $arraytoping = Get-DGMSearchQueryComputers -ProviderMachineName $ProviderMachineName -Sitecode $Sitecode
    }

    
    if ($arraytoping.count -lt 1){
        Write-Host "No Computers Were Found"
        break
    }


    if([bool]($MyInvocation.BoundParameters.Keys -match 'csvoutput')){
        $csvoutputcheck = $true
    }

    #Ping the computers
    $pingablecomputers = Get-DGMOnlineComputers -ComputerList $arraytoping -Threads $threads
    $pingablecomputers | add-member –membertype NoteProperty –name Pingable –Value True -Force

    #======================

    #Check RDP On the Pingable Computers
    $RDPEnableComputers = Get-DGMRDPComputers -ComputerList $pingablecomputers -Threads $threads
    $RDPEnableComputers | add-member –membertype NoteProperty –name RDPEnabled –Value True -Force

    #Create Non-RDP Enabled Computers Array
    $NonRDPEnabledComputers = $pingablecomputers | where {$RDPEnableComputers -notcontains $_}
    $NonRDPEnabledComputers | add-member –membertype NoteProperty –name RDPEnabled –Value False -Force

    #Combining RDP Enabled and Non-Enabled Computers into One Araay
    $RDPDetailedPingableComputers = @()
    $RDPDetailedPingableComputers+=$RDPEnableComputers
    $RDPDetailedPingableComputers+=$NonRDPEnabledComputers

    #======================


    #Check Path On the Pingable Computers
    $PathEnableComputers = Get-DGMTestPath -ComputerList $RDPDetailedPingableComputers -Threads $threads -Path "c$"
    $PathEnableComputers | add-member –membertype NoteProperty –name PathEnabled –Value True -Force

    #Create Non-Path Enabled Computers Array
    $NonPathEnabledComputers = $RDPDetailedPingableComputers | where {$PathEnableComputers -notcontains $_}
    $NonPathEnabledComputers | add-member –membertype NoteProperty –name PathEnabled –Value False -Force

    #Combining Path Enabled and Non-Enabled Computers into One Araay
    $PathRDPDetailedPingableComputers = @()
    $PathRDPDetailedPingableComputers+=$PathEnableComputers
    $PathRDPDetailedPingableComputers+=$NonPathEnabledComputers

    #======================

    #Create Non-Pingable Array
    $nonpingablecomputers = $arraytoping | where {$pingablecomputers -notcontains $_} 
    $nonpingablecomputers | add-member –membertype NoteProperty –name Pingable –Value False -Force
    $nonpingablecomputers | add-member –membertype NoteProperty –name RDPEnabled –Value $null -Force
    $nonpingablecomputers | add-member –membertype NoteProperty –name PathEnabled –Value $null -Force

    #Combine Everything into one giant final array
    $finalresults = @()
    $pingedresults = @()
    $pingedresults+=$PathRDPDetailedPingableComputers
    $pingedresults+=$nonpingablecomputers

   
    #Gather the DHCP Scope
    try{$dhcp_scopes = Get-DhcpServerv4Scope –ComputerName $domaincontroller}catch{Write-Host "No Access to Domain Controller $domaincontroller" -ForegroundColor Red;}

    $pingedresults | foreach-object {
       $Name = $_.Name
       $PredeterminedUser = $_.PredeterminedUser
       $RDPEnabled = $_.RDPEnabled
       $PathEnabled = $_.RDPEnabled
       
       #Note if CNO Object
       try{
        if((Get-DGMClusterComputerObject $Name) -eq $false) {$VirtualCNO = $null}else{$VirtualCNO = $TRUE}

       }catch{
        $VirtualCNO =$null
       }

        #If they were pingable, get the DHCP Scope and IP Address
        if ($_.Pingable -eq "True"){ 
            Write-Host "Processing Pinged $Name..."
            
            try{
                $ComputerObject = Get-ADComputer $Name -Properties Created,Description,OperatingSystem,CanonicalName,Enabled,extensionAttribute1,extensionAttribute2,extensionAttribute4,extensionAttribute5 | Select Name,Created,Description,OperatingSystem,CanonicalName,Enabled,extensionAttribute1,extensionAttribute2,extensionAttribute4,extensionAttribute5

                #Get IP Address
                if ($ComputerObject.IPv4Address){
                    $IPv4Address = ($ComputerObject.IPv4Address).ToString()

                    $IPv4Scope = (([ipaddress] $IPv4Address).GetAddressBytes()[0..2] -join '.').ToString()
                    $IPv4ScopesDescription = ($dhcp_scopes | Select-Object -Property Name,ScopeId | Where-Object ScopeId -Like "$IPv4Scope.*").Name
                }
                #If IP Was not in AD, Ping it and get it (mostly redundant at this point)
                elseif($IPv4Address = (Test-Connection -ComputerName $Name -Count 1 -ErrorAction SilentlyContinue).IPV4Address.IPAddressToString){
                    $IPv4Scope = (([ipaddress] $IPv4Address).GetAddressBytes()[0..2] -join '.').ToString()
                    $IPv4ScopesDescription = ($dhcp_scopes | Select-Object -Property Name,ScopeId | Where-Object ScopeId -Like "$IPv4Scope.*").Name
                }
                # No IP Found? Make these blank (IP should be found though, just a catch all
                else{
                    $IPv4Address = $null
                    $IPv4ScopesDescription = $null
                    $IPv4Scope = $null
                }
            }catch{
                $ComputerObject = $null
                $IPv4Address = $null
                $IPv4Scope = $null
                $IPv4ScopesDescription = $null
            }

        }
        #Since they are not pingable, don't bother with IP Address and Scope
        else{
            Write-Host "Processing Unpingable $Name..." -ForegroundColor Yellow
            try{
                $ComputerObject = Get-ADComputer $Name -Properties Created,Description,OperatingSystem,CanonicalName,Enabled,extensionAttribute1,extensionAttribute2,extensionAttribute4,extensionAttribute5 | Select Name,Created,Description,OperatingSystem,CanonicalName,Enabled,extensionAttribute1,extensionAttribute2,extensionAttribute4,extensionAttribute5
            }catch{
                $ComputerObject = $null
            }
            $IPv4Address = $null
            $IPv4ScopesDescription = $null
            $IPv4Scope = $null
            $RDOpen = $null
        }

        #Get AD Device Details
        if ($ComputerObject.Created){$Created = ($ComputerObject.Created).ToString()}else{$Created = $null}
        if ($ComputerObject.Description){$Description = ($ComputerObject.Description).ToString()}else{$Description = $null}
        if ($ComputerObject.OperatingSystem){$OperatingSystem = ($ComputerObject.OperatingSystem).ToString()}else{$OperatingSystem = $null}
        if ($ComputerObject.CanonicalName){$CanonicalName = ($ComputerObject.CanonicalName).ToString()}else{$CanonicalName = $null}
        if ($ComputerObject.Enabled){$Enabled = ($ComputerObject.Enabled).ToString()}else{$Enabled = $null}
        if ($ComputerObject.extensionAttribute1){$SME1 = ($ComputerObject.extensionAttribute1).ToString()}else{$SME1 = $null}
        if ($ComputerObject.extensionAttribute2){$SME2 = ($ComputerObject.extensionAttribute2).ToString()}else{$SME2 = $null}
        if ($ComputerObject.extensionAttribute4){$MW1 = ($ComputerObject.extensionAttribute4).ToString()}else{$MW1 = $null}
        if ($ComputerObject.extensionAttribute5){$MW2 = ($ComputerObject.extensionAttribute5).ToString()}else{$MW2 = $null}

        #Get SCCM Device Details
        try{
            $DeviceDetails = Get-DGMSCCMDeviceDetails -Hostname $Name -ProviderMachineName $ProviderMachineName -Sitecode $SiteCode

            $IsClient = $DeviceDetails.IsClient
            $CMUserName = $DeviceDetails.UserName
            $LastStatusMessage = $DeviceDetails.LastStatusMessage
            $LastSoftwareScan  = $DeviceDetails.LastSoftwareScan
            $LastPolicyRequest = $DeviceDetails.LastPolicyRequest
            $LastDDR = $DeviceDetails.LastDDR
            $LastClientCheckTime = $DeviceDetails.LastClientCheckTime
            $LastActiveTime  = $DeviceDetails.LastActiveTime
            $IsVirtualMachine = $DeviceDetails.IsVirtualMachine
            $CNLastOnlineTime  = $DeviceDetails.CNLastOnlineTime
            $CNLastOfflineTime = $DeviceDetails.CNLastOfflineTime
            $ResourceID = $DeviceDetails.ResourceID
        }catch{
            Write-Host "Warning: One of the standard details could not be determined. This probably means the machine is not in SCCM." -ForegroundColor cyan
            $IsClient = $null
            $CMUserName = $null
            $LastStatusMessage = $null
            $LastSoftwareScan  = $null
            $LastPolicyRequest = $null
            $LastDDR = $null
            $LastClientCheckTime = $null
            $LastActiveTime  = $null
            $IsVirtualMachine = $null
            $CNLastOnlineTime  = $null
            $CNLastOfflineTime = $null
            $ResourceID = $null
        }

        #Get Expanded SCCM WMI Device Details

        try{
            $ExpandedDeviceDetails = Get-DGMSCCMWMIHardwareDetails -ResourceID $ResourceID -ProviderMachineName $ProviderMachineName -Sitecode $SiteCode
            $SerialNumber = $ExpandedDeviceDetails.SMS_G_System_PC_BIOS.SerialNumber
            $BIOSVersion = $ExpandedDeviceDetails.SMS_G_System_PC_BIOS.SMBIOSBIOSVersion
            $Manufacturer = $ExpandedDeviceDetails.SMS_G_System_COMPUTER_SYSTEM.Manufacturer
            $Model = $ExpandedDeviceDetails.SMS_G_System_COMPUTER_SYSTEM.Model
            $Architecture = $ExpandedDeviceDetails.SMS_G_System_COMPUTER_SYSTEM.SystemType
            $MACAddresses = $ExpandedDeviceDetails.SMS_R_System.MACAddresses
        }catch{
            Write-Host "Warning: One of the expanded details could not be determined. This probably means the machine is not in SCCM." -ForegroundColor Yellow
            $SerialNumber = $null
            $BIOSVersion = $null
            $Manufacturer = $null
            $Model = $null
            $Architecture = $null
            $MACAddresses = $null
        }

        try{
            #Get User Device Affinity Details
            $DGMSCCMUsersOfDevice = Get-DGMSCCMUsersOfDevice -Hostname $Name -ProviderMachineName $ProviderMachineName -Sitecode $SiteCode
        }catch{
            $DGMSCCMUsersOfDevice = $null
        }

        #Get User Details
        
        if ($PredeterminedUser){
            try{$DGMUserDetails = Get-DGMUserDetails -UserName $PredeterminedUser}catch{$DGMUserDetails = $null}
            $PrimaryUser = $DGMUserDetails.DisplayName
            $Title = $DGMUserDetails.Title
            $Department = $DGMUserDetails.Department
            $EmailAddress = $DGMUserDetails.EmailAddress
            $UserSource = "Predetermined User"
        }
        elseif($SME1){
            try{$DGMUserDetails = Get-DGMUserDetails -DisplayName $SME1}catch{$DGMUserDetails = $null}
            $PrimaryUser = $DGMUserDetails.DisplayName
            $Title = $DGMUserDetails.Title
            $Department = $DGMUserDetails.Department
            $EmailAddress = $DGMUserDetails.EmailAddress
            $UserSource = "AD SME1 Attribute"
        }elseif ($CMUserName){
            try{$DGMUserDetails = Get-DGMUserDetails -UserName $CMUserName}catch{$DGMUserDetails = $null}
            $PrimaryUser = $DGMUserDetails.DisplayName
            $Title = $DGMUserDetails.Title
            $Department = $DGMUserDetails.Department
            $EmailAddress = $DGMUserDetails.EmailAddress
            $UserSource = "SCCM Hardware Association"
        }elseif ($DGMSCCMUsersOfDevice){
            $Users = $DGMSCCMUsersOfDevice
            foreach ($user in $users){ 
                $i++
                try{$DGMUserDetails = Get-DGMUserDetails -UserName $user}catch{$DGMUserDetails = $null}
                if ($i -eq 1){
                    $PrimaryUser = $DGMUserDetails.DisplayName
                    $Title = $DGMUserDetails.Title
                    $Department = $DGMUserDetails.Department
                    $EmailAddress = $DGMUserDetails.EmailAddress
                    $UserSource = "SCCM User-Device Affinity"
                
                 }
                else{
                    $SecondaryUser = $DGMUserDetails.DisplayName
                    $OtherUsers=$OtherUsers+$SecondaryUser+", "
            
                }
            $UserSource = "SCCM User-Device Affinity"
            }
        }elseif($Description -and ($DGMUserDetails = Get-DGMUserDetails -Description $Description)){
            #$DGMUserDetails = Get-DGMUserDetails -Description $Description
            $PrimaryUser = $DGMUserDetails.DisplayName
            $Title = $DGMUserDetails.Title
            $Department = $DGMUserDetails.Department
            $EmailAddress = $DGMUserDetails.EmailAddress
            $UserSource = "AD Description"
        }else{
            $OtherUsers = $null
            $PrimaryUser = $null
            $DisplayName = $null
            $Title = $null
            $Department = $null
            $EmailAddress = $null
            $UserSource = $null
        }

         $output = [PSCustomObject] @{
            'Name' = $Name;
            'Pingable' = $_.Pingable
            'IP Address' = $IPv4Address;
            'AD Enabled' = $Enabled;
            'RDP Enabled' = $RDPEnabled;
            'Connect to c$' = $PathEnabled;
            'VirtualCNO' = $VirtualCNO;
            'SCCM Client' = $IsClient;
            'Primary User' = $PrimaryUser;
            'User Source' = $UserSource;
            'User Title' = $Title;
            'User Department'  = $Department;
            'User E-Mail' = $EmailAddress;
            'Other Users' = $OtherUsers;
            'Operating System' = $OperatingSystem;
            'Manufacturer' = $Manufacturer;
            'Model' = $Model;
            'Serial Number' = $SerialNumber;
            'BIOS Version' = $BIOSVersion;
            '$Architecture' = $Architecture;
            'MAC Addresses' = $MACAddresses;
            'AD Description' = $Description;
            'DHCP Scope Location' = $IPv4ScopesDescription;
            'AD Creation Date' = $Created;
            #'Subnet' = $IPv4Scope;
            'Canonical Name' = $CanonicalName
            'Virtual Machine' = $IsVirtualMachine
            'Last Time Online' = $CNLastOnlineTime;
            'Last Time Offline' = $CNLastOfflineTime;
            'MW 1' = $MW1;
            'MW 2' = $MW2;
            'SME 1' = $SME1;
            'SME 2' = $SME2;
            'Predetermined User' = $PredeterminedUser;
        }

        $finalresults+=$output

       }

    #Export to CSV if chosen
        if ($csvoutputcheck){
            Write-Host =========================================== -ForegroundColor Cyan
            Write-Host CSV Output Results -ForegroundColor Cyan
            Write-Host =========================================== -ForegroundColor Cyan

            New-DGMCSVOut -csvoutputpath $csvoutput -arrayforoutput $finalresults 
        }

        #Remove-PSDrive "$SiteCode:"
        return $finalresults
        
}

Function Get-DGMUserDetails{
    [CmdletBinding()]
    [Alias()]
    Param
    (
        [Parameter(Mandatory=$false,ValueFromPipeline=$false,Position=0)] 
        [String]$UserName,
        [Parameter(Mandatory=$false,ValueFromPipeline=$false,Position=1)] 
        [String]$DisplayName,
        [Parameter(Mandatory=$false,ValueFromPipeline=$false,Position=2)] 
        [String]$Description
    )
    #Check for what arguments were passed
    if([bool]($MyInvocation.BoundParameters.Keys -match 'UserName')){
        #Remove Domain Name if found
        $UserName = $UserName -creplace '^[^\\]*\\', ''

        try{
            $UserObject = Get-ADUser $Username -Properties DisplayName,Title,Department,EmailAddress | Select -First 1

            $output = [PSCustomObject] @{
                'DisplayName' = $UserObject.DisplayName
                'Title' = $UserObject.Title
                'Department' = $UserObject.Department
                'EmailAddress' = $UserObject.EmailAddress;
            }

            return $output

        }catch{
            return $False
        }
    }
    #Check for what arguments were passed
    if([bool]($MyInvocation.BoundParameters.Keys -match 'DisplayName')){
        try{
            $UserObject = Get-ADUser -filter ('DisplayName -like "*' + $DisplayName + '*"') -Properties DisplayName,Title,Department,EmailAddress | Select -First 1

            $output = [PSCustomObject] @{
                'DisplayName' = $UserObject.DisplayName
                'Title' = $UserObject.Title
                'Department' = $UserObject.Department
                'EmailAddress' = $UserObject.EmailAddress;
            }

            return $output

        }catch{
            return $False
        }
    }

    #Check for what arguments were passed
    if([bool]($MyInvocation.BoundParameters.Keys -match 'Description')){
        
        #Replace bad charecters in the description with a space
        $description = $description -replace '-',' '

        #Split the string into an array
        $descriptionarray = $description -split " "

        #Clear Output
        $output = $null

        #Loop Through Every Sequential Two Word Combination in the description (looking for a first and last name) and see if there is a user associated to it in AD
        for ($i=0; $i -lt $descriptionarray.Length-1; $i++) {
            $DisplayName = $descriptionarray[$i]+" "+$descriptionarray[$i+1]
            
            $UserObject = Get-ADUser -filter ('DisplayName -like "*' + $DisplayName + '*"') -Properties DisplayName,Title,Department,EmailAddress | Select -First 1

            $output = [PSCustomObject] @{
                'DisplayName' = $UserObject.DisplayName
                'Title' = $UserObject.Title
                'Department' = $UserObject.Department
                'EmailAddress' = $UserObject.EmailAddress;
                }
            }

        if ($output.DisplayName -ne $null) {return $output}else{return $false}
    }
}

Function Get-DGMSCCMUsersOfDevice{

    [CmdletBinding()]
    [Alias()]
    Param
    (
        [Parameter(Position=0,Mandatory=$true,ValueFromPipeline=$true)]
        [String]$Hostname,
        [Parameter(Position=1,Mandatory=$true,ValueFromPipeline=$true)]
        [String]$ProviderMachineName,
        [Parameter(Position=2,Mandatory=$true,ValueFromPipeline=$true)]
        [ValidateLength(3,3)]
        [String]$Sitecode
    )

    #Connect to SCCM
    # Import the ConfigurationManager.psd1 module
    $module = "$($ENV:SMS_ADMIN_UI_PATH)\..\ConfigurationManager.psd1"
    if((Get-Module ConfigurationManager) -eq $null) {
        Write-Host Importing $module ...
        Import-Module $module -Force
    }

    # Connect to the site's drive if it is not already present
    if((Get-PSDrive -Name $SiteCode -PSProvider CMSite -ErrorAction SilentlyContinue) -eq $null) {
        $NewPSDrive = New-PSDrive -Name $SiteCode -PSProvider CMSite -Root $ProviderMachineName
    }

    # Set the current location to be the site code.
    Set-Location "$($SiteCode):\"

    $CMUserDeviceAffinity = Get-CMUserDeviceAffinity -DeviceName $Hostname
    $users = $CMUserDeviceAffinity.UniqueUserName

    return $users
}

Function Get-DGMSCCMDeviceDetails{

    [CmdletBinding()]
    [Alias()]
    Param
    (
        [Parameter(Position=0,Mandatory=$true,ValueFromPipeline=$true)]
        [String]$Hostname,
        [Parameter(Position=1,Mandatory=$true,ValueFromPipeline=$true)]
        [String]$ProviderMachineName,
        [Parameter(Position=2,Mandatory=$true,ValueFromPipeline=$true)]
        [ValidateLength(3,3)]
        [String]$Sitecode
    )

    #Connect to SCCM
    # Import the ConfigurationManager.psd1 module
    $module = "$($ENV:SMS_ADMIN_UI_PATH)\..\ConfigurationManager.psd1"
    if((Get-Module ConfigurationManager) -eq $null) {
        Write-Host Importing $module ...
        Import-Module $module -Force
    }

    # Connect to the site's drive if it is not already present
    if((Get-PSDrive -Name $SiteCode -PSProvider CMSite -ErrorAction SilentlyContinue) -eq $null) {
        $NewPSDrive = New-PSDrive -Name $SiteCode -PSProvider CMSite -Root $ProviderMachineName
    }

    # Set the current location to be the site code.
    Set-Location "$($SiteCode):\"
    try{
        $DeviceProperties = Get-CMDevice -Name $Hostname
        return $DeviceProperties
    }catch{
        return $FALSE
    }

}

function Get-DGMSearchQueryComputers{
    [CmdletBinding()]
    [Alias()]
    Param
    (
        [Parameter(Position=0,Mandatory=$true,ValueFromPipeline=$true)]
        [String]$ProviderMachineName,
        [Parameter(Position=1,Mandatory=$true,ValueFromPipeline=$true)]
        [ValidateLength(3,3)]
        [String]$Sitecode
    )

    
    #Connect to SCCM
    # Import the ConfigurationManager.psd1 module
    $module = "$($ENV:SMS_ADMIN_UI_PATH)\..\ConfigurationManager.psd1"
    if((Get-Module ConfigurationManager) -eq $null) {
        Write-Host Importing $module ...
        Import-Module $module -Force
    }

    # Connect to the site's drive if it is not already present
    if((Get-PSDrive -Name $SiteCode -PSProvider CMSite -ErrorAction SilentlyContinue) -eq $null) {
        $NewPSDrive = New-PSDrive -Name $SiteCode -PSProvider CMSite -Root $ProviderMachineName
    }

    # Set the current location to be the site code.
    Set-Location "$($SiteCode):\"

    Write-Host "[1] Search for single computer name"
    Write-Host "[2] Search by wildcard computer name"
    Write-Host "[3] Search by description"
    Write-Host "[4] Search by Operating System"
    Write-Host "[5] Search by User Name (DOMAIN\USER)"
    Write-Host "[6] Import CSV (with PCs as 'Name' column)"
    Write-Host "[7] Import CSV (with Users as 'PredeterminedUser' column)"

    do {
        try {$numOk = $true; [int]$GetMyANumber = Read-host "Selection"}
        catch {$numOK = $false}}
    until (($GetMyANumber -ge 1 -and $GetMyANumber -le 7) -and $numOK)

    $validcharacters = "^[a-zA-Z0-9\\\s-_@]+$"
    do {
        try {$stringOk = $true; [string]$query = Read-host "Enter search query (A-Z, a-z, 0-9,\,-,_,@ only)"}
        catch {$stringOk = $false}}
    until (($query -match $validcharacters) -and $stringOk)

    switch ($GetMyANumber) 
        { 
            1 {$finalresults = Get-ADComputer -filter {name -eq $query}}
            2 {$query = "*"+$query;$query = $query+"*";$finalresults = Get-ADComputer -filter {name -like $query}}
            3 {$query = "*"+$query;$query = $query+"*";$finalresults = Get-ADComputer -filter {description -like $query}}
            4 {$query = "*"+$query;$query = $query+"*";$finalresults = Get-ADComputer -filter {OperatingSystem -like $query}}
            5 {$finalresults = Get-CMUserDeviceAffinity -UserName $query | select @{name ="Name";e={$_.ResourceName}}}
            6 {$csvinputfile = Get-DGMFileName -filter "CSV";$csvinput = import-csv -Path $csvinputfile; $finalresults = $csvinput}
            7 {$csvinputfile = Get-DGMFileName -filter "CSV";$csvinput = import-csv -Path $csvinputfile; 
                $finalresults = @()
                foreach ($line in $csvinput){
                    $usercomputers = Get-CMUserDeviceAffinity -UserName $line.PredeterminedUser | Sort-Object -Property Sources | select @{name ="Name";e={$_.ResourceName}},Sources
                    foreach ($usercomputer in $usercomputers){
                        $output = [PSCustomObject] @{
                                    'Name' = $usercomputer.Name;
                                    'PredeterminedUser' = $line.PredeterminedUser;
                                    'Sources' = $usercomputer.Sources;
                                }
                        $finalresults+=$output
                   }
                }
                 $finalresults | Out-GridView -Title "User Affinity Preview. Still processing..."
              }
        }

    return $finalresults

}

function Get-DGMOnlineComputers{

    param(
        [Parameter(Position=0,Mandatory=$true,ValueFromPipeline=$true)]
        [int] $threads,
        [Array] $ComputerList
    )
    
    Write-Host ============================================ -ForegroundColor Cyan
    Write-Host Pinging Computers and Building Table -ForegroundColor Cyan
    Write-Host ============================================ -ForegroundColor Cyan
    
    $finalresults = @()

    if ($ComputerList.Length -gt 0){
        Write-Host "Pinging"($ComputerList.length)"computers in $threads threads."
        $finalresults = $ComputerList | Where-ParallelObject -Filter {Test-Connection -ComputerName $_.Name -Quiet -Count 1} -Threads $threads -ProgressBar -progressBartext "Buildng Computer Details"
        return $finalresults
    }else{
        Write-Host "No Pingable Computers were found."
        return $false
    }
}

function Get-DGMRDPComputers{

    param(
        [Parameter(Position=0,Mandatory=$true,ValueFromPipeline=$true)]
        [int] $threads,
        [Array] $ComputerList
    )
    
    Write-Host ============================================ -ForegroundColor Cyan
    Write-Host Testing RDP on Computers and Building Table -ForegroundColor Cyan
    Write-Host ============================================ -ForegroundColor Cyan
    
    $finalresults = @()

    if ($ComputerList.Length -gt 0){
        Write-Host "RDP Check on"($ComputerList.length)"computers in $threads threads."
        $finalresults = $ComputerList | Where-ParallelObject -Filter {Test-NetConnection -ComputerName $_.Name -CommonTCPPort RDP -InformationLevel Quiet -WarningAction SilentlyContinue} -Threads $threads -ProgressBar -progressBartext "Buildng RDP Return Details"
        return $finalresults
    }else{
        Write-Host "No RDP Enabled Computers were found."
        return $false
    }
}

function Get-DGMTestPath{

    param(
        [Parameter(Position=0,Mandatory=$true,ValueFromPipeline=$true)]
        [int] $threads,
        [Array] $ComputerList,
        [String]$path
    )
    
    Write-Host ============================================ -ForegroundColor Cyan
    Write-Host Testing Path on Computers and Building Table -ForegroundColor Cyan
    Write-Host ============================================ -ForegroundColor Cyan
    
    $finalresults = @()

    if ($ComputerList.Length -ge 0){
        Write-Host "Testing Path $path on"($ComputerList.length)"computers in $threads threads."
        $finalresults = $ComputerList | Where-ParallelObject -Filter {Test-Path $('filesystem::\\'+$_.Name+'\'+$path)} -Threads $threads -ProgressBar -progressBartext "Building Test-Path $path Details"
        return $finalresults
    }else{
        Write-Host "No Computers Returned a valid path."
        return $false
    }
}

function New-DGMCSVOut{

    param(
            [Parameter(Position=0,Mandatory=$true,ValueFromPipeline=$true)]
            [String] $csvoutputpath,
            [array] $arrayforoutput
        )

    try{
        $arrayforoutput | export-csv $csvoutputpath -notypeinformation
        Write-Host "CSV Export`: CSV Created at $csvoutputpath"
    }catch{
        Write-Host "CSV Export`: CSV Could NOT be Created at $csvoutputpath" -ForegroundColor Red
    }


}

function Where-ParallelObject {
    param(
        [Parameter(Position=0,Mandatory=$true,ValueFromPipeline=$true)] $input,
        [ScriptBlock] $Filter,
        [int] $threads,
        [switch] $progressBar,
        [String] $progressBartext
    )

    $inputQueue = [System.Collections.Queue]::Synchronized( (New-Object System.Collections.Queue) )
    $results = [System.Collections.Queue]::Synchronized( (New-Object System.Collections.Queue) )

    $sessionstate = [System.Management.Automation.Runspaces.InitialSessionState]::CreateDefault()
    $sessionstate.Variables.Add(
        (New-Object System.Management.Automation.Runspaces.SessionStateVariableEntry('inputQueue', $inputQueue, $null))
    )
    $sessionstate.Variables.Add(
        (New-Object System.Management.Automation.Runspaces.SessionStateVariableEntry('results', $results, $null))
    )

    $runspacepool = [runspacefactory]::CreateRunspacePool(1, $threads, $sessionstate, $Host)
    $runspacepool.Open()

    foreach ($object in $input) {
        $inputQueue.Enqueue($object)
    }

    $jobs = @()

    $sbpre = '
        while($inputQueue.Count -gt 0) {
            $_ = $inputQueue.Dequeue();
            if('
    $sbpost = ') 
            {
                $results.Enqueue($_);    
            }
        }
    '

    $sb = [ScriptBlock]::Create($sbpre + $Filter.toString() + $sbpost)

    1..$threads | % {
        $job = [PowerShell]::Create().AddScript($sb)
        $job.RunspacePool = $runspacepool
        $jobs += New-Object PSObject -Property @{
            Job = $job
            Result = $job.BeginInvoke()
        }
    }

    do {
        if($progressBar.IsPresent) 
        {
            Write-Progress -Activity ($progressBartext+" " +$input.Count+ " Objects") -status ("" + $($results.Count) + " complete.") -percentComplete ( ($results.Count) / $input.Count * 100) 
        }
        Start-Sleep -Seconds 1
    } while ( $jobs.Result.IsCompleted -contains $false)

    foreach ($job in $jobs) {
        $job.Job.EndInvoke($job.Result)
    }
    $runspacepool.Close()
    $runspacepool.Dispose()

    return $results.ToArray()

}

function Get-DGMSCCMWMIHardwareDetails{
    [CmdletBinding()]
    [Alias()]
    Param
    (
        [Parameter(Position=0,Mandatory=$true,ValueFromPipeline=$true)]
        [String]$ResourceID,
        [Parameter(Position=1,Mandatory=$true,ValueFromPipeline=$true)]
        [String]$ProviderMachineName,
        [Parameter(Position=2,Mandatory=$true,ValueFromPipeline=$true)]
        [ValidateLength(3,3)]
        [String]$Sitecode
    )
    #Change these to match your Server Name and Site Code
    $SCCMnameSpace = "root\SMS\SITE_$Sitecode"

    #Query WMI to get the 'Computer System Product' information
    $qry = "select * from SMS_R_System inner join SMS_G_System_COMPUTER_SYSTEM on SMS_G_System_COMPUTER_SYSTEM.ResourceID = SMS_R_System.ResourceId inner join SMS_G_System_PC_BIOS on SMS_G_System_PC_BIOS.ResourceID = SMS_R_System.ResourceId where ResourceID = '$ResourceID'"
    
    try{
        $objComputerSystemProduct = Get-WmiObject -ComputerName $ProviderMachineName -Namespace $SCCMnameSpace -Query $qry
        return $objComputerSystemProduct
    }catch{
        return $False
    }
}

Function Get-DGMFileName(){   
    [CmdletBinding()]
    [Alias()]
    Param
    (
        [Parameter(Position=0,Mandatory=$false,ValueFromPipeline=$true)]
        [String]$initialDirectory,
        [Parameter(Position=0,Mandatory=$true,ValueFromPipeline=$true)]
        [String]$filter
    )
    [System.Reflection.Assembly]::LoadWithPartialName("System.windows.forms") |
    Out-Null

    $OpenFileDialog = New-Object System.Windows.Forms.OpenFileDialog
    $OpenFileDialog.initialDirectory = $initialDirectory
    $OpenFileDialog.filter = "$filter files (*.$filter)| *.$filter"
    $OpenFileDialog.ShowDialog() | Out-Null
    $OpenFileDialog.filename
}

function Invoke-DGMThreadedComputerDetails{
    [CmdletBinding()]
    [Alias()]
    Param
    (
    )
    Write-Host "============================================"
    Write-Host "Get Threaded Computer Details"
    Write-Host "============================================"
    Write-Host "Author: dmaiolo"
    Write-Host "Instructions: Choose a CSV file where the column of computer names is 'Name'"
    $csvinput = Get-DGMFileName -filter "CSV"
    Get-DGMThreadedComputerDetails -ProviderMachineName SCCMSERVERNAME -Sitecode SITE -domaincontroller DOMAINCONTROLLER01 -csvinput $csvinput
}

Overview

This is a “Magic Offline Imaging Jumpdrive” I put together that can be used for OEM imaging or offline imaging where you still need to join PC’s to the domain but don’t have access to the network when the computer is being imaged. The idea is this “Magic Jumpdrive” would allow a trusted party to image your equipment without needing access to your network, broadening where and when a machine could be imaged.

Process

Create the Magic Offline Imaging Jumpdrive SCCM Package

First, download the Magic Offline Imaging Jumpdrive and unzip the contents


Magic Offline Imaging Jumpdrive

Create a new source location for content in your SCCM data directory, and all of the files found within the OFFLINE_PACKAGE_CONTENTS folder from the file you just downloaded:

Next, create an SCCM Package (or application if you prefer) and add two programs for each of the CMD files. The command line for each program only needs to point to the name of the file:

Setup the Magic Offline Imaging Jumpdrive OS Task Sequence

Next, choose the task sequence in SCCM that you would like to be available offline and copy it as a new Task sequence with “(OFFLINE)” in the name appended after it, such as “Windows 10 (OFFLINE)”.

Now, add two steps to this task sequence after the image has been applied, yet before anything you want installed on a “Domain Joined” machine. Point each step to the package you created earlier, with the STEP 1 and 2 in sequence:

Create the Magic Offline Imaging Jumpdrive

Now, create an offline Jumpdrive of this OFFLINE task sequence using the built in Create Task Sequence Media SCCM task sequence wizard:

Put your Jumpdrive aside as we’ll need it again in a few moments.

Creating the Offline Computer Provisioning Files

Now, within the file you download, inside the ADMINISTRATIVE_TOOLS directory modify the contents of the Add_Offline_Machine.cmd file to include the OU and Domain you want the machine placed in:


djoin /provision /domain "fqdn.company.com" /machine "%computerName%" /savefile .\%computerName%.txt /machineou "OU=Offline Domain Join,OU=Workstations,OU=con,DC=corp,DC=contoso,DC=com"

and the security group you want the machine placed in:


dsmod group "CN=ISE - Offline Domain Join,OU=Your Special Offline Security Group,OU=Security Groups,OU=con,DC=corp,DC=contoso,DC=com" -addmbr "CN=%computerName%,OU=Offline Domain Join,OU=Workstations,OU=cor,DC=corp,DC=contoso,DC=com"

If you don’t care to have the machine placed in a security group, just REM out this line. However, I recommend you do add it to a special security group with restricted permissions. You can then remove it from this group later once you’ve determined the computer is in safe hands.

Now launch the tool Add_Offline_Machine.cmd which will pre-provision offline domain objects for a serious of computers. These will be the names of the computers you want to be available to offline domain join:

You’ll notice two things happened. One, you’ll find a new COMPUTERNAME.txt file in the same directory you ran the tool. This is the offline provisioning file, and you’ll want to copy it to the ROOT of the Jumpdrive:

Second, you’ll notice a computer object was created inside the OU you specified earlier. This .txt file and computer object are a special pair. Our .txt offline provision file has a trusted key inside of it that Active Directory will recognize and trust, and associate to this computer object later on during the process. It’s all automated, so you don’t need to worry.

Booting and Imaging the Offline Computer with the Magic Offline Imaging Jumpdrive

Now comes the fun part. Take your Jumpdrive to a computer that is not connected to the network and boot it from the Jumpdrive. Image the computer in the normal fashion. Later on in the process, you’ll be prompted with a wizard where you can choose the Offline Provision File you created earlier:

This list is generated from all of the offline provisioning .txt files you added to the root of the Jumpdrive earlier. Once you select a file, the computer will join the domain as that name, even when there is no network access. That’s the magic part! Also, the file will be renamed from .txt to .old, indicating it has been used so the wizard does not make it available again the next time the Jumpdrive is used.

Joining the Domain

When the computer connects to the corporate network, the special key/AD Computer object pair will be linked, and the computer is joined to the domain as that computer object.

Once you have confirmed the computer is in good hands, the computer can be placed into a proper Security Group where it would get the standard security policies.

Administrative Tool: Add_Offline_Machine.cmd


echo off
color 9F
cls
echo ==============================================================
echo Offline Domain Join Tool (dmaiolo v2017-04-28)
echo ==============================================================
echo.
echo This tool is used to add a computer object that can be used
echo during an offline domain join for purposes of imaging OEM equipment
echo when not joined to the network.
echo.
SET /P computerName=[Enter Hostname To Add to Offline Domain Join:]
REM Set your OU below where you want the computers placed. For security, you could stick these in a stagging OU that only allows access to resources once the machine has been approved by an administrator
djoin /provision /domain "fqdn.company.com" /machine "%computerName%" /savefile .\%computerName%.txt /machineou "OU=Offline Domain Join,OU=Workstations,OU=con,DC=corp,DC=contoso,DC=com"
echo Adding %computerName% to Jump Drive Save File...
echo Adding %computerName% to Security Group...
dsmod group "CN=ISE - Offline Domain Join,OU=Your Special Offline Security Group,OU=Security Groups,OU=con,DC=corp,DC=contoso,DC=com" -addmbr "CN=%computerName%,OU=Offline Domain Join,OU=Workstations,OU=cor,DC=corp,DC=contoso,DC=com"
pause

Offline Join Tool: Choose_Machine_Join_File_STEP1.cmd


color 9f
@echo off
setlocal enabledelayedexpansion
set mediaroot=d:
set djoinfile=CURRENT_OFFLINE_MACHINE.DJOIN

:START
cls
echo ===========================================================================
echo JOIN MACHINE TO DOMAIN (OFFLINE) (v20160413 dmaiolo)
echo ===========================================================================
if exist %mediaroot%\%djoinfile% (
    GOTO END
) else (
    GOTO CHOOSEFILE
)
:CHOOSEFILE
if exist %mediaroot%\*.txt (
    GOTO CHOOSEFILESTART
) else (
    echo ERROR! No Domain Join files were found on the media root.
    echo Please add a domain join file using the djoin.exe command and try and again.
    echo This process will continue to look for this file every time you press any key.
    echo To bypass this entire process presss CTRL+C. You if you do, this computer will
    echo not join the domain.
    pause
    GOTO START
)
:CHOOSEFILESTART
echo Choose the the file associated to this machine from the list below. If you
echo do not see your machine file listed, please contact the helpdesk to have
echo it created, and then add it to the root of this installation media.
echo -

set count=0
set "choice_options="

for /F "delims=" %%A in ('dir /a:-d /b %mediaroot%\*.txt') do (
    REM Increment %count% here so that it doesn't get incremented later
    set /a count+=1

    REM Add the file name to the options array
    set "options[!count!]=%%A"

    REM Add the new option to the list of existing options
    set choice_options=!choice_options!!count!
)

for /L %%A in (1,1,!count!) do echo [%%A]. !options[%%A]!
echo -
choice /D 1 /T 60 /c:!choice_options! /n /m "Enter Number From Above (Option 1 Chosen in 60 Seconds): "

set var1=!options[%errorlevel%]!
echo %var1% > %mediaroot%\%djoinfile%
set /p var1=<%mediaroot%\%djoinfile%

choice /D y /c yn /T 60  /n /m "Proceed With %var1%? (y/n) (y Chosen in 60 Seonds): "
if %errorlevel%==1 (GOTO END) else GOTO CHOOSEFILE
:END

Offline Join Tool: Choose_Machine_Join_File_STEP1.cmd


color 9f
@echo off
setlocal enabledelayedexpansion
set mediaroot=d:
set djoinfile=CURRENT_OFFLINE_MACHINE.DJOIN
cls
set /p var2=<%mediaroot%\%djoinfile%
echo ===========================================================================
echo JOIN MACHINE TO DOMAIN (OFFLINE) (v20160413 dmaiolo) STEP 2
echo ===========================================================================
if exist %mediaroot%\%djoinfile% (
    GOTO STARTJOIN
) else (
    GOTO NOFILEFOUND
)
:STARTJOIN
echo Joining %var2% to Domain...
djoin /requestODJ /loadfile %mediaroot%\%var2% /windowspath %systemroot% /localos
echo Removing %var2% from the future list of options...
rename %mediaroot%\%var2% *.old
del %mediaroot%\%djoinfile%
GOTO END
:NOFILEFOUND
echo No File Was Found
:END

Overview

Contained in this article are the tools to help you detect and remediate the Spectre and Meltdown security vulnerabilities. This remediation is accomplished via the following SCCM configuration items which I specifically developed for this purpose.

Contained in these configuration items are several PowerShell scripts and return values for the configuration items, and may cause a slight slowdown on the machine during the evaluation. The detection is based off the Get-SpeculationControlSettings function that was provided by Microsoft. It is recommended that the baseline and associated PowerShell scripts are instructed to run once a day. You simply need to download these and import them into SCCM, then assign them to a baseline for deployment.

The end goal is twofold:

  • Provide the detailed data that is required to for remediation of these vulnerabilities
  • Provide the standard reporting on what devices remain vulnerable, and in which phase they are being remediated.

Configuration Baseline: Direct Detection

Use these configuration items to detect the vulnerabilities directly. This is the most useful baseline for determining your Spectre / Baseline compliance

  • CI.Meltdown-Spectre.CVE-2017-5754.mitigated
  • CI.Meltdown-Spectre.CVE-2017-5715.mitigated
  • CI.Meltdown-Spectre.CVE-2017-5753.mitigated.Chrome
  • CI.Meltdown-Spectre.CVE-2017-5753.mitigated.Firefox
  • CI.Meltdown-Spectre.CVE-2017-5753.mitigated.IE
  • CI.Meltdown-Spectre.AVCompatibility


Download Spectre Meltdown Direct Configuration Items

Direct Detection Reporting

When deployed as a baseline to your environment, you are presented with data that reports your overall compliance for the Meltdown / Spectre vulnerabilities. For a computer to be compliant, it must at least satisfy each of these six items. To really summarize what is being tested, it is important each computer is remdiated for CVE-2017-5715, CVE-2017-5754, CVE-2017-5753 and has the proper version of Antivirus.

Sample Report

cid:image003.png@01D3892D.E4C1DC00

cid:image001.jpg@01D38930.AA0A3EB0

Test Name

% Compliance

Type

Version

Total Clients

Compliant

Non-compliant

Failed

Remediated

Not-Applicable

Not-Detected

Unknown

CI.Meltdown-Spectre.CVE-2017-5754.mitigated

0.12%

OS

2

1607

2

1384

2

0

0

0

219

CI.Meltdown-Spectre.CVE-2017-5715.mitigated

0.00%

OS

2

1607

0

1386

2

0

0

0

219

CI.Meltdown-Spectre.CVE-2017-5753.mitigated.Chrome

83.76%

OS

4

1607

1346

39

3

0

0

0

219

CI.Meltdown-Spectre.CVE-2017-5753.mitigated.Firefox

85.44%

OS

5

1607

1373

11

4

0

0

0

219

CI.Meltdown-Spectre.CVE-2017-5753.mitigated.IE

0.68%

OS

5

1607

11

1375

2

0

0

0

219

CI.Meltdown-Spectre.Cisco.Amp.Equals.5.1.13.10483.or.6.0.5.10636

71.81%

OS

6

1607

1154

234

0

0

0

0

219

Configuration Baseline: Full Detection

Use these configuration items to detect all items associated with the vulnerabilities. This is the most useful baseline to supply to your IT staff so they have all of the relevant data to assist in remediation.

  • CI.Meltdown-Spectre.AVCompatibility
  • CI.Meltdown-Spectre.BTIDisabledByNoHardwareSupport
  • CI.Meltdown-Spectre.BTIDisabledBySystemPolicy
  • CI.Meltdown-Spectre.BTIHardwarePresent
  • CI.Meltdown-Spectre.BTIWindowsSupportEnabled
  • CI.Meltdown-Spectre.BTIWindowsSupportPresent
  • CI.Meltdown-Spectre.Cisco.Amp.Equals.5.1.13.10483.or.6.0.5.10636
  • CI.Meltdown-Spectre.CVE-2017-5715.mitigated
  • CI.Meltdown-Spectre.CVE-2017-5753.mitigated.Chrome
  • CI.Meltdown-Spectre.CVE-2017-5753.mitigated.Edge
  • CI.Meltdown-Spectre.CVE-2017-5753.mitigated.Firefox
  • CI.Meltdown-Spectre.CVE-2017-5753.mitigated.IE
  • CI.Meltdown-Spectre.CVE-2017-5754.mitigated
  • CI.Meltdown-Spectre.isDocker
  • CI.Meltdown-Spectre.isHyperV
  • CI.Meltdown-Spectre.isTerminalServer
  • CI.Meltdown-Spectre.KVAShadowPcidEnabled
  • CI.Meltdown-Spectre.KVAShadowRequired
  • CI.Meltdown-Spectre.KVAShadowWindowsSupportEnabled
  • CI.Meltdown-Spectre.KVAShadowWindowsSupportPresent
  • CI.Meltdown-Spectre.MinVmVersionForCpuBasedMitigations.Less.Than.6
  • CI.Meltdown-Spectre.OSMitigationRegKeySet
  • CI.Meltdown-Spectre.OSMitigationRegKeySet.FeatureSettingsOverride
  • CI.Meltdown-Spectre.OSMitigationRegKeySet.FeatureSettingsOverrideMask


Download Spectre Meltdown Full Configuration Items

Configuration Baseline

I suggest including the provided configuration items into the following two baselines:

  • CB.Meltdown-Spectre.Direct.Compliance
    • Failing compliance for this baseline indicates the computer is at risk.
  • CB.Meltdown-Spectre.Full.Compliance
    • Failing compliance for this baseline does not necessarily indicate risk, but provides all the reporting metrics that will be required for the remediation phase.

Sample Direct Report:

cid:image006.jpg@01D38897.D94CE1D0

Sample Full Report:

cid:image008.jpg@01D38897.D94CE1D0

Here is a sample of the baseline run on a machine and the type of data it gathers for CB.Meltdown-Spectre.Full.Compliance:

cid:image010.jpg@01D38897.D94CE1D0

Here is a sample of the baseline run on a machine and the type of data it gathers for CB.Meltdown-Spectre.Direct.Compliance:

cid:image011.jpg@01D38897.D94CE1D0

Mitigation Tactics

A Meltdown-Spectre vulnerability auto-remediation can be pushed to workstations to target any item, such as the OSMitigationRegKeySet. In this example, a collection of computers is targeted that fail the CI.Meltdown-Spectre.OSMitigationRegKeySet configuration item.

What Could This OSMitigationRegKeySet Fix Mitigate?

Enabling these mitigations may affect performance. The actual performance impact will depend on multiple factors, such as the specific chipset in your physical host and the workloads that are running. Microsoft recommends that you assess the performance impact for their environment and make necessary adjustments.

OSMitigationRegKeySet is true if the values for the registry key Memory Management are set as required,

i.e. FeatureSettingsOverride is 0 and FeatureSettingsOverrideMask is 3. OSMitigationRegKeySet is empty if the computer is a client.

An auto-remediation will create the following registry values if they are not present:

  • ‘HKLM:\SYSTEM\CurrentControlSet\Control\Session Manager\Memory Management’ -PropertyType ‘DWORD’ -Value ‘0’  -Name ‘FeatureSettingsOverride’
  • ‘HKLM:\SYSTEM\CurrentControlSet\Control\Session Manager\Memory Management’ -PropertyType ‘DWORD’ -Value ‘3’  -Name ‘FeatureSettingsOverrideMask’

Determinign Compliance

Compliance for this vulnerability can be tracked as follows:

cid:image002.jpg@01D38F87.A84E3150

cid:image004.jpg@01D38F87.A84E3150

Reporting Application

There is also a report I developed that stores the vulnerability check values locally on the computer for easy reporting purposes on the workstation itself. This creates values in the registry that can be easily viewed in the following registry location:

HKEY_LOCAL_MACHINE\SOFTWARE\Microsoft\Windows\CurrentVersion\MeltdownSpectreReport

A sample of the registry data the report produces:

The application as deployed through SCCM:

cid:image012.jpg@01D38897.D94CE1D0

PowerShell Function for Application

Run this as an SCCM application to return registry value results as shown above. This is a modification to the Get-SpeculationControlSettings function provided by Microsoft


  <#
.SYNOPSIS
    Query mitigation status of Meltdown and Spectre against one or multiple computers
.DESCRIPTION
    This script uses Get-SpeculationControlSettings (Microsoft) to get the mitigation status for Windows, 
    and extends the information with various registry keys, computer and software information to get a 
    broader picture. Also it uses Invoke-Parallel (RamblingCookieMonster) and Invoke-Command to obtain the 
    information from remote computers with speed.
.EXAMPLE
    PS C:\> .\MeltdownSpectreReport.ps1 -ComputerName computer01
    ComputerName                       : computer01
    Manufacturer                       : HP
    Model                              : HP Spectre x360 Convertible
    BIOS                               : F.47
    CPU                                : Intel(R) Core(TM) i7-6560U CPU @ 2.20GHz
    OperatingSystem                    : Microsoft Windows 10 Pro
    OSReleaseId                        : 1709
    isHyperV                           : True
    isTerminalServer                   : False
    isDocker                           : True
    CVE-2017-5754 mitigated            : True
    CVE-2017-5715 mitigated            : False
    CVE-2017-5753 mitigated in Edge    : True
    CVE-2017-5753 mitigated in IE      : True
    CVE-2017-5753 mitigated in Chrome  : False
    CVE-2017-5753 mitigated in Firefox : True
    BTIHardwarePresent                 : False
    BTIWindowsSupportPresent           : True
    BTIWindowsSupportEnabled           : False
    BTIDisabledBySystemPolicy          : False
    BTIDisabledByNoHardwareSupport     : True
    KVAShadowRequired                  : True
    KVAShadowWindowsSupportPresent     : True
    KVAShadowWindowsSupportEnabled     : True
    KVAShadowPcidEnabled               : True
    OSMitigationRegKeySet              :
    AVCompatibility                    : True
    MinVmVersionForCpuBasedMitigations : 2.0
    InstalledUpdates                   : {@{HotFixId=KB4048951; Description=Security Update; InstalledOn=15.11.2017 00:00:00; ComputerName=computer01},
                                        @{HotFixId=KB4049179; Description=Security Update; InstalledOn=05.11.2017 00:00:00; ComputerName=computer01},
                                        @{HotFixId=KB4051613; Description=Update; InstalledOn=09.11.2017 00:00:00; ComputerName=computer01}, @{HotFixId=KB4053577;
                                        Description=Security Update; InstalledOn=01.01.2018 00:00:00; ComputerName=computer01}...}
    Uptime                             : 15:01:18.3875647
    ExecutionDate                      : 06.01.2018
.EXAMPLE
    PS C:\> $ComputerName = Get-ADComputer -Filter * | Select-Object -ExpandProperty Name
    $Report = .\MeltdownSpectreReport.ps1 -ComputerName $ComputerName
    $Report | ConvertTo-Csv -NoTypeInformation -Delimiter ',' | Out-File C:\report.csv
    $Report | Out-GridView
.EXAMPLE
    PS C:\> $ComputerName = Get-Content $env:USERPROFILE\Desktop\servers.txt
    .\MeltdownSpectreReport.ps1 -ComputerName $ComputerName -ErrorAction SilentlyContinue | 
    Export-Csv -Path $env:USERPROFILE\Desktop\servers.txt -NoTypeInformation
.NOTES
    Author: VRDSE
    Version: 0.4.2
#>
[CmdletBinding()]
param(
    # Specify remote computers to query against. If not set, local computer is queried.
    [Parameter()]
    [string[]]
    $ComputerName
)
function Invoke-Parallel {
    <#
    .SYNOPSIS
        Function to control parallel processing using runspaces

    .DESCRIPTION
        Function to control parallel processing using runspaces

            Note that each runspace will not have access to variables and commands loaded in your session or in other runspaces by default.
            This behaviour can be changed with parameters.

    .PARAMETER ScriptFile
        File to run against all input objects.  Must include parameter to take in the input object, or use $args.  Optionally, include parameter to take in parameter.  Example: C:\script.ps1

    .PARAMETER ScriptBlock
        Scriptblock to run against all computers.

        You may use $Using: language in PowerShell 3 and later.

            The parameter block is added for you, allowing behaviour similar to foreach-object:
                Refer to the input object as $_.
                Refer to the parameter parameter as $parameter

    .PARAMETER InputObject
        Run script against these specified objects.

    .PARAMETER Parameter
        This object is passed to every script block.  You can use it to pass information to the script block; for example, the path to a logging folder

            Reference this object as $parameter if using the scriptblock parameterset.

    .PARAMETER ImportVariables
        If specified, get user session variables and add them to the initial session state

    .PARAMETER ImportModules
        If specified, get loaded modules and pssnapins, add them to the initial session state

    .PARAMETER Throttle
        Maximum number of threads to run at a single time.

    .PARAMETER SleepTimer
        Milliseconds to sleep after checking for completed runspaces and in a few other spots.  I would not recommend dropping below 200 or increasing above 500

    .PARAMETER RunspaceTimeout
        Maximum time in seconds a single thread can run.  If execution of your code takes longer than this, it is disposed.  Default: 0 (seconds)

        WARNING:  Using this parameter requires that maxQueue be set to throttle (it will be by default) for accurate timing.  Details here:
        http://gallery.technet.microsoft.com/Run-Parallel-Parallel-377fd430

    .PARAMETER NoCloseOnTimeout
        Do not dispose of timed out tasks or attempt to close the runspace if threads have timed out. This will prevent the script from hanging in certain situations where threads become non-responsive, at the expense of leaking memory within the PowerShell host.

    .PARAMETER MaxQueue
        Maximum number of powershell instances to add to runspace pool.  If this is higher than $throttle, $timeout will be inaccurate

        If this is equal or less than throttle, there will be a performance impact

        The default value is $throttle times 3, if $runspaceTimeout is not specified
        The default value is $throttle, if $runspaceTimeout is specified

    .PARAMETER LogFile
        Path to a file where we can log results, including run time for each thread, whether it completes, completes with errors, or times out.

    .PARAMETER AppendLog
        Append to existing log

    .PARAMETER Quiet
        Disable progress bar

    .EXAMPLE
        Each example uses Test-ForPacs.ps1 which includes the following code:
            param($computer)

            if(test-connection $computer -count 1 -quiet -BufferSize 16){
                $object = [pscustomobject] @{
                    Computer=$computer;
                    Available=1;
                    Kodak=$(
                        if((test-path "\\$computer\c$\users\public\desktop\Kodak Direct View Pacs.url") -or (test-path "\\$computer\c$\documents and settings\all users\desktop\Kodak Direct View Pacs.url") ){"1"}else{"0"}
                    )
                }
            }
            else{
                $object = [pscustomobject] @{
                    Computer=$computer;
                    Available=0;
                    Kodak="NA"
                }
            }

            $object

    .EXAMPLE
        Invoke-Parallel -scriptfile C:\public\Test-ForPacs.ps1 -inputobject $(get-content C:\pcs.txt) -runspaceTimeout 10 -throttle 10

            Pulls list of PCs from C:\pcs.txt,
            Runs Test-ForPacs against each
            If any query takes longer than 10 seconds, it is disposed
            Only run 10 threads at a time

    .EXAMPLE
        Invoke-Parallel -scriptfile C:\public\Test-ForPacs.ps1 -inputobject c-is-ts-91, c-is-ts-95

            Runs against c-is-ts-91, c-is-ts-95 (-computername)
            Runs Test-ForPacs against each

    .EXAMPLE
        $stuff = [pscustomobject] @{
            ContentFile = "windows\system32\drivers\etc\hosts"
            Logfile = "C:\temp\log.txt"
        }

        $computers | Invoke-Parallel -parameter $stuff {
            $contentFile = join-path "\\$_\c$" $parameter.contentfile
            Get-Content $contentFile |
                set-content $parameter.logfile
        }

        This example uses the parameter argument.  This parameter is a single object.  To pass multiple items into the script block, we create a custom object (using a PowerShell v3 language) with properties we want to pass in.

        Inside the script block, $parameter is used to reference this parameter object.  This example sets a content file, gets content from that file, and sets it to a predefined log file.

    .EXAMPLE
        $test = 5
        1..2 | Invoke-Parallel -ImportVariables {$_ * $test}

        Add variables from the current session to the session state.  Without -ImportVariables $Test would not be accessible

    .EXAMPLE
        $test = 5
        1..2 | Invoke-Parallel {$_ * $Using:test}

        Reference a variable from the current session with the $Using: syntax.  Requires PowerShell 3 or later. Note that -ImportVariables parameter is no longer necessary.

    .FUNCTIONALITY
        PowerShell Language

    .NOTES
        Credit to Boe Prox for the base runspace code and $Using implementation
            
            http://gallery.technet.microsoft.com/scriptcenter/Speedy-Network-Information-5b1406fb#content
            https://github.com/proxb/PoshRSJob/

        Credit to T Bryce Yehl for the Quiet and NoCloseOnTimeout implementations

        Credit to Sergei Vorobev for the many ideas and contributions that have improved functionality, reliability, and ease of use

    .LINK
        https://github.com/RamblingCookieMonster/Invoke-Parallel
    #>
    [cmdletbinding(DefaultParameterSetName = 'ScriptBlock')]
    Param (
        [Parameter(Mandatory = $false, position = 0, ParameterSetName = 'ScriptBlock')]
        [System.Management.Automation.ScriptBlock]$ScriptBlock,

        [Parameter(Mandatory = $false, ParameterSetName = 'ScriptFile')]
        [ValidateScript( {Test-Path $_ -pathtype leaf})]
        $ScriptFile,

        [Parameter(Mandatory = $true, ValueFromPipeline = $true)]
        [Alias('CN', '__Server', 'IPAddress', 'Server', 'ComputerName')]
        [PSObject]$InputObject,

        [PSObject]$Parameter,

        [switch]$ImportVariables,
        [switch]$ImportModules,
        [switch]$ImportFunctions,

        [int]$Throttle = 20,
        [int]$SleepTimer = 200,
        [int]$RunspaceTimeout = 0,
        [switch]$NoCloseOnTimeout = $false,
        [int]$MaxQueue,

        [validatescript( {Test-Path (Split-Path $_ -parent)})]
        [switch] $AppendLog = $false,
        [string]$LogFile,

        [switch] $Quiet = $false
    )
    begin {
        #No max queue specified?  Estimate one.
        #We use the script scope to resolve an odd PowerShell 2 issue where MaxQueue isn't seen later in the function
        if ( -not $PSBoundParameters.ContainsKey('MaxQueue') ) {
            if ($RunspaceTimeout -ne 0) { $script:MaxQueue = $Throttle }
            else { $script:MaxQueue = $Throttle * 3 }
        }
        else {
            $script:MaxQueue = $MaxQueue
        }
        Write-Verbose "Throttle: '$throttle' SleepTimer '$sleepTimer' runSpaceTimeout '$runspaceTimeout' maxQueue '$maxQueue' logFile '$logFile'"

        #If they want to import variables or modules, create a clean runspace, get loaded items, use those to exclude items
        if ($ImportVariables -or $ImportModules -or $ImportFunctions) {
            $StandardUserEnv = [powershell]::Create().addscript( {

                    #Get modules, snapins, functions in this clean runspace
                    $Modules = Get-Module | Select-Object -ExpandProperty Name
                    $Snapins = Get-PSSnapin | Select-Object -ExpandProperty Name
                    $Functions = Get-ChildItem function:\ | Select-Object -ExpandProperty Name

                    #Get variables in this clean runspace
                    #Called last to get vars like $? into session
                    $Variables = Get-Variable | Select-Object -ExpandProperty Name

                    #Return a hashtable where we can access each.
                    @{
                        Variables = $Variables
                        Modules   = $Modules
                        Snapins   = $Snapins
                        Functions = $Functions
                    }
                }).invoke()[0]

            if ($ImportVariables) {
                #Exclude common parameters, bound parameters, and automatic variables
                Function _temp {[cmdletbinding(SupportsShouldProcess = $True)] param() }
                $VariablesToExclude = @( (Get-Command _temp | Select-Object -ExpandProperty parameters).Keys + $PSBoundParameters.Keys + $StandardUserEnv.Variables )
                Write-Verbose "Excluding variables $( ($VariablesToExclude | Sort-Object ) -join ", ")"

                # we don't use 'Get-Variable -Exclude', because it uses regexps.
                # One of the veriables that we pass is '$?'.
                # There could be other variables with such problems.
                # Scope 2 required if we move to a real module
                $UserVariables = @( Get-Variable | Where-Object { -not ($VariablesToExclude -contains $_.Name) } )
                Write-Verbose "Found variables to import: $( ($UserVariables | Select-Object -expandproperty Name | Sort-Object ) -join ", " | Out-String).`n"
            }
            if ($ImportModules) {
                $UserModules = @( Get-Module | Where-Object {$StandardUserEnv.Modules -notcontains $_.Name -and (Test-Path $_.Path -ErrorAction SilentlyContinue)} | Select-Object -ExpandProperty Path )
                $UserSnapins = @( Get-PSSnapin | Select-Object -ExpandProperty Name | Where-Object {$StandardUserEnv.Snapins -notcontains $_ } )
            }
            if ($ImportFunctions) {
                $UserFunctions = @( Get-ChildItem function:\ | Where-Object { $StandardUserEnv.Functions -notcontains $_.Name } )
            }
        }

        #region functions
        Function Get-RunspaceData {
            [cmdletbinding()]
            param( [switch]$Wait )
            #loop through runspaces
            #if $wait is specified, keep looping until all complete
            Do {
                #set more to false for tracking completion
                $more = $false

                #Progress bar if we have inputobject count (bound parameter)
                if (-not $Quiet) {
                    Write-Progress  -Activity "Running Query" -Status "Starting threads"`
                        -CurrentOperation "$startedCount threads defined - $totalCount input objects - $script:completedCount input objects processed"`
                        -PercentComplete $( Try { $script:completedCount / $totalCount * 100 } Catch {0} )
                }

                #run through each runspace.
                Foreach ($runspace in $runspaces) {

                    #get the duration - inaccurate
                    $currentdate = Get-Date
                    $runtime = $currentdate - $runspace.startTime
                    $runMin = [math]::Round( $runtime.totalminutes , 2 )

                    #set up log object
                    $log = "" | Select-Object Date, Action, Runtime, Status, Details
                    $log.Action = "Removing:'$($runspace.object)'"
                    $log.Date = $currentdate
                    $log.Runtime = "$runMin minutes"

                    #If runspace completed, end invoke, dispose, recycle, counter++
                    If ($runspace.Runspace.isCompleted) {

                        $script:completedCount++

                        #check if there were errors
                        if ($runspace.powershell.Streams.Error.Count -gt 0) {
                            #set the logging info and move the file to completed
                            $log.status = "CompletedWithErrors"
                            Write-Verbose ($log | ConvertTo-Csv -Delimiter ";" -NoTypeInformation)[1]
                            foreach ($ErrorRecord in $runspace.powershell.Streams.Error) {
                                Write-Error -ErrorRecord $ErrorRecord
                            }
                        }
                        else {
                            #add logging details and cleanup
                            $log.status = "Completed"
                            Write-Verbose ($log | ConvertTo-Csv -Delimiter ";" -NoTypeInformation)[1]
                        }

                        #everything is logged, clean up the runspace
                        $runspace.powershell.EndInvoke($runspace.Runspace)
                        $runspace.powershell.dispose()
                        $runspace.Runspace = $null
                        $runspace.powershell = $null
                    }
                    #If runtime exceeds max, dispose the runspace
                    ElseIf ( $runspaceTimeout -ne 0 -and $runtime.totalseconds -gt $runspaceTimeout) {
                        $script:completedCount++
                        $timedOutTasks = $true

                        #add logging details and cleanup
                        $log.status = "TimedOut"
                        Write-Verbose ($log | ConvertTo-Csv -Delimiter ";" -NoTypeInformation)[1]
                        Write-Error "Runspace timed out at $($runtime.totalseconds) seconds for the object:`n$($runspace.object | out-string)"

                        #Depending on how it hangs, we could still get stuck here as dispose calls a synchronous method on the powershell instance
                        if (!$noCloseOnTimeout) { $runspace.powershell.dispose() }
                        $runspace.Runspace = $null
                        $runspace.powershell = $null
                        $completedCount++
                    }

                    #If runspace isn't null set more to true
                    ElseIf ($runspace.Runspace -ne $null ) {
                        $log = $null
                        $more = $true
                    }

                    #log the results if a log file was indicated
                    if ($logFile -and $log) {
                        ($log | ConvertTo-Csv -Delimiter ";" -NoTypeInformation)[1] | out-file $LogFile -append
                    }
                }

                #Clean out unused runspace jobs
                $temphash = $runspaces.clone()
                $temphash | Where-Object { $_.runspace -eq $Null } | ForEach-Object {
                    $Runspaces.remove($_)
                }

                #sleep for a bit if we will loop again
                if ($PSBoundParameters['Wait']) { Start-Sleep -milliseconds $SleepTimer }

                #Loop again only if -wait parameter and there are more runspaces to process
            } while ($more -and $PSBoundParameters['Wait'])

            #End of runspace function
        }
        #endregion functions

        #region Init

        if ($PSCmdlet.ParameterSetName -eq 'ScriptFile') {
            $ScriptBlock = [scriptblock]::Create( $(Get-Content $ScriptFile | out-string) )
        }
        elseif ($PSCmdlet.ParameterSetName -eq 'ScriptBlock') {
            #Start building parameter names for the param block
            [string[]]$ParamsToAdd = '$_'
            if ( $PSBoundParameters.ContainsKey('Parameter') ) {
                $ParamsToAdd += '$Parameter'
            }

            $UsingVariableData = $Null

            # This code enables $Using support through the AST.
            # This is entirely from  Boe Prox, and his https://github.com/proxb/PoshRSJob module; all credit to Boe!

            if ($PSVersionTable.PSVersion.Major -gt 2) {
                #Extract using references
                $UsingVariables = $ScriptBlock.ast.FindAll( {$args[0] -is [System.Management.Automation.Language.UsingExpressionAst]}, $True)

                If ($UsingVariables) {
                    $List = New-Object 'System.Collections.Generic.List`1[System.Management.Automation.Language.VariableExpressionAst]'
                    ForEach ($Ast in $UsingVariables) {
                        [void]$list.Add($Ast.SubExpression)
                    }

                    $UsingVar = $UsingVariables | Group-Object -Property SubExpression | ForEach-Object {$_.Group | Select-Object -First 1}

                    #Extract the name, value, and create replacements for each
                    $UsingVariableData = ForEach ($Var in $UsingVar) {
                        try {
                            $Value = Get-Variable -Name $Var.SubExpression.VariablePath.UserPath -ErrorAction Stop
                            [pscustomobject]@{
                                Name       = $Var.SubExpression.Extent.Text
                                Value      = $Value.Value
                                NewName    = ('$__using_{0}' -f $Var.SubExpression.VariablePath.UserPath)
                                NewVarName = ('__using_{0}' -f $Var.SubExpression.VariablePath.UserPath)
                            }
                        }
                        catch {
                            Write-Error "$($Var.SubExpression.Extent.Text) is not a valid Using: variable!"
                        }
                    }
                    $ParamsToAdd += $UsingVariableData | Select-Object -ExpandProperty NewName -Unique

                    $NewParams = $UsingVariableData.NewName -join ', '
                    $Tuple = [Tuple]::Create($list, $NewParams)
                    $bindingFlags = [Reflection.BindingFlags]"Default,NonPublic,Instance"
                    $GetWithInputHandlingForInvokeCommandImpl = ($ScriptBlock.ast.gettype().GetMethod('GetWithInputHandlingForInvokeCommandImpl', $bindingFlags))

                    $StringScriptBlock = $GetWithInputHandlingForInvokeCommandImpl.Invoke($ScriptBlock.ast, @($Tuple))

                    $ScriptBlock = [scriptblock]::Create($StringScriptBlock)

                    Write-Verbose $StringScriptBlock
                }
            }

            $ScriptBlock = $ExecutionContext.InvokeCommand.NewScriptBlock("param($($ParamsToAdd -Join ", "))`r`n" + $Scriptblock.ToString())
        }
        else {
            Throw "Must provide ScriptBlock or ScriptFile"; Break
        }

        Write-Debug "`$ScriptBlock: $($ScriptBlock | Out-String)"
        Write-Verbose "Creating runspace pool and session states"

        #If specified, add variables and modules/snapins to session state
        $sessionstate = [System.Management.Automation.Runspaces.InitialSessionState]::CreateDefault()
        if ($ImportVariables -and $UserVariables.count -gt 0) {
            foreach ($Variable in $UserVariables) {
                $sessionstate.Variables.Add((New-Object -TypeName System.Management.Automation.Runspaces.SessionStateVariableEntry -ArgumentList $Variable.Name, $Variable.Value, $null) )
            }
        }
        if ($ImportModules) {
            if ($UserModules.count -gt 0) {
                foreach ($ModulePath in $UserModules) {
                    $sessionstate.ImportPSModule($ModulePath)
                }
            }
            if ($UserSnapins.count -gt 0) {
                foreach ($PSSnapin in $UserSnapins) {
                    [void]$sessionstate.ImportPSSnapIn($PSSnapin, [ref]$null)
                }
            }
        }
        if ($ImportFunctions -and $UserFunctions.count -gt 0) {
            foreach ($FunctionDef in $UserFunctions) {
                $sessionstate.Commands.Add((New-Object System.Management.Automation.Runspaces.SessionStateFunctionEntry -ArgumentList $FunctionDef.Name, $FunctionDef.ScriptBlock))
            }
        }

        #Create runspace pool
        $runspacepool = [runspacefactory]::CreateRunspacePool(1, $Throttle, $sessionstate, $Host)
        $runspacepool.Open()

        Write-Verbose "Creating empty collection to hold runspace jobs"
        $Script:runspaces = New-Object System.Collections.ArrayList

        #If inputObject is bound get a total count and set bound to true
        $bound = $PSBoundParameters.keys -contains "InputObject"
        if (-not $bound) {
            [System.Collections.ArrayList]$allObjects = @()
        }

        #Set up log file if specified
        if ( $LogFile -and (-not (Test-Path $LogFile) -or $AppendLog -eq $false)) {
            New-Item -ItemType file -Path $logFile -Force | Out-Null
            ("" | Select-Object -Property Date, Action, Runtime, Status, Details | ConvertTo-Csv -NoTypeInformation -Delimiter ";")[0] | Out-File $LogFile
        }

        #write initial log entry
        $log = "" | Select-Object -Property Date, Action, Runtime, Status, Details
        $log.Date = Get-Date
        $log.Action = "Batch processing started"
        $log.Runtime = $null
        $log.Status = "Started"
        $log.Details = $null
        if ($logFile) {
            ($log | convertto-csv -Delimiter ";" -NoTypeInformation)[1] | Out-File $LogFile -Append
        }
        $timedOutTasks = $false
        #endregion INIT
    }
    process {
        #add piped objects to all objects or set all objects to bound input object parameter
        if ($bound) {
            $allObjects = $InputObject
        }
        else {
            [void]$allObjects.add( $InputObject )
        }
    }
    end {
        #Use Try/Finally to catch Ctrl+C and clean up.
        try {
            #counts for progress
            $totalCount = $allObjects.count
            $script:completedCount = 0
            $startedCount = 0
            foreach ($object in $allObjects) {
                #region add scripts to runspace pool
                #Create the powershell instance, set verbose if needed, supply the scriptblock and parameters
                $powershell = [powershell]::Create()

                if ($VerbosePreference -eq 'Continue') {
                    [void]$PowerShell.AddScript( {$VerbosePreference = 'Continue'})
                }

                [void]$PowerShell.AddScript($ScriptBlock).AddArgument($object)

                if ($parameter) {
                    [void]$PowerShell.AddArgument($parameter)
                }

                # $Using support from Boe Prox
                if ($UsingVariableData) {
                    Foreach ($UsingVariable in $UsingVariableData) {
                        Write-Verbose "Adding $($UsingVariable.Name) with value: $($UsingVariable.Value)"
                        [void]$PowerShell.AddArgument($UsingVariable.Value)
                    }
                }

                #Add the runspace into the powershell instance
                $powershell.RunspacePool = $runspacepool

                #Create a temporary collection for each runspace
                $temp = "" | Select-Object PowerShell, StartTime, object, Runspace
                $temp.PowerShell = $powershell
                $temp.StartTime = Get-Date
                $temp.object = $object

                #Save the handle output when calling BeginInvoke() that will be used later to end the runspace
                $temp.Runspace = $powershell.BeginInvoke()
                $startedCount++

                #Add the temp tracking info to $runspaces collection
                Write-Verbose ( "Adding {0} to collection at {1}" -f $temp.object, $temp.starttime.tostring() )
                $runspaces.Add($temp) | Out-Null

                #loop through existing runspaces one time
                Get-RunspaceData

                #If we have more running than max queue (used to control timeout accuracy)
                #Script scope resolves odd PowerShell 2 issue
                $firstRun = $true
                while ($runspaces.count -ge $Script:MaxQueue) {
                    #give verbose output
                    if ($firstRun) {
                        Write-Verbose "$($runspaces.count) items running - exceeded $Script:MaxQueue limit."
                    }
                    $firstRun = $false

                    #run get-runspace data and sleep for a short while
                    Get-RunspaceData
                    Start-Sleep -Milliseconds $sleepTimer
                }
                #endregion add scripts to runspace pool
            }
            Write-Verbose ( "Finish processing the remaining runspace jobs: {0}" -f ( @($runspaces | Where-Object {$_.Runspace -ne $Null}).Count) )

            Get-RunspaceData -wait
            if (-not $quiet) {
                Write-Progress -Activity "Running Query" -Status "Starting threads" -Completed
            }
        }
        finally {
            #Close the runspace pool, unless we specified no close on timeout and something timed out
            if ( ($timedOutTasks -eq $false) -or ( ($timedOutTasks -eq $true) -and ($noCloseOnTimeout -eq $false) ) ) {
                Write-Verbose "Closing the runspace pool"
                $runspacepool.close()
            }
            #collect garbage
            [gc]::Collect()
        }
    }
}

$GetMeltdownStatusInformation = {
    # Based on https://www.powershellgallery.com/packages/SpeculationControl/1.0.2
    function Get-SpeculationControlSettings {
        <# 
 
  .SYNOPSIS 
  This function queries the speculation control settings for the system. 
 
  .DESCRIPTION 
  This function queries the speculation control settings for the system. 
 
  Version 1.3. 
   
  #>

        [CmdletBinding()]
        param (

        )
  
        process {

            $NtQSIDefinition = @' 
    [DllImport("ntdll.dll")] 
    public static extern int NtQuerySystemInformation(uint systemInformationClass, IntPtr systemInformation, uint systemInformationLength, IntPtr returnLength); 
'@
    
            $ntdll = Add-Type -MemberDefinition $NtQSIDefinition -Name 'ntdll' -Namespace 'Win32' -PassThru


            [System.IntPtr]$systemInformationPtr = [System.Runtime.InteropServices.Marshal]::AllocHGlobal(4)
            [System.IntPtr]$returnLengthPtr = [System.Runtime.InteropServices.Marshal]::AllocHGlobal(4)

            $object = New-Object -TypeName PSObject

            try {
    
                #
                # Query branch target injection information.
                #

                #Write-Host "Speculation control settings for CVE-2017-5715 [branch target injection]" -ForegroundColor Cyan
                #Write-Host

                $btiHardwarePresent = $false
                $btiWindowsSupportPresent = $false
                $btiWindowsSupportEnabled = $false
                $btiDisabledBySystemPolicy = $false
                $btiDisabledByNoHardwareSupport = $false
    
                [System.UInt32]$systemInformationClass = 201
                [System.UInt32]$systemInformationLength = 4

                $retval = $ntdll::NtQuerySystemInformation($systemInformationClass, $systemInformationPtr, $systemInformationLength, $returnLengthPtr)

                if ($retval -eq 0xc0000003 -or $retval -eq 0xc0000002) {
                    # fallthrough
                }
                elseif ($retval -ne 0) {
                    throw (("Querying branch target injection information failed with error {0:X8}" -f $retval))
                }
                else {
    
                    [System.UInt32]$scfBpbEnabled = 0x01
                    [System.UInt32]$scfBpbDisabledSystemPolicy = 0x02
                    [System.UInt32]$scfBpbDisabledNoHardwareSupport = 0x04
                    [System.UInt32]$scfHwReg1Enumerated = 0x08
                    [System.UInt32]$scfHwReg2Enumerated = 0x10
                    [System.UInt32]$scfHwMode1Present = 0x20
                    [System.UInt32]$scfHwMode2Present = 0x40
                    [System.UInt32]$scfSmepPresent = 0x80

                    [System.UInt32]$flags = [System.UInt32][System.Runtime.InteropServices.Marshal]::ReadInt32($systemInformationPtr)

                    $btiHardwarePresent = ((($flags -band $scfHwReg1Enumerated) -ne 0) -or (($flags -band $scfHwReg2Enumerated)))
                    $btiWindowsSupportPresent = $true
                    $btiWindowsSupportEnabled = (($flags -band $scfBpbEnabled) -ne 0)

                    if ($btiWindowsSupportEnabled -eq $false) {
                        $btiDisabledBySystemPolicy = (($flags -band $scfBpbDisabledSystemPolicy) -ne 0)
                        $btiDisabledByNoHardwareSupport = (($flags -band $scfBpbDisabledNoHardwareSupport) -ne 0)
                    }

                    if ($PSBoundParameters['Verbose']) {
                        #Write-Host "BpbEnabled :" (($flags -band $scfBpbEnabled) -ne 0)
                        #Write-Host "BpbDisabledSystemPolicy :" (($flags -band $scfBpbDisabledSystemPolicy) -ne 0)
                        #Write-Host "BpbDisabledNoHardwareSupport :" (($flags -band $scfBpbDisabledNoHardwareSupport) -ne 0)
                        #Write-Host "HwReg1Enumerated :" (($flags -band $scfHwReg1Enumerated) -ne 0)
                        #Write-Host "HwReg2Enumerated :" (($flags -band $scfHwReg2Enumerated) -ne 0)
                        #Write-Host "HwMode1Present :" (($flags -band $scfHwMode1Present) -ne 0)
                        #Write-Host "HwMode2Present :" (($flags -band $scfHwMode2Present) -ne 0)
                        #Write-Host "SmepPresent :" (($flags -band $scfSmepPresent) -ne 0)
                    }
                }

                #Write-Host "Hardware support for branch target injection mitigation is present:"($btiHardwarePresent) -ForegroundColor $(If ($btiHardwarePresent) { [System.ConsoleColor]::Green } Else { [System.ConsoleColor]::Red })
                #Write-Host "Windows OS support for branch target injection mitigation is present:"($btiWindowsSupportPresent) -ForegroundColor $(If ($btiWindowsSupportPresent) { [System.ConsoleColor]::Green } Else { [System.ConsoleColor]::Red })
                #Write-Host "Windows OS support for branch target injection mitigation is enabled:"($btiWindowsSupportEnabled) -ForegroundColor $(If ($btiWindowsSupportEnabled) { [System.ConsoleColor]::Green } Else { [System.ConsoleColor]::Red })
  
                if ($btiWindowsSupportPresent -eq $true -and $btiWindowsSupportEnabled -eq $false) {
                    #Write-Host -ForegroundColor Red "Windows OS support for branch target injection mitigation is disabled by system policy:"($btiDisabledBySystemPolicy)
                    #Write-Host -ForegroundColor Red "Windows OS support for branch target injection mitigation is disabled by absence of hardware support:"($btiDisabledByNoHardwareSupport)
                }
        
                $object | Add-Member -MemberType NoteProperty -Name BTIHardwarePresent -Value $btiHardwarePresent
                $object | Add-Member -MemberType NoteProperty -Name BTIWindowsSupportPresent -Value $btiWindowsSupportPresent
                $object | Add-Member -MemberType NoteProperty -Name BTIWindowsSupportEnabled -Value $btiWindowsSupportEnabled
                $object | Add-Member -MemberType NoteProperty -Name BTIDisabledBySystemPolicy -Value $btiDisabledBySystemPolicy
                $object | Add-Member -MemberType NoteProperty -Name BTIDisabledByNoHardwareSupport -Value $btiDisabledByNoHardwareSupport

                #
                # Query kernel VA shadow information.
                #

                #Write-Host
                #Write-Host "Speculation control settings for CVE-2017-5754 [rogue data cache load]" -ForegroundColor Cyan
                #Write-Host    

                $kvaShadowRequired = $true
                $kvaShadowPresent = $false
                $kvaShadowEnabled = $false
                $kvaShadowPcidEnabled = $false

                $cpu = Get-WmiObject -Class Win32_Processor | Select-Object -First 1 #Fix for the case of multiple objects returned

                if ($cpu.Manufacturer -eq "AuthenticAMD") {
                    $kvaShadowRequired = $false
                }
                elseif ($cpu.Manufacturer -eq "GenuineIntel") {
                    $regex = [regex]'Family (\d+) Model (\d+) Stepping (\d+)'
                    $result = $regex.Match($cpu.Description)
            
                    if ($result.Success) {
                        $family = [System.UInt32]$result.Groups[1].Value
                        $model = [System.UInt32]$result.Groups[2].Value
                        $stepping = [System.UInt32]$result.Groups[3].Value
                
                        if (($family -eq 0x6) -and 
                            (($model -eq 0x1c) -or
                                ($model -eq 0x26) -or
                                ($model -eq 0x27) -or
                                ($model -eq 0x36) -or
                                ($model -eq 0x35))) {

                            $kvaShadowRequired = $false
                        }
                    }
                }
                else {
                    throw ("Unsupported processor manufacturer: {0}" -f $cpu.Manufacturer)
                }

                [System.UInt32]$systemInformationClass = 196
                [System.UInt32]$systemInformationLength = 4

                $retval = $ntdll::NtQuerySystemInformation($systemInformationClass, $systemInformationPtr, $systemInformationLength, $returnLengthPtr)

                if ($retval -eq 0xc0000003 -or $retval -eq 0xc0000002) {
                }
                elseif ($retval -ne 0) {
                    throw (("Querying kernel VA shadow information failed with error {0:X8}" -f $retval))
                }
                else {
    
                    [System.UInt32]$kvaShadowEnabledFlag = 0x01
                    [System.UInt32]$kvaShadowUserGlobalFlag = 0x02
                    [System.UInt32]$kvaShadowPcidFlag = 0x04
                    [System.UInt32]$kvaShadowInvpcidFlag = 0x08

                    [System.UInt32]$flags = [System.UInt32][System.Runtime.InteropServices.Marshal]::ReadInt32($systemInformationPtr)

                    $kvaShadowPresent = $true
                    $kvaShadowEnabled = (($flags -band $kvaShadowEnabledFlag) -ne 0)
                    $kvaShadowPcidEnabled = ((($flags -band $kvaShadowPcidFlag) -ne 0) -and (($flags -band $kvaShadowInvpcidFlag) -ne 0))

                    if ($PSBoundParameters['Verbose']) {
                        #Write-Host "KvaShadowEnabled :" (($flags -band $kvaShadowEnabledFlag) -ne 0)
                        #Write-Host "KvaShadowUserGlobal :" (($flags -band $kvaShadowUserGlobalFlag) -ne 0)
                        #Write-Host "KvaShadowPcid :" (($flags -band $kvaShadowPcidFlag) -ne 0)
                        #Write-Host "KvaShadowInvpcid :" (($flags -band $kvaShadowInvpcidFlag) -ne 0)
                    }
                }
        
                #Write-Host "Hardware requires kernel VA shadowing:"$kvaShadowRequired

                if ($kvaShadowRequired) {

                    #Write-Host "Windows OS support for kernel VA shadow is present:"$kvaShadowPresent -ForegroundColor $(If ($kvaShadowPresent) { [System.ConsoleColor]::Green } Else { [System.ConsoleColor]::Red })
                    #Write-Host "Windows OS support for kernel VA shadow is enabled:"$kvaShadowEnabled -ForegroundColor $(If ($kvaShadowEnabled) { [System.ConsoleColor]::Green } Else { [System.ConsoleColor]::Red })

                    if ($kvaShadowEnabled) {
                        #Write-Host "Windows OS support for PCID performance optimization is enabled: $kvaShadowPcidEnabled [not required for security]" -ForegroundColor $(If ($kvaShadowPcidEnabled) { [System.ConsoleColor]::Green } Else { [System.ConsoleColor]::Blue })
                    }
                }

        
                $object | Add-Member -MemberType NoteProperty -Name KVAShadowRequired -Value $kvaShadowRequired
                $object | Add-Member -MemberType NoteProperty -Name KVAShadowWindowsSupportPresent -Value $kvaShadowPresent
                $object | Add-Member -MemberType NoteProperty -Name KVAShadowWindowsSupportEnabled -Value $kvaShadowEnabled
                $object | Add-Member -MemberType NoteProperty -Name KVAShadowPcidEnabled -Value $kvaShadowPcidEnabled

                #
                # Provide guidance as appropriate.
                #

                $actions = @()
        
                if ($btiHardwarePresent -eq $false) {
                    $actions += "Install BIOS/firmware update provided by your device OEM that enables hardware support for the branch target injection mitigation."
                }

                if ($btiWindowsSupportPresent -eq $false -or $kvaShadowPresent -eq $false) {
                    $actions += "Install the latest available updates for Windows with support for speculation control mitigations."
                }

                if (($btiHardwarePresent -eq $true -and $btiWindowsSupportEnabled -eq $false) -or ($kvaShadowRequired -eq $true -and $kvaShadowEnabled -eq $false)) {
                    $guidanceUri = ""
                    $guidanceType = ""

            
                    $os = Get-WmiObject Win32_OperatingSystem

                    if ($os.ProductType -eq 1) {
                        # Workstation
                        $guidanceUri = "https://support.microsoft.com/help/4073119"
                        $guidanceType = "Client"
                    }
                    else {
                        # Server/DC
                        $guidanceUri = "https://support.microsoft.com/help/4072698"
                        $guidanceType = "Server"
                    }

                    $actions += "Follow the guidance for enabling Windows $guidanceType support for speculation control mitigations described in $guidanceUri"
                }

                if ($actions.Length -gt 0) {

                    #Write-Host
                    #Write-Host "Suggested actions" -ForegroundColor Cyan
                    #Write-Host 

                    foreach ($action in $actions) {
                        #Write-Host " *" $action
                    }
                }


                return $object

            }
            finally {
                if ($systemInformationPtr -ne [System.IntPtr]::Zero) {
                    [System.Runtime.InteropServices.Marshal]::FreeHGlobal($systemInformationPtr)
                }
 
                if ($returnLengthPtr -ne [System.IntPtr]::Zero) {
                    [System.Runtime.InteropServices.Marshal]::FreeHGlobal($returnLengthPtr)
                }
            }    
        }
    }    
    function Get-SystemInformation {
        $ComputerName = $env:COMPUTERNAME
        $Win32_ComputerSystem = Get-WmiObject -Class Win32_ComputerSystem
        $Win32_OperatingSystem = Get-WmiObject -Class Win32_OperatingSystem
        $ComputerManufacturer = $Win32_ComputerSystem.Manufacturer
        $ComputerModel = $Win32_ComputerSystem.Model
        $ProductType = $Win32_OperatingSystem.ProductType
        $BIOS = (Get-WmiObject -Class Win32_BIOS).Name
        $Processor = (Get-WmiObject -Class Win32_Processor).Name
        $OperatingSystem = $Win32_OperatingSystem.Caption
        $OSReleaseId = (Get-ItemProperty -Path 'HKLM:\SOFTWARE\Microsoft\Windows NT\CurrentVersion' -ErrorAction SilentlyContinue).ReleaseId
        $LastReboot = [Management.ManagementDateTimeConverter]::ToDateTime($Win32_OperatingSystem.LastBootUptime)
        $Uptime = ((Get-Date) - $LastReboot).ToString()
        $Hotfixes = Get-WmiObject -Class Win32_QuickFixEngineering | 
            Select-Object HotFixId, Description, InstalledOn, @{
            Name       = 'ComputerName'; 
            Expression = {$env:COMPUTERNAME}
        } | Sort-Object HotFixId
        $ExecutionDate = Get-Date -Format d

        $vmms = Get-Service -Name vmms -ErrorAction SilentlyContinue
        if ($vmms.Status -eq 'Running') {
            $isHyperV = $true
        }
        else {
            $isHyperV = $false
        }

        $TerminalServerMode = (Get-WmiObject -Namespace root\CIMV2/TerminalServices -Class Win32_TerminalServiceSetting).TerminalServerMode
        if ($TerminalServerMode -eq 1) {
            $isTerminalServer = $true
        }
        else {
            $isTerminalServer = $false
        }

        # Test for Docker
        if ($env:Path -match 'docker') {
            $isDocker = $true
        }
        else {
            $isDocker = $false
        }

        # Test for Chrome 
        # WMI Class Win32_Product does not show Chrome for me.
        # Win32_InstalledWin32Program requies administrative privileges and Windows 7
        $isChrome = Test-Path -Path 'C:\Program Files (x86)\Google\Chrome\Application\chrome.exe'  

        # Test for Edge
        if ($OSReleaseId) {
            # Is Windows 10
            if (Get-AppxPackage -Name Microsoft.MicrosoftEdge) {
                $isEdge = $true
            }
            else {
                $isEdge = $false
            }
        }
        else {
            $isEdge = $false
        }

        # Test for IE
        $isIE = Test-Path -Path 'C:\Program Files\Internet Explorer\iexplore.exe'

        # Test for Firefox
        $isFirefox = (Test-Path -Path 'C:\Program Files\Mozilla Firefox\firefox.exe') -or
        (Test-Path -Path 'C:\Program Files (x86)\Mozilla Firefox\firefox.exe')

        <#
        Customers need to enable mitigations to help protect against speculative execution side-channel vulnerabilities.

        Enabling these mitigations may affect performance. The actual performance impact will depend on multiple factors such as the specific chipset in your physical host and the workloads that are running. Microsoft recommends customers assess the performance impact for their environment and make the necessary adjustments if needed.

        Your server is at increased risk if your server falls into one of the following categories:

        Hyper-V hosts
        Remote Desktop Services Hosts (RDSH)
        For physical hosts or virtual machines that are running untrusted code such as containers or untrusted extensions for database, untrusted web content or workloads that run code that is provided from external sources.
        #>
        #if ($ProductType -ne 1) {
            # Product Type = Workstation
            $FeatureSettingsOverride = (Get-ItemProperty -Path 'HKLM:\SYSTEM\CurrentControlSet\Control\Session Manager\Memory Management' -ErrorAction SilentlyContinue).FeatureSettingsOverride # must be 0
            $FeatureSettingsOverrideMask = (Get-ItemProperty -Path 'HKLM:\SYSTEM\CurrentControlSet\Control\Session Manager\Memory Management' -ErrorAction SilentlyContinue).FeatureSettingsOverrideMask # must be 3
            if (($FeatureSettingsOverride -eq 0) -and ($FeatureSettingsOverrideMask -eq 3)) {
                $OSMitigationRegKeySet = $true
            }
            else {
                $OSMitigationRegKeySet = $false
            }
        #}

        # https://docs.microsoft.com/en-us/virtualization/hyper-v-on-windows/CVE-2017-5715-and-hyper-v-vms
        if ($isHyperV) {
            $MinVmVersionForCpuBasedMitigations = (Get-ItemProperty -Path 'HKLM:\SOFTWARE\Microsoft\Windows NT\CurrentVersion\Virtualization' -ErrorAction SilentlyContinue).MinVmVersionForCpuBasedMitigations
            if (-not $MinVmVersionForCpuBasedMitigations) {
                if ($OSReleaseId) {
                    $MinVmVersionForCpuBasedMitigations = '8.0'
                }
                else {
                    $MinVmVersionForCpuBasedMitigations = $false
                }
            }
        }

        <#
        Customers without Anti-Virus
        Microsoft recommends all customers protect their devices by running a supported anti-virus program. Customers can also take advantage of built-in anti-virus protection, Windows Defender for Windows 10 devices or Microsoft Security Essentials for Windows 7 devices. These solutions are compatible in cases where customers can’t install or run anti-virus software. Microsoft recommends manually setting the registry key in the following section to receive the January 2018 security updates.
        #>
        $AVRegKeyValue = (Get-ItemProperty -Path 'HKLM:\SOFTWARE\Microsoft\Windows\CurrentVersion\QualityCompat' -ErrorAction SilentlyContinue).'cadca5fe-87d3-4b96-b7fb-a231484277cc' # must be 0
        if ($AVRegKeyValue -eq 0) {
            $AVCompatibility = $true
        }
        else {
            $AVCompatibility = $false
        }

        $output = New-Object -TypeName PSCustomObject
        $output | Add-Member -MemberType NoteProperty -Name ComputerName -Value $ComputerName
        $output | Add-Member -MemberType NoteProperty -Name Manufacturer -Value $ComputerManufacturer
        $output | Add-Member -MemberType NoteProperty -Name Model -Value $ComputerModel
        $output | Add-Member -MemberType NoteProperty -Name BIOS -Value $BIOS
        $output | Add-Member -MemberType NoteProperty -Name CPU -Value $Processor
        $output | Add-Member -MemberType NoteProperty -Name OperatingSystem -Value $OperatingSystem
        $output | Add-Member -MemberType NoteProperty -Name ProductType -Value $ProductType
        $output | Add-Member -MemberType NoteProperty -Name OSReleaseId -Value $OSReleaseId
        $output | Add-Member -MemberType NoteProperty -Name isHyperV -Value $isHyperV
        $output | Add-Member -MemberType NoteProperty -Name isTerminalServer -Value $isTerminalServer
        $output | Add-Member -MemberType NoteProperty -Name isDocker -Value $isDocker
        $output | Add-Member -MemberType NoteProperty -Name isEdge -Value $isEdge
        $output | Add-Member -MemberType NoteProperty -Name isIE -Value $isIE
        $output | Add-Member -MemberType NoteProperty -Name isChrome -Value $isChrome
        $output | Add-Member -MemberType NoteProperty -Name isFirefox -Value $isFirefox        
        $output | Add-Member -MemberType NoteProperty -Name OSMitigationRegKeySet -Value $OSMitigationRegKeySet
        $output | Add-Member -MemberType NoteProperty -Name AVCompatibility -Value $AVCompatibility
        $output | Add-Member -MemberType NoteProperty -Name MinVmVersionForCpuBasedMitigations -Value $MinVmVersionForCpuBasedMitigations
        $output | Add-Member -MemberType NoteProperty -Name InstalledUpdates -Value $Hotfixes
        $output | Add-Member -MemberType NoteProperty -Name Uptime -Value $Uptime
        $output | Add-Member -MemberType NoteProperty -Name ExecutionDate -Value $ExecutionDate
        $output
    }

    # CVE-2017-5754 (Meltdown)
    function Get-CVE-2017-5754 ($SpeculationControlSettings, $SystemInformation) {
        if ($SpeculationControlSettings.KVAShadowRequired -eq $false) {
            $mitigated = $true
        }
        elseif (($SpeculationControlSettings.KVAShadowWindowsSupportPresent -eq $true) -and 
            ($SpeculationControlSettings.KVAShadowWindowsSupportEnabled -eq $true) -and
            ($SpeculationControlSettings.KVAShadowPcidEnabled -eq $true)) {
            $mitigated = $true
        }
        else {
            $mitigated = $false
        }
        $mitigated        
    }
    
    # CVE-2017-5715 (Spectre)
    function Get-CVE-2017-5715 ($SpeculationControlSettings, $SystemInformation) {
        # probably more -and then required, but better safe then sorry
        if (($SpeculationControlSettings.BTIHardwarePresent -eq $true) -and 
            ($SpeculationControlSettings.BTIWindowsSupportPresent -eq $true) -and
            ($SpeculationControlSettings.BTIWindowsSupportEnabled -eq $true)) {
            $mitigated = $true
        }
        else {
            $mitigated = $false
        }
        $mitigated
    }   

    # CVE-2017-5753 (Spectre)
    function Get-CVE-2017-5753 ($SystemInformation) {
        function IsHotfixInstalled ($ListOfRequiredKBs, $ListOfInstalledKBs) {
            <#
            .SYNOPSIS
                If any of the required KBs is installed, the function returns true
            #>
            foreach ($KB in $ListOfRequiredKBs) {
                if ($ListOfInstalledKBs -contains $KB) {
                    $installed = $true
                    break
                }
            }
            if ($installed) {
                $true
            }
            else {
                $false
            }
        }

        # Chrome
        # https://www.chromium.org/Home/chromium-security/site-isolation 
        if ($SystemInformation.isChrome) {
            $ChromeVersion = (Get-Item 'C:\Program Files (x86)\Google\Chrome\Application\chrome.exe').VersionInfo.ProductVersion -as [version]
            if ($ChromeVersion.Major -gt 63) {
                $ChromeMitigated = $true
            }
            elseif ($ChromeVersion.Major -eq 63) {
                $ChromeSitePerProcessSetting = (Get-ItemProperty -Path HKLM:\Software\Policies\Google\Chrome -ErrorAction SilentlyContinue).SitePerProcess # must be 1
                if ($ChromeSitePerProcessSetting -eq 1) {
                    $ChromeMitigated = $true
                }
                else {
                    $ChromeMitigated = $false
                }
            }
            else {
                $ChromeMitigated = $false
            }
        } 

        # Microsoft Browser (https://blogs.windows.com/msedgedev/2018/01/03/speculative-execution-mitigations-microsoft-edge-internet-explorer/)
        # From my understanding, the patch is effective as soon as the patch is installed

        # Edge
        if ($SystemInformation.isEdge) {
            #KBs from https://portal.msrc.microsoft.com/en-US/security-guidance/advisory/ADV180002
            $EdgeUpdates = 'KB4056893', 'KB4056890', 'KB4056891', 'KB4056892', 'KB4056888'
            $Hotfixes = $SystemInformation.InstalledUpdates | Select-Object -ExpandProperty HotFixId
            $EdgeMitigated = IsHotfixInstalled $EdgeUpdates $Hotfixes
        } 

        # Internet Explorer 
        if ($SystemInformation.isIE) {
            # KBs from https://portal.msrc.microsoft.com/en-US/security-guidance/advisory/ADV180002
            $IEUpdates = 'KB4056890', 'KB4056895', 'KB4056894', 'KB4056568', 'KB4056893', 'KB4056891', 'KB4056892'
            $Hotfixes = $SystemInformation.InstalledUpdates | Select-Object -ExpandProperty HotFixId
            $IEMitigated = IsHotfixInstalled $IEUpdates $Hotfixes
        } 

        # Firefox
        if ($SystemInformation.isFirefox) {
            # See https://blog.mozilla.org/security/2018/01/03/mitigations-landing-new-class-timing-attack/
            $Firefox = (Get-Item -Path 'C:\Program Files\Mozilla Firefox\firefox.exe', 
                'C:\Program Files (x86)\Mozilla Firefox\firefox.exe' -ErrorAction SilentlyContinue)
            $FirefoxVersion = ($Firefox.VersionInfo.ProductVersion | Sort-Object | Select-Object -First 1) -as [version]
            if ($FirefoxVersion -ge [version]'57.0.4') {
                $FirefoxMitigated = $true
            }
            else {
                $FirefoxMitigated = $false
            }
        }

        $output = New-Object -TypeName PSCustomObject
        $output | Add-Member -MemberType NoteProperty -Name EdgeMitigated -Value $EdgeMitigated
        $output | Add-Member -MemberType NoteProperty -Name IEMitigated -Value $IEMitigated
        $output | Add-Member -MemberType NoteProperty -Name ChromeMitigated -Value $ChromeMitigated
        $output | Add-Member -MemberType NoteProperty -Name FirefoxMitigated -Value $FirefoxMitigated
        $output
    }    

    $SystemInformation = Get-SystemInformation
    $SpeculationControlSettings = Get-SpeculationControlSettings -ErrorAction Continue
    $CVE20175754mitigated = Get-CVE-2017-5754 $SpeculationControlSettings $SystemInformation
    $CVE20175715mitigated = Get-CVE-2017-5715 $SpeculationControlSettings $SystemInformation
    $CVE20175753mitigated = Get-CVE-2017-5753 $SystemInformation

    $output = New-Object -TypeName PSCustomObject
    $output.PSObject.TypeNames.Insert(0, 'MeltdownSpectre.Report')
    

    $output | Add-Member -MemberType NoteProperty -Name ComputerName -Value $SystemInformation.ComputerName
    $output | Add-Member -MemberType NoteProperty -Name Manufacturer -Value $SystemInformation.Manufacturer
    $output | Add-Member -MemberType NoteProperty -Name Model -Value $SystemInformation.Model
    $output | Add-Member -MemberType NoteProperty -Name BIOS -Value $SystemInformation.BIOS
    $output | Add-Member -MemberType NoteProperty -Name CPU -Value $SystemInformation.CPU
    $output | Add-Member -MemberType NoteProperty -Name OperatingSystem -Value $SystemInformation.OperatingSystem
    $output | Add-Member -MemberType NoteProperty -Name OSReleaseId -Value $SystemInformation.OSReleaseId
    $output | Add-Member -MemberType NoteProperty -Name isHyperV -Value $SystemInformation.isHyperV
    $output | Add-Member -MemberType NoteProperty -Name isTerminalServer -Value $SystemInformation.isTerminalServer
    $output | Add-Member -MemberType NoteProperty -Name isDocker -Value $SystemInformation.isDocker
    #$output | Add-Member -MemberType NoteProperty -Name isIE -Value $SystemInformation.isIE
    #$output | Add-Member -MemberType NoteProperty -Name isEdge -Value $SystemInformation.isEdge
    #$output | Add-Member -MemberType NoteProperty -Name isChrome -Value $SystemInformation.isChrome
    #$output | Add-Member -MemberType NoteProperty -Name isFirefox -Value $SystemInformation.isFirefox
    $output | Add-Member -MemberType NoteProperty -Name 'CVE-2017-5754 mitigated' -Value $CVE20175754mitigated
    $output | Add-Member -MemberType NoteProperty -Name 'CVE-2017-5715 mitigated' -Value $CVE20175715mitigated
    $output | Add-Member -MemberType NoteProperty -Name 'CVE-2017-5753 mitigated in Edge' -Value $CVE20175753mitigated.EdgeMitigated
    $output | Add-Member -MemberType NoteProperty -Name 'CVE-2017-5753 mitigated in IE' -Value $CVE20175753mitigated.IEMitigated
    $output | Add-Member -MemberType NoteProperty -Name 'CVE-2017-5753 mitigated in Chrome' -Value $CVE20175753mitigated.ChromeMitigated
    $output | Add-Member -MemberType NoteProperty -Name 'CVE-2017-5753 mitigated in Firefox' -Value $CVE20175753mitigated.FirefoxMitigated
    $output | Add-Member -MemberType NoteProperty -Name BTIHardwarePresent -Value $SpeculationControlSettings.BTIHardwarePresent
    $output | Add-Member -MemberType NoteProperty -Name BTIWindowsSupportPresent -Value $SpeculationControlSettings.BTIWindowsSupportPresent
    $output | Add-Member -MemberType NoteProperty -Name BTIWindowsSupportEnabled -Value $SpeculationControlSettings.BTIWindowsSupportEnabled
    $output | Add-Member -MemberType NoteProperty -Name BTIDisabledBySystemPolicy -Value $SpeculationControlSettings.BTIDisabledBySystemPolicy
    $output | Add-Member -MemberType NoteProperty -Name BTIDisabledByNoHardwareSupport -Value $SpeculationControlSettings.BTIDisabledByNoHardwareSupport
    $output | Add-Member -MemberType NoteProperty -Name KVAShadowRequired -Value $SpeculationControlSettings.KVAShadowRequired
    $output | Add-Member -MemberType NoteProperty -Name KVAShadowWindowsSupportPresent -Value $SpeculationControlSettings.KVAShadowWindowsSupportPresent
    $output | Add-Member -MemberType NoteProperty -Name KVAShadowWindowsSupportEnabled -Value $SpeculationControlSettings.KVAShadowWindowsSupportEnabled
    $output | Add-Member -MemberType NoteProperty -Name KVAShadowPcidEnabled -Value $SpeculationControlSettings.KVAShadowPcidEnabled
    $output | Add-Member -MemberType NoteProperty -Name OSMitigationRegKeySet -Value $SystemInformation.OSMitigationRegKeySet
    $output | Add-Member -MemberType NoteProperty -Name AVCompatibility -Value $SystemInformation.AVCompatibility
    $output | Add-Member -MemberType NoteProperty -Name MinVmVersionForCpuBasedMitigations -Value $SystemInformation.MinVmVersionForCpuBasedMitigations  
    $output | Add-Member -MemberType NoteProperty -Name InstalledUpdates -Value $SystemInformation.InstalledUpdates
    $output | Add-Member -MemberType NoteProperty -Name Uptime -Value $SystemInformation.Uptime
    $output | Add-Member -MemberType NoteProperty -Name ExecutionDate -Value $SystemInformation.ExecutionDate

	$output
	
}

#Set Installation Registry Key
$registryPath = "HKLM:\SOFTWARE\Microsoft\Windows\CurrentVersion\MeltdownSpectreReport"
$Name = "Version"
$value = "1"

if(!(Test-Path $registryPath))
  {
    New-Item -Path $registryPath -Force | Out-Null
    New-ItemProperty -Path $registryPath -Name $name -Value $value -PropertyType DWORD -Force | Out-Null
    }
 else{
    New-ItemProperty -Path $registryPath -Name $name -Value $value -PropertyType DWORD -Force | Out-Null
    }

if ($ComputerName) {
    $SessionOption = New-PSSessionOption -NoMachineProfile
    $CimSession = New-PSSession -ComputerName $ComputerName -SessionOption $SessionOption

    Invoke-Parallel -InputObject $CimSession -ScriptBlock {
        Invoke-Command -ScriptBlock $GetMeltdownStatusInformation -Session $_
    } -ImportVariable

    $CimSession | Remove-CimSession -ErrorAction SilentlyContinue
}
else {
     $result = . $GetMeltdownStatusInformation

     <#
     #Outputing results to registry
     New-ItemProperty -Path $registryPath -Name ComputerName -Value ($result).ComputerName -PropertyType String -Force | Out-Null
     New-ItemProperty -Path $registryPath -Name Manufacturer -Value ($result).Manufacturer -PropertyType String -Force | Out-Null
     New-ItemProperty -Path $registryPath -Name Model -Value ($result).Model -PropertyType String -Force | Out-Null
     New-ItemProperty -Path $registryPath -Name BIOS -Value ($result).BIOS -PropertyType String -Force | Out-Null
     New-ItemProperty -Path $registryPath -Name CPU -Value ($result).CPU -PropertyType String -Force | Out-Null
     New-ItemProperty -Path $registryPath -Name OperatingSystem -Value ($result).OperatingSystem -PropertyType String -Force | Out-Null
     New-ItemProperty -Path $registryPath -Name OSReleaseId -Value ($result).OSReleaseId -PropertyType String -Force | Out-Null
     New-ItemProperty -Path $registryPath -Name isHyperV -Value ($result).isHyperV -PropertyType String -Force | Out-Null
     New-ItemProperty -Path $registryPath -Name isTerminalServer -Value ($result).isTerminalServer -PropertyType String -Force | Out-Null
     New-ItemProperty -Path $registryPath -Name isDocker -Value ($result).isDocker -PropertyType String -Force | Out-Null
     New-ItemProperty -Path $registryPath -Name 'CVE-2017-5754 mitigated' -Value ($result).'CVE-2017-5754 mitigated' -PropertyType String -Force | Out-Null
     New-ItemProperty -Path $registryPath -Name 'CVE-2017-5715 mitigated' -Value ($result).'CVE-2017-5715 mitigated' -PropertyType String -Force | Out-Null
     New-ItemProperty -Path $registryPath -Name 'CVE-2017-5753 mitigated in Edge' -Value ($result).'CVE-2017-5753 mitigated in Edge' -PropertyType String -Force | Out-Null
     New-ItemProperty -Path $registryPath -Name 'CVE-2017-5753 mitigated in IE' -Value ($result).'CVE-2017-5753 mitigated in IE' -PropertyType String -Force | Out-Null
     New-ItemProperty -Path $registryPath -Name 'CVE-2017-5753 mitigated in Chrome' -Value ($result).'CVE-2017-5753 mitigated in Chrome' -PropertyType String -Force | Out-Null
     New-ItemProperty -Path $registryPath -Name 'CVE-2017-5753 mitigated in Firefox' -Value ($result).'CVE-2017-5753 mitigated in Firefox' -PropertyType String -Force | Out-Null
     New-ItemProperty -Path $registryPath -Name BTIHardwarePresent -Value ($result).BTIHardwarePresent -PropertyType String -Force | Out-Null
     New-ItemProperty -Path $registryPath -Name BTIWindowsSupportPresent -Value ($result).BTIWindowsSupportPresent -PropertyType String -Force | Out-Null
     New-ItemProperty -Path $registryPath -Name BTIWindowsSupportEnabled -Value ($result).BTIWindowsSupportEnabled -PropertyType String -Force | Out-Null
     New-ItemProperty -Path $registryPath -Name BTIDisabledBySystemPolicy -Value ($result).BTIDisabledBySystemPolicy -PropertyType String -Force | Out-Null
     New-ItemProperty -Path $registryPath -Name BTIDisabledByNoHardwareSupport -Value ($result).BTIDisabledByNoHardwareSupport -PropertyType String -Force | Out-Null
     New-ItemProperty -Path $registryPath -Name KVAShadowRequired -Value ($result).KVAShadowRequired -PropertyType String -Force | Out-Null
     New-ItemProperty -Path $registryPath -Name KVAShadowWindowsSupportPresent -Value ($result).KVAShadowWindowsSupportPresent -PropertyType String -Force | Out-Null
     New-ItemProperty -Path $registryPath -Name KVAShadowWindowsSupportEnabled -Value ($result).KVAShadowWindowsSupportEnabled -PropertyType String -Force | Out-Null
     New-ItemProperty -Path $registryPath -Name KVAShadowPcidEnabled -Value ($result).KVAShadowPcidEnabled -PropertyType String -Force | Out-Null
     New-ItemProperty -Path $registryPath -Name OSMitigationRegKeySet -Value ($result).OSMitigationRegKeySet -PropertyType String -Force | Out-Null
     New-ItemProperty -Path $registryPath -Name AVCompatibility -Value ($result).AVCompatibility -PropertyType String -Force | Out-Null
     New-ItemProperty -Path $registryPath -Name MinVmVersionForCpuBasedMitigations -Value ($result).MinVmVersionForCpuBasedMitigations -PropertyType String -Force | Out-Null
     New-ItemProperty -Path $registryPath -Name InstalledUpdates -Value ($result).InstalledUpdates -PropertyType String -Force | Out-Null
     New-ItemProperty -Path $registryPath -Name Uptime -Value ($result).Uptime -PropertyType String -Force | Out-Null
     New-ItemProperty -Path $registryPath -Name ExecutionDate -Value ($result).ExecutionDate -PropertyType String -Force | Out-Null

     #[int]$var = $result.MinVmVersionForCpuBasedMitigations
     $result
     #>
     $returnvalue = . $GetMeltdownStatusInformation
     

     return ($returnvalue).'OSMitigationRegKeySet'
}

Overview

This process will allow you to automate deployment of required WSUS updates in your SCCM environment that were missed by your Software Update ADR. A built in SCCM SQL report can indicate which WSUS software updates are required, but not deployed in an environment.

Utilizing my two other functions, HTML Email Report and SCCM Report to Array, you can help automate the process of detecting these updates and re-injecting them into the proper Software Update Groups which target the computers requiring them.

Fundamentals

At its core, the idea here is to automate running this report and to do something with the values that are returned. For example we can choose the report we want to target:


$ReportPath="/ConfigMgr_DGM/Software Updates - B Deployment Management/Management 2 - Updates required but not deployed"

And then choose the same parameters that we would have chosen int he GUI above;


$inputParams = @{
    "CollID"="DGM00084";
    "UpdateClass"="Security Updates";
    "Vendor"="Microsoft";
}

and then using my SQL to Array function we can store the report results as an array:


$array = Get-DMGSCCMSQLReport -inputParams $inputParams `
                               -ReportServerUrl $ReportServerUrl `
                               -ReportPath $ReportPath `
                               -ProviderMachineName $ProviderMachineName `
                               -Sitecode $Sitecode

These returned results are easily be passed into the next phase where they are automatically injected into the proper Software Update Group:


$updates = $array
$undeployedupdates=$updates | %{Get-CMSoftwareUpdate -ArticleId $_.update -Fast | ?{$_.nummissing -ge 1}} 
$PilotSoftwareUpdategroup=Get-CMSoftwareUpdateGroup -Name "Desired Software Update Group* nnn"
$undeployedupdates | %{Add-CMSoftwareUpdateToGroup -SoftwareUpdateId $_.CI_ID -SoftwareUpdateGroupName "SVR - 2 - Production Servers Updates - All other Products* nnn"}

You can then choose the Software Update Group you want these automatically injected inside of:


#Multiple Arrays
Get-DMGEmailReport `
    -Arrays $OutputArrays `
    -ReportTitle "Updates Required but Not Deployed Report" `
    -from "SCCMSQLReports@corporation.com" `
    -To "c-dmaiolo@corporation.com" `
    -subject "SCCM Report: Required But Not Deployed (Not Superseded, Not Expired, Not Security Only)"

For this example let’s choose to also have the results first emailed out utilizing my HTML Email Function. This generates an email, indicating which updates were included:

required but not deployed

PowerShell Invocation


Import-Module \\scriptserver\scripts\DMGSCCM\Get-DMGSCCMSQLReport\Get-DMGSCCMSQLReport.psm1 -Force
Import-Module \\scriptserver\scripts\Get-DMGEmailReport\Get-DMGEmailReport.psm1 -Force

#Set Universal Parameters for this Report
$ReportServerUrl="http://sccmsqlrserver/ReportServer"
$ReportPath="/ConfigMgr_DGM/Software Updates - B Deployment Management/Management 2 - Updates required but not deployed"

#Create Some Arrays Of Data To Display in Report. You can create as many as you want.
$OutputArrays = @()
$ProviderMachineName = "sccmsqlrserver.corp.corporation.com"
$Sitecode = "DGM"

Set-Location $Sitecode":"

#Array1
$inputParams = @{
    "CollID"="DGM00084";
    "UpdateClass"="Security Updates";
    "Vendor"="Microsoft";
}

$array = Get-DMGSCCMSQLReport -inputParams $inputParams `
                               -ReportServerUrl $ReportServerUrl `
                               -ReportPath $ReportPath `
                               -ProviderMachineName $ProviderMachineName `
                               -Sitecode $Sitecode
Set-Location $Sitecode":"  
Write-Host "Gonna take a while..."                                          
$arrayresult = $array | %{Get-CMSoftwareUpdate -ArticleId $_.Details_Table0_Title -Fast| ?{$_.nummissing -ge 1 -and $_.IsExpired -eq $FALSE -and $_.isSuperseded -eq $FALSE -and $_.LocalizedDisplayName -notlike "*Security Only*"}} | `
                               Select ArticleID,LocalizedDisplayName,NumMissing,NumPresent,IsSuperseded,IsExpired -Unique | Sort-Object -Descending -Property NumMissing

$output = [PSCustomObject] @{
'Message' = "These are all of the Windows Updates that are required but not deplyoyed for All Servers.";
'Title' = "All Production Servers with Maintenanace Window (Security Updates): Required But Not Deployed";
'Color' = "Red";
'Array' = $arrayresult
}

if ($output.Array -ne $NULL){$OutputArrays+=$output}


#Array2
$inputParams = @{
    "CollID"="DGM00084";
    "UpdateClass"="Critical Updates";
    "Vendor"="Microsoft";
}

$array = Get-DMGSCCMSQLReport -inputParams $inputParams `
                               -ReportServerUrl $ReportServerUrl `
                               -ReportPath $ReportPath `
                               -ProviderMachineName $ProviderMachineName `
                               -Sitecode $Sitecode

Set-Location $Sitecode":"                                               
Write-Host "Gonna take a while..."                                          
$arrayresult = $array | %{Get-CMSoftwareUpdate -ArticleId $_.Details_Table0_Title -Fast| ?{$_.nummissing -ge 1 -and $_.IsExpired -eq $FALSE -and $_.isSuperseded -eq $FALSE -and $_.LocalizedDisplayName -notlike "*Security Only*"}} | `
                               Select ArticleID,LocalizedDisplayName,NumMissing,NumPresent,IsSuperseded,IsExpired -Unique | Sort-Object -Descending -Property NumMissing

$output = [PSCustomObject] @{
'Message' = "These are all of the Windows Updates that are required but not deplyoyed for All Servers.";
'Title' = "All Production Servers with Maintenanace Window (Security Updates): Required But Not Deployed";
'Color' = "Red";
'Array' = $arrayresult
}

if ($output.Array -ne $NULL){$OutputArrays+=$output}

#Array3
$inputParams = @{
    "CollID"="DGM00085";
    "UpdateClass"="Security Updates";
    "Vendor"="Microsoft";
}

$array = Get-DMGSCCMSQLReport -inputParams $inputParams `
                               -ReportServerUrl $ReportServerUrl `
                               -ReportPath $ReportPath `
                               -ProviderMachineName $ProviderMachineName `
                               -Sitecode $Sitecode

Set-Location $Sitecode":"                                               
Write-Host "Gonna take a while..."                                          
$arrayresult = $array | %{Get-CMSoftwareUpdate -ArticleId $_.Details_Table0_Title -Fast| ?{$_.nummissing -ge 1 -and $_.IsExpired -eq $FALSE -and $_.isSuperseded -eq $FALSE -and $_.LocalizedDisplayName -notlike "*Security Only*"}} | `
                               Select ArticleID,LocalizedDisplayName,NumMissing,NumPresent,IsSuperseded,IsExpired -Unique | Sort-Object -Descending -Property NumMissing

$output = [PSCustomObject] @{
'Message' = "These are all of the Windows Updates that are required but not deplyoyed for All Servers.";
'Title' = "All Production Servers with Maintenanace Window (Security Updates): Required But Not Deployed";
'Color' = "Red";
'Array' = $arrayresult
}

if ($output.Array -ne $NULL){$OutputArrays+=$output}

#Array4
$inputParams = @{
    "CollID"="DGM00085";
    "UpdateClass"="Critical Updates";
    "Vendor"="Microsoft";
}

$array = Get-DMGSCCMSQLReport -inputParams $inputParams `
                               -ReportServerUrl $ReportServerUrl `
                               -ReportPath $ReportPath `
                               -ProviderMachineName $ProviderMachineName `
                               -Sitecode $Sitecode

Set-Location $Sitecode":"                                               
Write-Host "Gonna take a while..."                                          
$arrayresult = $array | %{Get-CMSoftwareUpdate -ArticleId $_.Details_Table0_Title -Fast| ?{$_.nummissing -ge 1 -and $_.IsExpired -eq $FALSE -and $_.isSuperseded -eq $FALSE -and $_.LocalizedDisplayName -notlike "*Security Only*"}} | `
                               Select ArticleID,LocalizedDisplayName,NumMissing,NumPresent,IsSuperseded,IsExpired -Unique | Sort-Object -Descending -Property NumMissing

$output = [PSCustomObject] @{
'Message' = "These are all of the Windows Updates that are required but not deplyoyed for All Servers.";
'Title' = "All Production Servers with Maintenanace Window (Security Updates): Required But Not Deployed";
'Color' = "Red";
'Array' = $arrayresult
}

if ($output.Array -ne $NULL){$OutputArrays+=$output}

#Multiple Arrays
Get-DMGEmailReport `
    -Arrays $OutputArrays `
    -ReportTitle "Updates Required but Not Deployed Report" `
    -from "SCCMSQLReports@corporation.com" `
    -To "c-dmaiolo@corporation.com" `
    -subject "SCCM Report: Required But Not Deployed (Not Superseded, Not Expired, Not Security Only)"

Overview

I created this script, Get-DMGSCCMNewDeployments, to allow you to send out an email report of new SCCM deployments in your environment. This script uses native SCCM methods to build an automated report that sends an easy to read “what was deployed this week” report out to SCCM administrators.

Methodology

The report is compiled one array at a time, then combined into an array of arrays that is fed into my HTML email script.

Generating an Automated Report

This report loops through all of the available deployments that were created within the last seven days and emails the results to an email address:

If you would like to change the date range, simply update the values -MinDaysOld and -MaxDaysOld in the array element that is in the invocation function when calling the script:


'Array' = Get-DMGSCCMNewDeployments -MinDaysOld 0 -MaxDaysOld 7 -PercentSuccessThreshold 1 -NumberOfTargetedThreshold 0 -FeatureType Baseline -ProviderMachineName $ProviderMachineName -Sitecode $Sitecode;

PowerShell Invocation Function


Import-Module \\scriptserver\scripts\Get-DMGEmailReport\Get-DMGEmailReport.psm1 -Force
Import-Module \\scriptserver\Scripts\DMGSCCM\Get-DMGSCCMNewDeployments\Get-DMGSCCMNewDeployments.psm1 -Force

#Create Some Arrays Of Data To Display in Report. You can create as many as you want.
$OutputArrays = @()
$ProviderMachineName = "SCCMSERVER.corp.corporation.com" #Enter Your SCCM Server Here
$Sitecode = "NNN" #Enter Your Site Code Here
   
#Array1
$output = [PSCustomObject] @{
'Message' = "These are all of the new Task Sequence deployments, and the collections they were deployed to, that were created within the last seven days. As a reminder, Task Sequences should not be used to deploy applications outside of an Operating System deployment.";
'Title' = "Task Sequence Deployments`: New This Week!";
'Color' = "Red";
'Array' = Get-DMGSCCMNewDeployments -MinDaysOld 0 -MaxDaysOld 7 -PercentSuccessThreshold 1 -NumberOfTargetedThreshold 0 -FeatureType TaskSequence -ProviderMachineName $ProviderMachineName -Sitecode $Sitecode;
}
if ($output.Array -ne $NULL){$OutputArrays+=$output}

#Array2
$output = [PSCustomObject] @{
'Message' = "These are all of the new Package deployments, and the collections they were deployed to, that were created within the last seven days. As a reminder, packages have been depreciated in SCCM, in favor of using Applications.";
'Title' = "Package Deployments`: New This Week!";
'Color' = "Red";
'Array' = Get-DMGSCCMNewDeployments -MinDaysOld 0 -MaxDaysOld 7 -PercentSuccessThreshold 1 -NumberOfTargetedThreshold 0 -FeatureType Package -ProviderMachineName $ProviderMachineName -Sitecode $Sitecode;
}
if ($output.Array -ne $NULL){$OutputArrays+=$output}

#Array3
$output = [PSCustomObject] @{
'Message' = "These are all of the new Application deployments, and the collections they were deployed to, that were created within the last seven days.";
'Title' = "Application Deployments`: New This Week!";
'Color' = "Black";
'Array' = Get-DMGSCCMNewDeployments -MinDaysOld 0 -MaxDaysOld 7 -PercentSuccessThreshold 1 -NumberOfTargetedThreshold 0 -FeatureType Application -ProviderMachineName $ProviderMachineName -Sitecode $Sitecode;
}
if ($output.Array -ne $NULL){$OutputArrays+=$output}

#Array4
$output = [PSCustomObject] @{
'Message' = "These are all of the new Windows Update deployments, and the collections they were deployed to, that were created within the last seven days.";
'Title' = "Windows Update Deployments`: New This Week!";
'Color' = "Black";
'Array' = Get-DMGSCCMNewDeployments -MinDaysOld 0 -MaxDaysOld 7 -PercentSuccessThreshold 1 -NumberOfTargetedThreshold 0 -FeatureType Update -ProviderMachineName $ProviderMachineName -Sitecode $Sitecode;
}
if ($output.Array -ne $NULL){$OutputArrays+=$output}

#Array5
$output = [PSCustomObject] @{
'Message' = "These are all of the new Configuration Baseline deployments, and the collections they were deployed to, that were created within the last seven days.";
'Title' = "Configuration Baseline Deployments`: New This Week!";
'Color' = "Black";
'Array' = Get-DMGSCCMNewDeployments -MinDaysOld 0 -MaxDaysOld 7 -PercentSuccessThreshold 1 -NumberOfTargetedThreshold 0 -FeatureType Baseline -ProviderMachineName $ProviderMachineName -Sitecode $Sitecode;
}
if ($output.Array -ne $NULL){$OutputArrays+=$output}


#Multiple Arrays
Get-DMGEmailReport `
    -Arrays $OutputArrays `
    -ReportTitle "Last Seven Days SCCM Deployments Report" `
    -from "SCCMDeployments@corporation.com" `
    -To "serverteam@corporation.com","desktopteam@corporation.com","ddinh@corporation.com" `
    -subject "This Week's New SCCM Deployments"

PowerShell Function


<#
.SYNOPSIS
  Generates an array of SCCM objects that are new deployments
.NOTES
  Version:        1.0
  Author:         David Maiolo
  Creation Date:  2018-01-10
  Purpose/Change: Initial script development

#>

#---------------------------------------------------------[Initialisations]--------------------------------------------------------

function Get-DMGSCCMNewDeployments {
    param(
        [Parameter(Position=0,Mandatory=$true,ValueFromPipeline=$true)]
        [ValidateRange(1,10000)]
        [Int] $MaxDaysOld,
        [Parameter(Position=0,Mandatory=$true,ValueFromPipeline=$true)]
        [ValidateRange(0,10000)]
        [Int] $MinDaysOld,
        [Parameter(Position=0,Mandatory=$true,ValueFromPipeline=$true)]
        [ValidateRange(0,1)]
        [Float] $PercentSuccessThreshold,
        [Parameter(Position=0,Mandatory=$true,ValueFromPipeline=$true)]
        [ValidateRange(0,10000)]
        [int] $NumberOfTargetedThreshold,

        [Parameter(Position=2,Mandatory=$false,ValueFromPipeline=$true)]
        [ValidateSet("Application","Package","Update","Baseline","TaskSequence")]
        [String]$FeatureType,

        [Parameter(Position=3,Mandatory=$true,ValueFromPipeline=$true)]
        [String]$ProviderMachineName,

        [Parameter(Position=4,Mandatory=$true,ValueFromPipeline=$true)]
        [ValidateLength(3,3)]
        [String]$Sitecode

    )

    #Check which feature type was selected and convert to the number Get-CMDeployments uses
    if([bool]($MyInvocation.BoundParameters.Keys -contains 'FeatureType')){
           switch ($FeatureType)
           {
               'Application' {$FeatureTypeOutput=1}
               'Package' {$FeatureTypeOutput=2}
               'Update' {$FeatureTypeOutput=5}
               'Baseline' {$FeatureTypeOutput=6}
               'TaskSequence' {$FeatureTypeOutput=7}
           }
    }

    #Connect to SCCM
    # Import the ConfigurationManager.psd1 module
    $module = "$($ENV:SMS_ADMIN_UI_PATH)\..\ConfigurationManager.psd1"
    if((Get-Module ConfigurationManager) -eq $null) {
        Write-Host Importing $module ...
        Import-Module $module -Force
    }

    # Connect to the site's drive if it is not already present
    if((Get-PSDrive -Name $SiteCode -PSProvider CMSite -ErrorAction SilentlyContinue) -eq $null) {
        $NewPSDrive = New-PSDrive -Name $SiteCode -PSProvider CMSite -Root $ProviderMachineName
    }

    # Set the current location to be the site code.
    Set-Location "$($SiteCode):\"

    #Get date for comparison
    $MaxDaysOldAgo=(Get-Date).AddDays(-$MaxDaysOld)
    $MinDaysOldAgo=(Get-Date).AddDays(-$MinDaysOld)

    Write-Host "Processing $($FeatureType)s..."

    #Get deployment matching featuretype and date range
    if ($FeatureType){
        $DeploymentsNewerThanDaysAgo = Get-CMDeployment | Where-Object {$_.DeploymentTime -gt $MaxDaysOldAgo -and $_.DeploymentTime -lt $MinDaysOldAgo -and $_.FeatureType -eq $FeatureTypeOutput}
    }else{
        $DeploymentsNewerThanDaysAgo = Get-CMDeployment | Where-Object {$_.DeploymentTime -gt $MaxDaysOldAgo -and $_.DeploymentTime -lt $MinDaysOldAgo}
    }

    #Created a Calculated Value of the Percentage of Succesful Deployments and add additional Properties
    $DMGSCCMNewDeployments = $DeploymentsNewerThanDaysAgo | Select-Object -Property `
        @{Name = 'Deployment Name'; Expression = {$_.ApplicationName}},`
        @{Name = 'Deployed To'; Expression = {$_.CollectionName}},`
        @{Name = 'Deployment Time'; Expression = {$_.DeploymentTime}},`
        @{Name = 'Percent Success'; Expression = {[math]::Round(($_.Properties.NumberSuccess/$_.Properties.NumberTargeted),2)*100}},`
        @{Name = 'Number Targeted'; Expression = {$_.Properties.NumberTargeted}},`
        @{Name = 'Success'; Expression = {$_.Properties.NumberSuccess}},`
        @{Name = 'In Progress'; Expression = {$_.Properties.NumberInProgress}},`
        @{Name = 'Unknowns'; Expression = {$_.Properties.NumberUnknown}}

    #Calculate where the percent success than the supplied values
    $DMGSCCMNewDeployments = $DMGSCCMNewDeployments | Where-Object {$_."Percent Success" -le ($PercentSuccessThreshold*100) -and $_."Number Targeted" -gt $NumberOfTargetedThreshold} | Sort-Object -Property 'Deployment Name'

    #Return the array
    return $DMGSCCMNewDeployments

}