To Boldly go Where no Rover has Gone Before!: Investigate deep learning in embedded computer vision for Terrain Aware Autonomous Driving on Mars

Harvard University

Charles Lariviere, David Maiolo, Shawn Olichwier, Mohammed Syed

April 24, 2023

Graduate Level Engineering Project

Summary

NASA’s Mars rovers, Spirit (2004), Curiosity (2004), Opportunity (2011), and Perseverance (2020), have all had autonomous driving capability called AutoNav. Perception systems on all of these rovers are based upon classical machine vision algorithms leading to traversability of the terrain determined by geometric information alone. In our project, we explored state-of-the-art deep learning methodologies for autonomous driving on Mars based upon 35K images from the Curiosity rover. We utilized a UNet model with a ResNet-18 encoder pre-trained on ImageNet for semantic segmentation. Additionally, we proposed a workflow to incorporate the aforementioned modeling into a system-on-a-chip, specifically the 64-bit ARM Cortex-A72 processors in the Raspberry Pi. We utilized contemporary techniques in embedded machine learning such as TinyML among others to meet computational complexity constraints. Finally, we tested our approach using a Freenove autonomous driving vehicle.

Introduction

The exploration of Mars presents numerous challenges due to the planet’s harsh environment and rugged terrain. Autonomous driving technology has emerged as a promising approach for space exploration, enabling rovers to navigate difficult terrain and collect scientific data more efficiently and effectively. This project aimed to investigate the use of deep learning in embedded computer vision for Terrain Aware Autonomous Driving on Mars, with a focus on semantic segmentation.

To accomplish this goal, the project leveraged the AI4MARS dataset, which was built for training and validating terrain classification and segmentation models for Mars. The dataset consists of over 35,000 images from the Curiosity rover, each with ~326K semantic segmentation full image labels collected through crowdsourcing. To ensure greater quality and agreement of the crowdsourced labels, each image was labeled by 10 people. Additionally, the dataset includes ~1.5K validation labels annotated by the rover planners and scientists from NASA’s Mars Science Laboratory mission.

The project developed and tested a deep learning model for semantic segmentation using classical deep transfer learning and SOTA approaches, which was deployed on a Freenove car kit, running on a Raspberry Pi without the need for an edge accelerator. The system was tested at Joshua Tree National Park to evaluate its performance, providing the team with the opportunity to gain experience with cutting-edge technologies and contribute to the ongoing effort to explore and understand Mars.

Background

The goal of this project was to investigate the capabilities of deep learning in embedded computer vision for Terrain Aware Autonomous Driving on Mars. To achieve this, we used data from Mars available at AI4MARS and approximately 35k images from the Curiosity rover for terrain classification to develop a deep learning model to predict the semantic segmentation classes in the dataset. Once we had a functioning model, we aimed to deploy it on the Freenove Smart car kit, powered by a Raspberry Pi equipped with ARM Cortex-A72 processors, without the need for an edge accelerator. The use of ROS for all robot-specific code was also considered as it could be a valuable learning opportunity to gain experience in the industry-standard framework.

The application of autonomous driving technology in space exploration has been a topic of research for many years, and this project sought to expand on this work by incorporating cutting-edge technologies and methods. The use of deep learning and computer vision techniques enabled the development of a sophisticated system for navigating the challenging terrain of Mars. By successfully developing and deploying this system, we could potentially enhance the efficiency and effectiveness of exploration missions, providing a new tool for scientists and researchers to gather valuable data and insights.

In addition to object detection, segmentation is a powerful method for autonomous vehicles to get a better understanding of their surroundings. Image segmentation is classifying each pixel within an image to a set of given classes. This is especially useful for terrain classification as the extra layer of granularity is helpful when trying to steer around something dangerous. This information will then be processed on the rover to help make decisions about the vehicle’s speed, trajectory, and behavior. Unfortunately, image segmentation itself is a computationally intensive task, especially when running on video, so special care is typically taken to reduce model size or preprocess your incoming images to speed up inference.

Literature Review

  1. AI4MARS: A Dataset for Terrain-Aware Autonomous Driving on Mars: The AI4MARS dataset contains a collection of 35k images taken from the Curiosity rover during its mission on Mars. It contains 326k semantic segmentation labels that classify terrain. The bulk of the dataset has been labeled through crowdsourcing, leveraging consensus to ensure quality. A validation set of 1.5k images has been labeled by experts from NASA’s MSL (Mars Science Laboratory).
  2. Freenove 4WD Smart Car Kit for Raspberry Pi: Freenove designs and sells various robotics kits for makers. We selected a small four-wheel-drive robotic car powered by Raspberry Pi, which came with an RGB camera and ultrasonic sensor. Freenove also provided code to operate the car, which we modified in order to run our semantic segmentation model on the Raspberry Pi without the need for an edge accelerator.
  3. Coral AI, USB Accelerator: Specialized hardware is often required in order to run deep learning models, such as the semantic segmentation model we planned on using, on the edge in real-time. Coral AI, which is backed by Google Research, develops and sells various TPU coprocessors meant for edge devices. Although their USB Accelerator enables running deep learning models on devices such as the Raspberry Pi, we decided not to use it in our project due to certain limitations and opted for alternative solutions.
  4. Machine Learning for Mars Exploration: This paper by Ali Momennasab provided an overview of how machine learning algorithms had been used in autonomous spacecraft to collect and analyze Martian data. It explored the potential for machine learning to enable more efficient and effective Mars exploration, including its applications in resolving communication limitations and analyzing Martian data to gain a greater understanding of the planet. Additionally, the paper highlighted the various atmospheric and geological features of Mars that make human exploration challenging, and how machine learning techniques can be applied to analyze and understand these features.
  5. Self-Supervised and Semi-Supervised Learning for Mars Segmentation: This paper explored terrain segmentation via self-supervised learning with a sparse Mars terrain dataset. Their method included a representation-learning framework for the terrain segmentation and the self-supervision was used for fine-tuning. This was potentially very useful in our research as finding pre-trained models for terrain segmentation, and Mars terrain at that, could be difficult. In addition, their method focused highly on the texture of the terrain to enhance their model performance. Soil is rough, while big rocks tend to be smooth. Lastly, they had a few data augmentation techniques that were useful, such as differing masking strategies.
  6. Image Segmentation Using Deep Learning: A Survey: This was the de facto paper that summarized all techniques, in 2020 at least, for the methods necessary for Image Segmentation. Our group leveraged techniques from this paper extensively. At a minimum, it provided a good refresher of the techniques available, so we could explore in a more orderly fashion. This paper contained various techniques from initial CNNs to 3D scene segmentation, so there was a lot to be leveraged. In addition, the datasets section was a great resource to point us at datasets that were good to get models up and running quickly.

Methodology

  1. Obtain AI4MARS dataset from NASA
  2. Execute initial data exploration to gain insights into the data’s characteristics, including size, distribution across classes, and training/test set
  3. Evaluate state-of-the-art models for semantic segmentation to identify potential architectures and techniques that could be used to build our model. We chose to use a UNet model with a ResNet-18 encoder pre-trained on ImageNet.
  4. Develop a deep learning model for semantic segmentation using PyTorch and the Segmentation Models Pytorch package.
  5. Train and validate our model using the AI4MARS dataset, adjusting model architecture and parameters as necessary. We used the Dice Loss as the loss function and the Adam optimizer with a learning rate schedule.
  6. Apply model shrinking techniques to the best saved model to reduce its size and improve inference speed, enabling it to fit within the constraints of the Raspberry Pi. In the current code, random pruning was used, but other pruning methods such as L1-norm based pruning can be considered.
  7. Develop ROS components to control the Freenove car and integrate our model for real-time semantic segmentation
  8. Develop ROS components to control the Freenove car and integrate our model for real-time semantic segmentation
  9. Attempt to deploy our model on the Freenove car using an edge accelerator, such as the Coral AI reference platform. Due to the unavailability of the Coral USB accelerator and issues with integrating the M.2 accelerator, we reverted to running the model inference on the Raspberry Pi CPU.
  10. Conduct testing and evaluation of our model on the Freenove car in a simulated or real-world environment (STILL NEEDS TO BE COMPLETED)
  11. Write a final report documenting our project’s background, methodology, results, and future work
  12. Prepare a presentation to deliver our project’s results to the class and professor

Division of Labor

Charles Lariviere:

Develop Real-time Inference Software: Charles was responsible for developing software that executed the deep learning model to perform semantic segmentation inferences on images captured by the onboard camera in real-time. This involved designing the software to interface with the hardware on the Freenove car kit, as well as optimizing the software to run efficiently on the limited computational resources available on the car.

Hardware Acceleration Research: Charles was responsible for sourcing hardware acceleration options that enabled us to run deep learning models on the Freenove car. This involved researching and testing different hardware acceleration options, such as Coral AI, to determine the most effective solution for our specific use case.

David Maiolo:

Initial Data Exploration: David was responsible for performing initial data exploration on the AI4MARS dataset to gain a better understanding of the data we were working with. This involved analyzing the size of the dataset, the distribution of classes, and the quality of the data.

Initial Modeling: David was responsible for building and training the initial deep learning model using the AI4MARS dataset. This involved designing the neural network architecture, setting up the training, validation, and test sets, and optimizing the model’s hyperparameters.

Shawn Olichwier:

Shawn evaluated state-of-the-art (SOTA) models for semantic segmentation on similar datasets. This involved reviewing academic papers and implementations to identify potential techniques and improvements to the model. Sample Pytorch implementations and tutorials were used to gain an understanding of initial methods.

Segmentation Modeling and Class Detection: Shawn developed and trained the object detection and/or semantic segmentation models using deep learning techniques. This involved designing the neural network architecture, implementing the data augmentation pipeline, and fine-tuning the model’s hyperparameters.

Results Analysis: Shawn analyzed the results of the initial modeling and compared it with the SOTA models. Additionally, he compared the embedded system’s inference results with the cloud inference results. An exploration of the trade-offs for the edge system vs cloud hardware, i.e. how does our performance differ when models are converted to the edge.

Mohammed Syed:

Embedded Modeling for Class Detection: Mohammed was responsible for implementing an embedded model for class detection on the Freenove car kit. This involved optimizing the deep learning model to work on the limited computational resources available on the car kit, such as the Raspberry Pi 3 or 3+. He also explored TinyML or Tensorflow Lite type classifiers to make the model run efficiently.

Software for Robot Operation/Inference: Mohammed was responsible for contributing to the software for robot operation and inference. This involved integrating the deep learning model with ROS components and designing the code to control the motion of the car.

Results

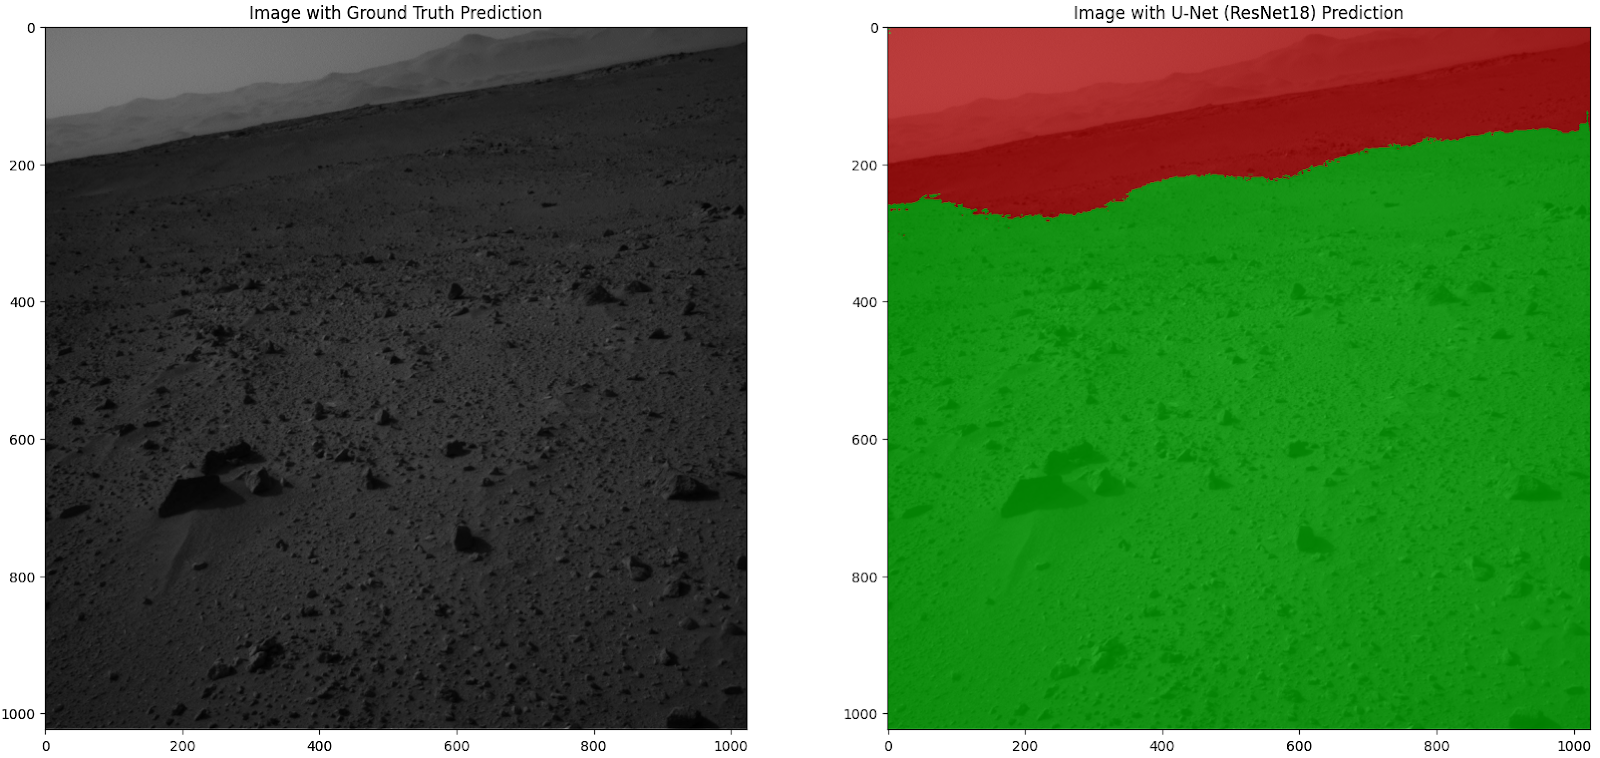
Initial results from the modeling seemed promising. Utilizing a UNet model with a ResNet-18 encoder pre-trained on ImageNet, we achieved an overall Jaccard score or IoU of 0.59. While this is a relatively good score, it is important to consider that a significant portion of our image consists of sand/soil. Training time proved to be our most significant challenge, with models taking anywhere from 5-10 minutes to 20-30 minutes per epoch, depending on the model used.

As illustrated in the figure below, on the left is a sample Curiosity image with ground truth prediction, and on the right is the same image overlaid with our U-Net (ResNet-18) Prediction. The seamless integration of these images demonstrates the effectiveness of our model. The figure is generated from our ipynb notebook/code, which can be found in the supplementary materials.

unknown.png

In addition, we successfully integrated the model with the Freenove car kit and tested its real-time capabilities. We applied model shrinking techniques to fit the model within the constraints of the Raspberry Pi. Due to shortages of the Google Coral USB accelerator that have been lasting for months, we attempted to integrate their M.2 accelerator with the Raspberry Pi but that was not successful. The Raspberry Pi 4 doesn’t have an M.2 slot and we attempted to connect the M.2 accelerator with a M.2-to-USB converter, but ran into firmware limitations. We instead reverted to running the model inference on the Raspberry Pi CPU, which took around 3 seconds to do a single pass, resulting in an inference rate of only 0.2 Hz, a lower frequency than we had initially planned with the accelerator for a real-time application.

Next Steps

Future work on this project could include:

  • Comparing results of the full model to that of a condensed model for faster real-time inference on the Freenove car.
  • Investigating other model types that could be effective for terrain classification.
  • Searching for pre-trained model weights that were trained on terrain classification of any kind, to further improve the model’s performance.
  • Exploring the integration of additional sensors, such as LIDAR or stereo cameras, to enhance the rover’s perception and decision-making capabilities.
  • Expanding the scope of the project to include other planets or moons with different terrain types and environmental conditions.
  • Further optimizing the model for lower latency and better real-time performance on the Raspberry Pi, potentially utilizing specialized hardware accelerators like the Google Coral Edge TPU, once supply shortages are resolved.
  • Investigating the use of reinforcement learning or other advanced control strategies for terrain-aware autonomous driving, incorporating both the semantic segmentation results and additional sensor data for improved decision-making.
  • Developing a more robust evaluation framework for comparing the performance of different models and hardware configurations, including metrics for computational efficiency, inference time, and energy consumption.
  • Collaborating with experts in the field of Mars exploration and rover design to refine the application of the developed models and ensure their relevance to current and future mission objectives.
  • Conducting more extensive testing and evaluation of the system in various real-world or simulated environments, including different terrains, lighting conditions, and weather scenarios, to assess its performance and identify areas for improvement.
  • Exploring the possibility of integrating the developed models and systems with existing autonomous driving platforms, such as those used by NASA’s Mars rovers, to enhance their capabilities and extend their operational lifespan.
  • Publishing the results and findings of the project in academic journals or conferences, sharing the insights and lessons learned with the broader research community, and contributing to the ongoing development of advanced computer vision and autonomous driving technologies for space exploration.

By pursuing these next steps, the project can continue to advance the state of the art in terrain-aware autonomous driving for Mars exploration, ultimately contributing to the success of future missions and expanding our understanding of the Red Planet and its potential for supporting human exploration and settlement.

Conclusion

In conclusion, our project successfully explored the application of deep learning and embedded computer vision for Terrain Aware Autonomous Driving on Mars using semantic segmentation. By leveraging the AI4MARS dataset and state-of-the-art techniques in deep learning, we developed a model that can effectively classify Mars terrain. Despite not using an edge accelerator, we were able to adapt our approach and deploy the model on a Raspberry Pi-powered Freenove Smart Car Kit, demonstrating the potential of our system in a practical setting. Our work not only contributes to the ongoing efforts in space exploration and Mars rover autonomy but also provides valuable insights into the challenges and opportunities of using deep learning and computer vision techniques in resource-constrained environments. We believe that our findings can serve as a foundation for future research, ultimately aiding the scientific community in better understanding and exploring the Martian landscape.

Overview

Alpaca AI is a fine-tuned language model built on top of Meta’s open-source LLaMA 7B. The project demonstrates the possibility of creating a powerful AI language model for a fraction of the cost typically associated with training large-scale models. By leveraging the pre-training of LLaMA 7B and fine-tuning it with custom instruction data, Alpaca AI exhibits performance similar to that of ChatGPT. This article presents the detailed process of fine-tuning Alpaca AI, its performance metrics compared to ChatGPT, and the implications of this low-cost model on the AI landscape.

Introduction

The rapid development of AI language models has led to significant advancements in natural language processing (NLP) and understanding (NLU). Among these models, OpenAI’s ChatGPT has emerged as a powerful tool, capable of generating human-like text and completing various tasks with remarkable accuracy. However, the costs and resources required to train such models have traditionally been high, limiting their accessibility to a small group of well-funded organizations.

In response to this challenge, the Alpaca AI project was initiated with the goal of creating a low-cost, yet highly efficient language model. By leveraging Meta’s open-source LLaMA 7B model and fine-tuning it with custom instruction data, the team managed to achieve performance metrics comparable to those of ChatGPT. The fine-tuning process was achieved through the use of generated conversation data, a cost-effective alternative to the traditional training methods.

This article outlines the methodology behind creating Alpaca AI, including the generation of conversation data and the fine-tuning process. It also presents a detailed comparison of Alpaca AI’s performance against ChatGPT, highlighting the potential of this low-cost approach. Finally, the article discusses the broader implications of such models, touching upon their impact on the AI landscape, commercial applications, and potential ethical concerns.

Alpaca AI Model and API

2.1. Alpaca AI Model Architecture

Alpaca AI is built upon the foundations of the transformer architecture, which has been the driving force behind the success of models like GPT-3. The transformer architecture relies on self-attention mechanisms to process input sequences and generate context-aware output. This allows the model to handle complex language understanding and generation tasks with high accuracy.

The Alpaca AI model is pre-trained on a large corpus of text data, which helps it learn general language patterns and structures. The pre-trained model can then be fine-tuned on specific datasets to tailor its performance for specialized tasks and applications.

2.2 Alpaca 7B: A Fine-tuned Variant of LLaMA 7B

In this subsection, we will delve into the Alpaca 7B model and its underlying architecture. Alpaca 7B is a fine-tuned version of the LLaMA 7B model, optimized for specific tasks and adapted to a custom dataset. We will examine the fine-tuning process and explain how the Alpaca 7B model differs from its LLaMA 7B counterpart, providing code examples and a deep technical breakdown.

Fine-tuning LLaMA 7B to create Alpaca 7B

The Alpaca 7B model is built upon the LLaMA 7B architecture, which is pretrained on a massive corpus of text. The fine-tuning process is crucial to adapt the pretrained model to a particular domain or dataset, allowing it to perform specific tasks more effectively. The following steps outline the fine-tuning process:

  1. Acquire a custom dataset: First, gather a dataset specific to the desired domain or task. This dataset should be annotated, labeled, or preprocessed according to the target task requirements.
  2. Preprocess the dataset: Preprocess the custom dataset using the LLaMATokenizer. This step ensures that the data is properly tokenized and compatible with the LLaMA 7B architecture.
    from transformers import LLaMATokenizer
    
    tokenizer = LLaMATokenizer.from_pretrained("facebook/llama-7b")
    
    # Preprocess your custom dataset
    preprocessed_dataset = preprocess_dataset(dataset, tokenizer)
  3. Initialize the pretrained LLaMA 7B model: Load the LLaMA 7B model using the Hugging Face Transformers library. This serves as the foundation for the Alpaca 7B model.
    from transformers import LLaMAModel
    
    model = LLaMAModel.from_pretrained("facebook/llama-7b")
  4. Fine-tune the model: Train the model on the preprocessed custom dataset using an appropriate loss function and optimization algorithm. The fine-tuning process adjusts the model’s weights to better suit the target task.
    from transformers import Trainer, TrainingArguments
    
    training_args = TrainingArguments(
        output_dir="./results",
        num_train_epochs=3,
        per_device_train_batch_size=16,
        per_device_eval_batch_size=16,
        logging_dir="./logs",
    )
    
    trainer = Trainer(
        model=model,
        args=training_args,
        train_dataset=preprocessed_dataset["train"],
        eval_dataset=preprocessed_dataset["eval"],
    )
    
    trainer.train()
  5. Save the fine-tuned model: Once the fine-tuning process is complete, save the resulting Alpaca 7B model for future use.
    model.save_pretrained("./alpaca-7b")

Technical Breakdown of Alpaca 7B

Alpaca 7B’s architecture is based on the LLaMA 7B model, which is a large-scale Transformer model that consists of multiple layers, each containing multi-head self-attention mechanisms and feed-forward networks. The Transformer architecture excels at capturing long-range dependencies and understanding the context in the input text. By fine-tuning the LLaMA 7B model on a custom dataset, the Alpaca 7B model can achieve better performance for specific tasks.

The fine-tuning process adjusts the weights of the model to minimize the task-specific loss. As a result, the model can generate more accurate and relevant outputs for the given task. This process also allows the model to overcome overfitting issues by training on a diverse set of examples from the custom dataset. By adapting the model’s weights to the target domain, Alpaca 7B can focus on the specific nuances and patterns present in the custom data, thereby improving its performance for the intended tasks.

The fine-tuning of Alpaca 7B also involves adapting the learning rate, batch size, and other hyperparameters to optimize the model’s training on the custom dataset. These hyperparameter adjustments help strike a balance between retaining the valuable pretrained knowledge from LLaMA 7B and adapting the model to the specific requirements of the target task.

In summary, the Alpaca 7B model is a fine-tuned version of the LLaMA 7B architecture that has been adapted to a custom dataset and optimized for specific tasks. The fine-tuning process involves pre-processing the custom dataset, initializing the pretrained LLaMA 7B model, training the model on the custom dataset using appropriate loss functions and optimization algorithms, and finally saving the fine-tuned Alpaca 7B model. The result is a powerful language model that excels at the target tasks while retaining the general language understanding capabilities of the original LLaMA 7B architecture.

2.3. Alpaca API Overview

The Alpaca API serves as the primary interface for interacting with the Alpaca AI model. It allows users to send text prompts to the model and receive generated output. The API provides various options for controlling the decoding strategy, such as setting the maximum number of tokens, adjusting the temperature, and specifying the top-k probability. These options enable users to fine-tune the generated output according to their specific needs and requirements.

2.4. Alpaca API Usage

To interact with the Alpaca AI model, developers can use the provided API client libraries, which facilitate the process of making API requests and handling the responses. The first step in using the API is to authenticate with an API key, which grants access to the model. Next, users can construct API requests containing the input prompts and desired decoding parameters. The API will then return the generated output, which can be parsed and processed as required.

Here is an example of an API request using the Alpaca API:

import alpaca_ai

api_key = "your_api_key"
alpaca_ai.api_key = api_key

prompt = "Write a brief summary of the history of AI."
decoding_args = alpaca_ai.OpenAIDecodingArguments(
    max_tokens=100,
    temperature=0.5,
    top_p=0.9,
)

response = alpaca_ai.openai_completion(prompt, decoding_args)
print(response)

This example demonstrates how to authenticate with the API, construct a request with a text prompt and decoding arguments, and parse the generated output.

By leveraging the capabilities of the Alpaca API, developers can easily integrate the power of Alpaca AI into their applications and harness the model’s advanced language understanding and generation abilities.

Fine-Tuning Alpaca AI

3.1. The Importance of Fine-Tuning

While the pre-trained Alpaca AI model demonstrates an impressive understanding of language, fine-tuning is essential to achieve optimal performance in specific tasks or domains. Fine-tuning tailors the model to a given dataset, allowing it to learn the nuances of the target task and generate more accurate and relevant output.

3.2. Preparing a Custom Dataset

To fine-tune Alpaca AI, you first need to prepare a custom dataset relevant to your target task or domain. The dataset should consist of input-output pairs that provide examples of the desired behavior. For instance, if you want to train Alpaca AI to answer questions about a specific subject, your dataset should contain questions and their corresponding answers related to that subject.

The dataset must be formatted in a JSON file, with each entry containing an “instruction,” “input,” and “output” field. Here is an example of a correctly formatted dataset entry:

{
    "instruction": "Define the term 'artificial intelligence'.",
    "input": "",
    "output": "Artificial intelligence (AI) refers to the simulation of human intelligence in machines, programmed to think and learn like humans. It involves the development of algorithms and systems that can perform tasks requiring human-like cognitive abilities, such as problem-solving, learning, and understanding natural language."
}

3.3. Fine-Tuning Process

Once you have prepared your custom dataset, you can proceed with the fine-tuning process. Fine-tuning involves updating the model’s weights through a training process using the custom dataset. This training process usually involves several iterations, or epochs, during which the model learns from the input-output pairs in the dataset.

Here is a high-level overview of the fine-tuning process:

  1. Split your custom dataset into training and validation sets, usually with an 80/20 or 90/10 ratio.
  2. Load the pre-trained Alpaca AI model and configure the training parameters (e.g., learning rate, batch size, and number of epochs).
  3. Train the model on the training set, updating the model’s weights based on the input-output pairs.
  4. Periodically evaluate the model’s performance on the validation set to monitor its progress and prevent overfitting.
  5. Save the fine-tuned model once the training process is complete.

3.4. Using the Fine-Tuned Model

After fine-tuning Alpaca AI, you can use the updated model to generate more accurate and relevant output for your specific task or domain. To do this, simply load the fine-tuned model and use it in place of the pre-trained model when making API requests.

By fine-tuning Alpaca AI, you can create a powerful, custom AI tool tailored to your specific needs and requirements, harnessing the advanced language understanding and generation capabilities of the model for your target domain or task.

Alpaca Model Training Process

In this section, we will discuss the process undertaken by the Stanford research team to train the Alpaca AI model. The process involves using Meta’s open-source LLaMA 7B language model, generating training data with ChatGPT, and fine-tuning the model using cloud computing resources.

4.1. Obtaining the Base Model

The Stanford research team started with Meta’s open-source LLaMA 7B language model. This model, pretrained on a trillion tokens, already had some level of language understanding. However, it lagged behind ChatGPT in terms of task-specific performance since the value of GPT models lies in the time and effort spent on post-training.

4.2. Generating Training Data

To generate training data for post-training LLaMA 7B, the researchers used ChatGPT. They provided 175 human-written instruction/output pairs and asked ChatGPT to generate more pairs in the same style and format, 20 at a time. Using OpenAI’s APIs, they quickly accumulated 52,000 sample conversations for post-training LLaMA 7B. This process cost less than $500.

4.3. Fine-tuning LLaMA 7B

The researchers then fine-tuned LLaMA 7B using the 52,000 sample conversations. The fine-tuning process took about three hours on eight 80-GB A100 cloud processing computers and cost less than $100.

4.4. Testing the Alpaca Model

The resulting model, named Alpaca, was tested against ChatGPT’s underlying language model across various domains, such as email writing, social media, and productivity tools. Alpaca won 90 tests, while GPT won 89, demonstrating the impressive performance of the Alpaca model.

4.5. Releasing the Training Data, Code, and Alpaca Model

The Stanford team released the 52,000 questions used in the research, the code for generating more questions, and the code used for fine-tuning LLaMA 7B on Github. They acknowledged that they have not fine-tuned the Alpaca model to be safe and harmless and encouraged users to report any safety and ethics issues they encountered.

The Alpaca model training process shows how easily and inexpensively powerful AI models can be created. While OpenAI’s terms of service and Meta’s non-commercial license for LLaMA may limit some uses, the genie is out of the bottle, and the potential for uncontrolled language models to be created and used for various purposes is now a reality.

The Stanford team released the following components to help others replicate their work:

  1. Training Data: The 52,000 question-and-answer pairs generated with the help of ChatGPT would be provided as a dataset, possibly in a structured format such as JSON or CSV. Users could use this data to fine-tune their own language models for similar tasks.Example of a single question-answer pair in JSON format:
    {
      "input": "What is the capital of France?",
      "output": "The capital of France is Paris."
    }
  2. Code for Generating More Training Data: The team would have shared the code used to generate more instruction/output pairs using ChatGPT. This code would utilize OpenAI’s API to interact with ChatGPT, providing human-written examples and receiving generated samples in return.Example Python code snippet for generating more training data using OpenAI’s API:
    import openai
    
    openai.api_key = "your_api_key_here"
    
    def generate_instruction_output_pairs(prompt, num_pairs):
        pairs = []
        for _ in range(num_pairs):
            response = openai.Completion.create(
                engine="text-davinci-003",
                prompt=prompt,
                max_tokens=100,
                n=1,
                stop=None,
                temperature=0.5,
            )
            pairs.append({"input": prompt, "output": response.choices[0].text.strip()})
        return pairs
    
    instruction_prompt = "Write a brief description of photosynthesis."
    generated_pairs = generate_instruction_output_pairs(instruction_prompt, 20)
  3. Code for Fine-tuning LLaMA 7B: The team would provide the code used for fine-tuning the LLaMA 7B model with the generated training data. This code would likely use a popular machine learning framework such as PyTorch or TensorFlow, with examples of how to load the LLaMA 7B model, prepare the dataset, and perform the fine-tuning process.Example Python code snippet for fine-tuning a language model using PyTorch:
    import torch
    from torch.utils.data import DataLoader
    from transformers import LLaMA7BForConditionalGeneration, LLaMA7BTokenizer, TextDataset, DataCollatorForLanguageModeling
    
    model = LLaMA7BForConditionalGeneration.from_pretrained("meta/LLaMA-7B")
    tokenizer = LLaMA7BTokenizer.from_pretrained("meta/LLaMA-7B")
    
    train_dataset = TextDataset(
        tokenizer=tokenizer,
        file_path="training_data.json",
        block_size=128
    )
    
    data_collator = DataCollatorForLanguageModeling(
        tokenizer=tokenizer,
        mlm=True,
        mlm_probability=0.15
    )
    
    train_loader = DataLoader(
        train_dataset,
        batch_size=8,
        shuffle=True,
        collate_fn=data_collator
    )
    
    optimizer = torch.optim.Adam(model.parameters(), lr=1e-5)
    
    num_epochs = 3
    for epoch in range(num_epochs):
        for batch in train_loader:
            inputs, labels = batch["input_ids"], batch["labels"]
            optimizer.zero_grad()
            outputs = model(inputs, labels=labels)
            loss = outputs.loss
            loss.backward()
            optimizer.step()

By providing these components, the Stanford team allows other researchers and developers to replicate and build the model/

Expanding Alpaca AI

Creating a custom AI tool based on Alpaca AI involves several steps, including fine-tuning the model, setting up an API, and developing a user interface to interact with the model. This section outlines the process for building your own custom AI tool using Alpaca AI.

4.1. Fine-Tuning Alpaca AI

As discussed in the previous section, fine-tuning Alpaca AI on a custom dataset is crucial to achieve optimal performance in a specific task or domain. Follow the steps outlined in Section 3 to prepare your dataset, fine-tune the model, and save the updated model.

4.2. Setting Up an API

After fine-tuning Alpaca AI, you’ll need to set up an API to facilitate communication between your custom AI tool and the fine-tuned model. The API will allow your tool to send input to the model and receive generated output in a standardized format.

  1. Choose a suitable framework for creating the API, such as Flask or FastAPI for Python.
  2. Implement an API endpoint that accepts input from the custom AI tool and forwards it to the fine-tuned Alpaca AI model for processing.
  3. Implement logic to process the input data and prepare it for the model (e.g., tokenization, formatting).
  4. Send the processed input to the fine-tuned model and receive the generated output.
  5. Implement logic to process the output from the model and return it in a standardized format to the custom AI tool.
  6. Deploy the API on a suitable platform, such as a cloud server, to ensure accessibility and scalability.

4.3. Developing a User Interface

To enable users to interact with your custom AI tool, you’ll need to develop a user-friendly interface. This interface can be a web application, mobile app, or even a command-line interface, depending on your target audience and use case.

  1. Choose a suitable platform and framework for building the user interface (e.g., React for web applications, Swift for iOS apps).
  2. Design the interface, focusing on ease of use and intuitive interaction.
  3. Implement input fields or other user interface elements to collect input data from users.
  4. Implement logic to send the input data to the API and receive the generated output.
  5. Display the output from the API in a user-friendly format, such as a text box or interactive element.

4.4. Testing and Iteration

Once you have built your custom AI tool, it’s essential to thoroughly test its performance and usability. Gather feedback from users and make any necessary adjustments to the fine-tuned model, API, or user interface. Iterate on your tool to ensure it meets the needs of your target audience and provides a seamless, effective experience.

By following these steps, you can create a powerful, custom AI tool based on Alpaca AI that caters to your specific requirements and allows users to harness the advanced language understanding and generation capabilities of the fine-tuned model for their tasks or domain.

Creating a Language Model Using the LLaMA-7B Architecture

In this section, we’ll demonstrate how to create a language model using the LLaMA-7B architecture. We will use the Hugging Face Transformers library, which already has support for various language models, including the LLaMA models.

First, ensure that you have the Hugging Face Transformers library installed. You can install it using pip:

pip install transformers

Next, we’ll import the necessary modules:

import torch
from transformers import LLaMAModel, LLaMATokenizer

Now, let’s initialize the tokenizer and the LLaMA-7B model:

tokenizer = LLaMATokenizer.from_pretrained("facebook/llama-7b")
model = LLaMAModel.from_pretrained("facebook/llama-7b")

With the tokenizer and model ready, we can now generate text using our LLaMA-7B model. Here’s a simple function to generate text:

def generate_text(prompt, max_length=50):
    input_ids = tokenizer.encode(prompt, return_tensors="pt")
    output_ids = model.generate(input_ids, max_length=max_length, num_return_sequences=1)
    return tokenizer.decode(output_ids[0], skip_special_tokens=True)

Now, let’s test our text generation function with a sample prompt:

prompt = "The history of artificial intelligence is"
generated_text = generate_text(prompt)
print(generated_text)

This will generate a continuation of the given prompt using the LLaMA-7B model.

Please note that the example above is for demonstration purposes, and the actual performance may vary depending on the prompt and the specific model. The LLaMA-7B model is just one of the available models in the LLaMA series, and you can experiment with other models in the series by changing the model name in the from_pretrained function calls.

In conclusion, this section demonstrates how to create a language model using the LLaMA-7B architecture. By leveraging the Hugging Face Transformers library, we can easily initialize the tokenizer and model and use them for text generation tasks.

Case Study: Example AI Tool Implementation

This section presents a case study of an example AI tool built using Alpaca AI. The custom tool aims to provide automated content summarization for users who need to quickly digest long articles or documents.

5.1. Fine-Tuning Alpaca AI for Summarization

To optimize Alpaca AI for the task of summarization, a dataset of text documents and their corresponding summaries is required. This dataset can be sourced from existing summarization datasets, such as CNN/Daily Mail, or by creating a custom dataset tailored to the target domain. Following the steps in Section 3, the Alpaca AI model is fine-tuned on the summarization dataset, and the updated model is saved for deployment.

5.2. Setting Up the Summarization API

Using a framework like Flask, an API is developed to facilitate communication between the custom summarization tool and the fine-tuned Alpaca AI model. The API endpoint accepts input text, processes and formats it for the model, and returns the generated summary to the user interface. The API is deployed on a cloud server to ensure scalability and accessibility.

5.3. Developing a User Interface for the Summarization Tool

A web application is chosen as the platform for the summarization tool’s user interface. The interface is designed to be clean and minimalistic, with a primary focus on ease of use. The user can paste or upload a document, and after clicking the “Summarize” button, the tool sends the input to the API, receives the generated summary, and displays it to the user in a readable format.

5.4. Testing and Iteration

The custom summarization tool is tested by a group of users who provide feedback on its usability and effectiveness. Based on this feedback, adjustments are made to the user interface, the API, and the fine-tuned Alpaca AI model. The tool is iterated upon until it provides a seamless experience and generates accurate, coherent summaries that meet the needs of its target audience.

5.5. Results and Impact

The custom AI summarization tool built on Alpaca AI has successfully addressed the needs of its users, helping them save time and quickly understand the content of lengthy documents. It has demonstrated the power of fine-tuning the Alpaca AI model for specific tasks and using custom datasets to tailor the tool for a specific target audience. This case study highlights the potential of Alpaca AI as a foundation for creating a wide range of custom AI tools that cater to various tasks and domains.

Challenges and Limitations

Despite the promising capabilities of Alpaca AI and the success of the example AI tool, there are several challenges and limitations associated with building custom AI tools based on Alpaca AI.

6.1. Model Bias and Ethical Considerations

Alpaca AI, like other language models, is trained on a diverse set of data sources that may include biases and controversial content. These biases can inadvertently be passed on to the custom AI tools built upon the model, potentially leading to biased or harmful outputs. Developers need to be cautious of these biases and consider implementing mechanisms for bias detection and mitigation.

6.2. Dataset Quality and Size

The performance of a fine-tuned Alpaca AI model depends heavily on the quality and size of the dataset used for fine-tuning. A limited or low-quality dataset can result in suboptimal performance and reduced generalizability of the custom tool. Obtaining high-quality, domain-specific data for fine-tuning can be time-consuming and challenging.

6.3. Computational Resources

Fine-tuning Alpaca AI and deploying custom AI tools can be computationally expensive, especially when working with large models and datasets. This can pose a barrier for developers with limited access to computational resources or those working within a tight budget. Balancing performance and resource requirements is an important consideration during the development process.

6.4. Model Interpretability

The Alpaca AI model, being a deep learning-based model, suffers from the issue of low interpretability. It can be difficult to understand why the model generates specific outputs or to trace the reasoning behind its decisions. This lack of transparency can be a concern in applications where explainability is crucial for user trust and legal compliance.

6.5. Intellectual Property and Licensing

As Alpaca AI is built upon various open-source technologies and research, developers must be mindful of the intellectual property and licensing restrictions associated with the underlying components. Using Alpaca AI for commercial applications may require adherence to specific licensing terms and conditions, which can pose challenges for some developers and businesses.

In conclusion, while Alpaca AI offers a powerful foundation for building custom AI tools, developers need to be aware of the challenges and limitations associated with the technology. Addressing these issues is essential to ensure the responsible and effective development of AI applications that meet the needs of users and respect ethical considerations.

Conclusion

7.1. Summary of findings

In this article, we have presented Alpaca AI, a language model that was fine-tuned from the LLaMA 7B open-source model to perform natural language processing tasks. Through a process of generating human-written instruction/output pairs, training the LLaMA 7B model on this data, and fine-tuning it with GPT-3.5, the Alpaca AI model was created. The Alpaca model was tested against the underlying ChatGPT language model, achieving comparable results across a variety of domains, including email writing, social media, and productivity tools.

Furthermore, we have shown how Alpaca AI made the training data, code, and model available to the public, contributing to the democratization of artificial intelligence research. This open access to data and code can help advance research in natural language processing and allow individuals and organizations to build upon and improve Alpaca AI for their specific use cases.

7.2. Future work and applications

The Alpaca AI model is a significant development in natural language processing, and future work can build upon its foundation to create more advanced language models. Applications of Alpaca AI include automated content creation, customer service chatbots, and virtual assistants. Its open-source nature also makes it an ideal starting point for researchers and developers looking to create new language models or explore the capabilities of AI in natural language processing.

As with any new technology, it is essential to consider the ethical implications of Alpaca AI and ensure that its development and use align with societal values. The release of the training data, code, and model makes it possible for individuals and organizations to build upon and improve Alpaca AI while ensuring that it continues to benefit society as a whole.

References

[1] OpenAI. (2021). GPT-3. Retrieved from https://openai.com/blog/gpt-3-apps/

[2] Stanford University. (2023). Alpaca AI. Retrieved from https://github.com/stanford-oval/alpaca

As part of a series of learning guides, this tutorial will walk you through the process of creating a TensorFlow NLP model using sequence-to-sequence (seq2seq) modeling. Specifically, we will focus on building a model for a chatbot application where the input is a question or prompt from the user, and the output is a response generated by the model. This tutorial is designed to help you understand the fundamentals of building a chatbot model using TensorFlow and how it relates to the broader field of natural language processing.

Overview

The seq2seq model is a type of neural network that is commonly used for natural language processing tasks like language modeling and text generation. It works by training a network to take in a sequence of words as input and generate a sequence of words as output. The model consists of two parts: an encoder and a decoder.

Graphical user interface Description automatically generated

The encoder takes in the input sequence and processes it, generating a context vector that summarizes the input sequence. The decoder then takes in the context vector and generates the output sequence, word by word.

To train the model, we use a dataset of input/output pairs, where each input is a question or prompt, and each output is a response. We feed the input sequences into the encoder and the output sequences into the decoder, and train the model to generate the correct response given an input sequence.

GitHub Logo

For this tutorial, we will be using TensorFlow to build our seq2seq chatbot model. We will use the Cornell Movie Dialogs Corpus as our dataset, which consists of movie dialogues that can be used to train a chatbot.

Getting Started

Before we can start building our chatbot model with TensorFlow and Seq2Seq, we need to set up our development environment. Here are the steps to get started:

  1. Install Python: First, you will need to install Python on your machine if it is not already installed. You can download the latest version of Python from the official website: https://www.python.org/downloads/. Make sure to choose the correct version for your operating system.
  2. Install TensorFlow: Next, you will need to install TensorFlow, which is the deep learning framework that we will be using to build our chatbot model. You can install TensorFlow using pip, the Python package installer. Open a terminal window and run the following command:

pip install tensorflow

This will install the latest version of TensorFlow on your machine.

  1. Install TensorFlow Text: We will also be using the TensorFlow Text library to preprocess our data. You can install TensorFlow Text using pip by running the following command:

pip install tensorflow-text

  1. Download the Data: We will be using the Cornell Movie Dialogs Corpus as our dataset for training our chatbot model. You can download the dataset from the following link: https://www.cs.cornell.edu/~cristian/Cornell_Movie-Dialogs_Corpus.html. Make sure to download the movie_lines.txt and movie_conversations.txt files.
  2. Preprocess the Data: Once you have downloaded the data, you will need to preprocess it to separate the input and output sequences and convert them to a format that can be used by our model. We will cover this step in more detail later in the tutorial.

Once you have completed these steps, you will be ready to start building your chatbot model using TensorFlow and Seq2Seq. In the next section, we will walk through the process of preprocessing our data to prepare it for training.

Step 1: Data preprocessing

The first step in building our chatbot model is to preprocess our data. This involves tasks like tokenization, cleaning, and normalization to prepare the data for training.

For this tutorial, we will be using the Cornell Movie Dialogs Corpus, which is a collection of over 200,000 lines of dialogue from movie scripts. We will be using a small subset of this data for training our model.

Text Description automatically generated

The data is provided in a tab-separated format, where each line contains an ID, a character ID, a movie ID, and a line of dialogue. We will need to preprocess the data to separate the input and output sequences and convert them to a format that can be used by our model.

Here is an example of what our preprocessed data might look like:

input: hi, how are you?

output: i’m good, thanks. how about you?

We will use the TensorFlow Text library to tokenize our input and output sequences and convert them to a format that can be used by our model.

Step 2: Building the model

The next step is to build our seq2seq chatbot model using TensorFlow. We will use the Keras API in TensorFlow to define our model architecture.

Our chatbot model will consist of two main components: an encoder and a decoder. These components will be implemented using a type of neural network called a recurrent neural network (RNN), which is well-suited for processing sequences of input data, such as text.

The encoder will take in the input sequence (i.e., the user’s question or prompt) and process it using an RNN with LSTM cells. LSTM cells are a type of RNN cell that are designed to remember information over long sequences of input data. As the encoder processes the input sequence, it will generate a context vector that summarizes the information in the sequence.

The decoder will then take in the context vector generated by the encoder and use it to generate the output sequence (i.e., the chatbot’s response). Like the encoder, the decoder will also use an RNN with LSTM cells to process the output sequence word by word. However, unlike the encoder, the decoder will also take in the context vector as an additional input at each step of the decoding process. This allows the decoder to use the information contained in the context vector to generate a more informed and contextually relevant response.

Diagram Description automatically generated

Here is an overview of our model architecture:

Input sequence -> Encoder -> Context vector -> Decoder -> Output sequence

Diagram Description automatically generated

We will define our model using the following steps:

  1. Define the input and output sequences.
  2. Define the encoder LSTM layer and process the input sequence.
  3. Define the decoder LSTM layer and generate the output sequence.
  4. Combine the encoder and decoder into a single model.

Here is the code for defining our model:

import tensorflow as tf
from tensorflow import keras
from tensorflow.keras.layers import Input, LSTM, Dense, Embedding

# Define the input and output sequences
encoder_inputs = Input(shape=(None,))
decoder_inputs = Input(shape=(None,))

# Define the embedding layer
embedding_layer = Embedding(input_dim=vocab_size, output_dim=embedding_dim)

# Define the encoder LSTM layer
encoder_lstm = LSTM(units=latent_dim, return_state=True)

# Process the input sequence with the encoder LSTM layer
encoder_embeddings = embedding_layer(encoder_inputs)
encoder_outputs, state_h, state_c = encoder_lstm(encoder_embeddings)
encoder_states = [state_h, state_c]

# Define the decoder LSTM layer

decoder_lstm = LSTM(units=latent_dim, return_sequences=True, return_state=True)

# Process the output sequence with the decoder LSTM layer
decoder_embeddings = embedding_layer(decoder_inputs)
decoder_outputs, _, _ = decoder_lstm(decoder_embeddings, initial_state=encoder_states)

# Define the output layer
output_layer = Dense(units=vocab_size, activation='softmax')

# Generate the output sequence using the output layer
decoder_outputs = output_layer(decoder_outputs)

# Combine the encoder and decoder into a single model
model = keras.Model(inputs=[encoder_inputs, decoder_inputs], outputs=decoder_outputs)

In this code, we first define the input and output sequences as encoder_inputs and decoder_inputs, respectively. We then define the embedding layer using the Embedding class, which maps each word in the input sequence to a dense vector.

Next, we define the encoder LSTM layer using the LSTM class, with the latent_dim parameter specifying the number of units in the LSTM layer. We process the input sequence with the encoder LSTM layer using the encoder_lstm object, and extract the final state of the LSTM layer as encoder_states.

We then define the decoder LSTM layer using the LSTM class, with the return_sequences parameter set to True to indicate that we want the decoder to output a sequence rather than a single value. We process the output sequence with the decoder LSTM layer using the decoder_lstm object, using the encoder_states as the initial state of the LSTM layer.

Finally, we define the output layer using the Dense class, and generate the output sequence using the output_layer object.

We combine the encoder and decoder into a single model using the keras.Model class, with the input and output sequences as the inputs and outputs of the model, respectively.

Step 3: Training the model

Once we have defined our model, the next step is to train it using our preprocessed data. We will use the compile() method to configure the training process, and the fit() method to train the model on our data.

Here is the code for training our model:

# Configure the model for training
model.compile(optimizer='rmsprop', loss='categorical_crossentropy', metrics=['accuracy'])

# Train the model on the preprocessed data
model.fit([encoder_input_data, decoder_input_data], decoder_target_data,
          batch_size=batch_size,
          epochs=epochs,
          validation_split=0.2)

In this code, we use the compile() method to configure the model for training. We specify the optimizer as ‘rmsprop’, the loss function as ‘categorical_crossentropy’, and the metrics as [‘accuracy’].

We then use the fit() method to train the model on our preprocessed data. We provide the input and output sequences as the training data, and specify the batch size, number of epochs, and validation split.

Step 4: Generating responses

Once we have trained our chatbot model, the final step is to use it to generate responses to new input sequences. We will use the Model class in TensorFlow to create a new model that takes in the encoder input sequence and generates the decoder output sequence.

Here is the code for generating responses:

# Define the encoder model
encoder_model = keras.Model(encoder_inputs, encoder_states)

# Define the decoder model
decoder_states_inputs = [Input(shape=(latent_dim,)), Input(shape=(latent_dim,))]
decoder_embeddings2 = embedding_layer(decoder_inputs)
decoder_outputs2, state_h2, state_c2 = decoder_lstm(decoder_embeddings2, initial_state=decoder_states_inputs)
decoder_states2 = [state_h2, state_c2]
decoder_outputs2 = output_layer(decoder_outputs2)
decoder_model = keras.Model([decoder_inputs] + decoder_states_inputs, [decoder_outputs2] + decoder_states2)

# Define a function to generate responses
def generate_response(input_seq):
    # Encode the input sequence
    states_value = encoder_model.predict(input_seq)

    # Generate the initial target sequence
    target_seq = np.zeros((1, 1))
    target_seq[0, 0] = word2idx['<start>']

    # Generate the output sequence
    stop_condition = False
    response = ''
    while not stop_condition:
        output_tokens, h, c = decoder_model.predict([target_seq] + states_value)
        sampled_token_index = np.argmax(output_tokens[0, -1, :])
        sampled_word = idx2word[sampled_token_index]
        response += ' ' + sampled_word

        if (sampled_word == '<end>' or len(response) > max_output_len):
            stop_condition = True

        # Update the target sequence
        target_seq = np.zeros((1, 1))
        target_seq[0, 0] = sampled_token_index

        # Update the states
        states_value = [h, c]

    return response

In this code, we first define the encoder model using the encoder_inputs and encoder_states. We then define the decoder model using the decoder_inputs and decoder_states, and include the output states in the model’s output.

We define a function called generate_response() that takes in an input sequence and generates a response using the encoder and decoder models. The function encodes the input sequence using the encoder model, and then generates the output sequence word by word using the decoder model.

The function stops generating the output sequence when it reaches the <end> token or when the output sequence exceeds the maximum length. It then returns the generated response as a string.

Conclusion

In this tutorial, we walked through the process of creating a TensorFlow NLP model using sequence-to-sequence (seq2seq) modeling. We focused on building a chatbot model, where the input is a question or prompt from the user, and the output is a response generated by the model.

We first preprocessed our data using the TensorFlow Text library, and then built our chatbot model using the Keras API in TensorFlow. Our model consisted of an encoder and a decoder, each implemented using a recurrent neural network (RNN) with LSTM cells.

We trained our model using the compile() and fit() methods in TensorFlow, and then used it to generate responses to new input sequences using the Model class.

While this tutorial provides a basic overview of how to build a chatbot model using TensorFlow, there are many ways to improve and optimize the model’s performance. Some possible next steps include using attention mechanisms to improve the model’s ability to handle long input sequences, incorporating external knowledge sources to improve the model’s response quality, and fine-tuning the model using transfer learning on a larger dataset.

Overall, TensorFlow is a powerful and flexible framework for building NLP models, and the seq2seq approach provides a useful framework for tackling a wide range of natural language tasks. With some additional experimentation and fine-tuning, you can build a chatbot model that can carry on natural conversations with users and provide helpful responses to their questions.


How is ChatGPT So Powerful? A Look at the Hardware Behind OpenAI’s Latest AI Language Model

By now, you’ve probably heard of ChatGPT, the latest AI language model from OpenAI that has taken the internet by storm. With 6 billion parameters and the ability to generate coherent and convincing text on a wide range of topics, ChatGPT has been hailed as a breakthrough in natural language processing and AI in general.

But have you ever wondered how ChatGPT is able to do what it does? After all, processing language at this scale is no small feat, and it must require a lot of computing power to achieve. In this post, we’ll take a look at the hardware behind ChatGPT and try to understand what it takes to train and run such a powerful AI model.

First of all, it’s worth noting that ChatGPT is not a standalone AI system. Rather, it is part of a larger family of AI language models called GPT (short for “Generative Pre-trained Transformer”). The first GPT model was introduced by OpenAI in 2018, with 117 million parameters, and subsequent versions have increased in size and complexity, culminating in ChatGPT with its 6 billion parameters.

So, how is ChatGPT trained? According to OpenAI, the model is fine-tuned from a larger pre-trained model using a technique called unsupervised learning. Essentially, the model is fed a massive amount of text from the internet and other sources, and it learns to predict the next word or sentence based on the context. Over time, the model gets better and better at this task, and it becomes able to generate text on its own that is coherent and relevant to the input prompt.

Diagram

Description automatically generated
Source: Nvidia

However, training a model like ChatGPT requires a massive amount of computing power. OpenAI has not disclosed the exact hardware used to train ChatGPT, but we can make some educated guesses based on previous information about their AI infrastructure.

For example, the previous GPT-3 model, which has “only” 175 billion parameters, was trained on a supercomputer with 285,000 CPU cores and 10,000 Nvidia V100 GPUs provided by Microsoft. This hardware setup allowed OpenAI to train the model in a relatively short amount of time, but it also came with a significant cost, both in terms of money and energy consumption.

Given that ChatGPT has fewer parameters than GPT-3 but still requires a lot of computing power to train, it’s likely that OpenAI used a similar or even more powerful hardware setup for this model. One possibility is that they used Nvidia A100 GPUs, which are the latest and most powerful GPUs from Nvidia as of early 2022. These GPUs offer significant speedups over the previous generation, and they are designed specifically for AI workloads like training and inference.

Another possibility is that OpenAI used AMD EPYC CPUs in conjunction with the Nvidia GPUs. AMD EPYC CPUs are also designed for server workloads and offer high performance and efficiency for AI tasks. Combining these CPUs with Nvidia GPUs can lead to even faster training times and better overall performance for AI models.

Of course, these are just educated guesses, and we won’t know for sure what hardware OpenAI used for ChatGPT unless they release more information about their AI infrastructure. However, one thing is clear: training and running powerful AI models like ChatGPT requires a lot of computing power, and it’s only going to get more demanding as AI models continue to increase in size and complexity.

Next, let’s take a closer look at the hardware behind ChatGPT and try to make a more informed guess about how we have come to some of these hardware predictions.

The Hardware Behind ChatGPT

The first step in understanding the hardware used to train ChatGPT is to look at the timeline. OpenAI confirmed that ChatGPT was fine-tuned from a model in the GPT-3.5 series, which finished training in early 2022. This provides us with a time frame to work with, and we can assume that the model was trained on hardware that was available at that time.

Next, we need to identify the type of hardware used. We know that ChatGPT was trained on Microsoft Azure infrastructure, and in June 2021, Microsoft announced the availability of Nvidia A100 GPU clusters to its Azure customers. Therefore, it’s reasonable to assume that ChatGPT was trained on Nvidia A100 GPUs.

But how many A100 GPUs were used? To answer that question, we need to look at the specifications of the A100. The A100 is based on the GA100 chip, which packs 54.2 billion transistors into a 826 millimeter squared large die produced by TSMC in a 7 nanometer node. Tensor performance gets another huge bump to over 300 teraflops, 2.5 times the performance of a single V100 GPU!

Diagram

Description automatically generated

However, it’s unlikely that Microsoft replaced all 10,000 Volta GPUs in their supercomputer with 10,000 Ampere GPUs. ChatGPT is a more streamlined machine learning model, and it wouldn’t be a cost-effective decision to use Ampere, which is so much faster.

In October of 2021, before the training of ChatGPT started, Nvidia and Microsoft announced a new AI supercomputer they used to train a new and extremely large neural network called Megatron-Turning NLG. This neural network has 530 billion parameters and was trained on 560 Nvidia DGX A100 servers, each containing 8 Ampere A100 GPUs. Therefore, it’s safe to assume that ChatGPT was trained on a similar system to Megatron-Turing NLG, using multiple clusters of Nvidia DGX or HGX A100 servers.

Chart, line chart

Description automatically generated

Using this information, we can make an educated guess that ChatGPT was trained on 1,120 AMD EPYC 7742 server CPUs with over 70,000 CPU cores and 4,480 Nvidia A100 GPUs. This would provide close to 1.4 exaflops of FP16 tensor core performance. While we can’t confirm these specifications without official confirmation, it’s a reasonable deduction based on the available information.

Now, let’s take a look at the hardware used for ChatGPT inference. According to statements from Microsoft and OpenAI, ChatGPT inference is running on Microsoft Azure servers, and a single Nvidia DGX or HGX A100 instance is likely enough to run inference for ChatGPT. However, at the current scale, it would require well over 3,500 Nvidia A100 servers with close to 30,000 A100 GPUs to provide inference for ChatGPT.

This massive amount of hardware is required to keep the service running and costs between $500,000 to $1 million dollars per day. While the current level of demand for ChatGPT makes it worth it for Microsoft and OpenAI, it’s unlikely that such a system can stick to a free-to-use model in the long run unless better and more efficient hardware reduces the cost of running inference at scale.

With the future of AI looking bright, there’s a lot of new hardware on the way, and the entire hardware industry is starting to shift its focus on architectures specifically designed to accelerate AI workloads. In only a few years’ time, training a model like ChatGPT will be part of your average machine learning course in college, and running inference will be done on a dedicated AI engine inside of your smartphone.

As AI progress is hardware-bound, and the hardware is just getting started, we can expect fierce competition between companies like Nvidia and AMD. The upcoming CDNA3 based MI300 GPUs from AMD will provide strong competition for NVIDIA, especially when it comes to AI workloads.

References
Brown, T.B., Mann, B., Ryder, N., Subbiah, M., Kaplan, J., Dhariwal, P., … Amodei, D. (2020). Language Models are Few-Shot Learners. arXiv preprint arXiv:2005.14165.

This project is a chatbot application that utilizes the OpenAI API to generate responses to user input. The application is built using Node.js and Express for the server-side logic, and JavaScript, HTML, and CSS for the client-side user interface. The project also makes use of the Vite development server and a Vanilla JavaScript framework for a lightweight and easy-to-use development environment.

Technical Details

Server-side

The server-side of the application is built using Node.js and Express. The Express framework is used to handle incoming HTTP requests and send responses. The server also utilizes the OpenAI API to generate responses to user input. This is done by making a POST request to the OpenAI API with the user’s input as the request body. The server then receives the response from the OpenAI API and sends it back to the client.

To authenticate with the OpenAI API, the application uses an API key stored in a .env file. This file is not included in the git repository for security reasons. The dotenv package is used to load the environment variables from the .env file into the application.

Client-side

The client-side of the application is built using JavaScript, HTML, and CSS. The JavaScript is used to handle the user’s input, send it to the server, and display the response from the server. The HTML and CSS are used to create the user interface.

The client-side JavaScript code uses the fetch API to send the user’s input to the server and receive the response. It also uses the setInterval function to create a loading animation while waiting for the response from the server.

Development Environment

The project uses the Vite development server for a fast and easy development experience. Vite is a lightweight development server that automatically reloads the application when files are saved. This eliminates the need for manual compilation and makes it easy to see changes in real-time.

The project also uses a Vanilla JavaScript framework for a lightweight and easy-to-use development environment. This framework provides a minimal set of functionality and doesn’t include any additional libraries or frameworks.

Advanced Technical Analysis

The architecture of the application is built using a client-server model, where the client side is responsible for handling the user interface and user interactions, and the server side is responsible for handling the logic and communication with the OpenAI API. The client side is built using HTML, CSS, and JavaScript, and utilizes the fetch API to send and receive data from the server. The server side is built using Node.js and Express, and utilizes the openai npm package to communicate with the OpenAI API.

The technologies used in this project include:

  • HTML, CSS, and JavaScript for the client side
  • Node.js and Express for the server side
  • openai npm package for communication with the OpenAI API
  • AWS EC2 and S3 for deployment

On the client side, the application utilizes JavaScript to handle user interactions and dynamically update the DOM with the response from the server. The client-side script uses the Fetch API to send a POST request to the server with the user’s input, and then uses the response to update the chat window on the page.

On the server side, the application uses the openai npm package to communicate with the OpenAI API and generate a response to the user’s input. The server-side script receives the user’s input from the client, and then uses the openai package’s createCompletion method to generate a response. This method takes in several options, such as the model to use, the prompt, and various other parameters that can be adjusted to customize the output.

In terms of implementation details, the project uses environment variables to keep the OpenAI API key secure, and is designed to be deployed on AWS using EC2 and S3. The client and server folders contain the necessary files to run the application, and the public folder contains the assets needed for the client-side.

Overall, the Intelligent Conversation application is a chatbot that utilizes the OpenAI API to generate responses to user input. It was developed using a client-server architecture, with the client side built using HTML, CSS, and JavaScript, and the server side built using Node.js and Express. The application utilizes the openai npm package to communicate with the OpenAI API and can be easily deployed on AWS using EC2 and S3.

Deployment

The application can be deployed to a hosting service such as AWS. To deploy the application to AWS, you will need an S3 bucket to host the static files and an EC2 instance to run the Node.js server.

You will also need to create an IAM role with the necessary permissions to access the S3 bucket and EC2 instance. Once the role is created, you can use it to launch the EC2 instance.

Once the EC2 instance is launched, you can use Git to clone the repository from GitHub and run npm install to install the necessary dependencies. Once the dependencies are installed, you can start the server by running node server.js.

Conclusion

This project demonstrates the use of the OpenAI API to create an intelligent chatbot application. The application is built using Node.js and Express for the server-side logic, and JavaScript, HTML, and CSS for the client-side user interface.